Advertisement
Available languages
Available languages
Quick Links
welcoming • sophisticated • inspiring
®
allen + roth
is a registered trademark
of LF, LLC. All Rights Reserved.
ATTACH YOUR RECEIPT HERE
Serial Number
Purchase Date
Questions, problems, missing parts? Before returning to your retailer, call our customer service
department at 1-866-439-9800, 8 a.m. – 8 p.m., EST, Monday - Sunday. You could also contact us at
partsplus@lowes.com or visit www.lowespartsplus.com.
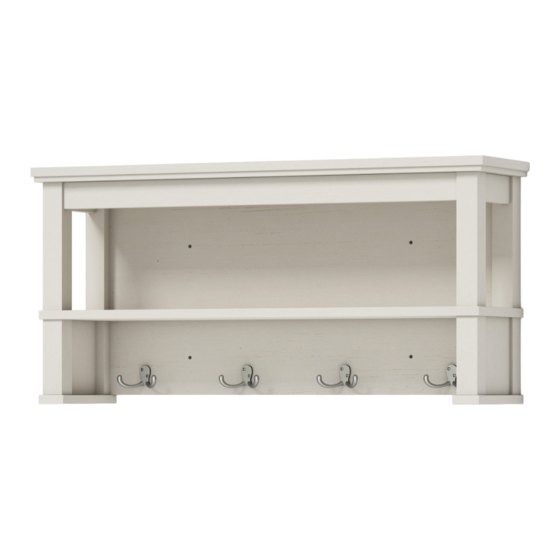
ITEM #3592135
WALL SHELF WITH HOOKS
MODEL#LWSWMSW
Français p. 13
Español p. 25
1
TABLE OF CONTENTS
Camlock System Operation............................................................................................... 2
Package Contents............................................................................................................... 3
Hardware Contents...............................................................................................................4
Safety Information............................................................................................................... 5
Preparation ......................................................................................................................... 5
Assembly Instructions.......................................................................................................... 6
Care and Maintenance ....................................................................................................... 10
Limited Lifetime Warranty.................................................................................................. 11
Replacement Parts List ...................................................................................................... 11
CAM LOCK SYSTEM OPERATION
DETAIL A
THREADED
INSERT
1. Screw cam bolts into the predrilled small holes on panel.
2. Insert cam lock into predrilled large hole on panel.
3. Make sure the arrow on the cam lock is pointed toward the cam bolts.
4. Connect both panels together, making sure cam bolts goes into predrilled hole on
the end of panel with cam lock.
5. Once cam bolts is connected inside cam lock, take Phillips screwdriver and tighten
cam lock clockwise.
AS21419
DETAIL B
CAM LOCK
Cam Bolts
PANEL
2
LOCKED POSITION
PANEL
Advertisement

Related Manuals for Allen + Roth LWSWMSW


Summary of Contents for Allen + Roth LWSWMSW
- Page 1 CAM LOCK SYSTEM OPERATION DETAIL A DETAIL B CAM LOCK LOCKED POSITION ITEM #3592135 THREADED ® Cam Bolts allen + roth is a registered trademark INSERT of LF, LLC. All Rights Reserved. PANEL PANEL WALL SHELF WITH HOOKS MODEL#LWSWMSW Français p. 13 1.
- Page 2 HARDWARE CONTENTS (shown not actual size) PACKAGE CONTENTS Cam Lock Cam Bolt Wood Dowel M4 x 12 mm M4 x 32 mm Screw Screw Qty. 33 Qty. 33 Qty. 22 Qty. 8 Qty. 12 M4 x 57 mm Screw Qty. 4 PART DESCRIPTION QUANTITY...
- Page 3 SAFETY INFORMATION ASSEMBLY INSTRUCTIONS Please read and understand this entire manual before attempting to assemble, operate or install 1. Insert cam bolts (BB) into upper left back post (D), up- the product. per left front post (E), upper right back post (F), upper right •...
- Page 4 ASSEMBLY INSTRUCTIONS ASSEMBLY INSTRUCTIONS 4. Insert wood dowel (CC) into upper shelf panel (A), at- 7. Install the wood dowel (CC) and cam bolt (BB) into lower tach upper left back post (D), upper right back post (F), left back post (M), lower left front post (N), lower right back upper back panel (H), tighten with cam lock (AA).
- Page 5 ASSEMBLY INSTRUCTIONS ASSEMBLY INSTRUCTIONS Wall Hanging Installation 10. Using cam lock (AA) to tighten the middle shelf panel Wooden Stud 13. For wooden stud wall installations,using a stud finder (J), and left side panel (k), right side panel (L). (not included), find 4 stud locations in the wall and mark Stud locations them with a pencil (not included).
- Page 6 LIMITED LIFETIME WARRANTY This product is warranted to the original purchaser. If there is a failure in this unit due to defects in materials or workmanship, the manufacturer will repair or replace this item at our discretion without charge. Warranty is void if product has been assembled incorrectly, misused, abused by overloading, altered in any way or damaged due to accident.
-
Page 7: Table Of Contents
PANNEAU PANNEAU ÉTAGÈRE MURALE AVEC CROCHETS MODÈLE N LWSWMSW Français p. 13 1. Vissez les vis Camloc dans les petits trous déjà percés sur le panneau. 2. Insérez les attaches Camloc dans les grands trous déjà percés sur le panneau. -
Page 8: Contenu De L'emballage
QUINCAILLERIE INCLUSE (non illustrée à la grandeur réelle) CONTENU DE L’EMBALLAGE Attache Goujon Camloc Camloc de bois M4 x 12 mm M4 x 32 mm Qty. 33 Qty. 33 Qty. 22 Qty. 8 Qty. 12 M4 x 57 mm Qty. 4 PIÈCE DESCRIPTION QUANTITÉ... -
Page 9: Consignes De Sécurité
CONSIGNES DE SÉCURITÉ INSTRUCTIONS POUR L’ASSEMBLAGE Assurez-vous de lire et de comprendre l’intégralité du présent manuel avant de tenter 1. Insérez les vis camloc (BB) dans le poteau arrière supéri- d’assembler, d’utiliser ou d’installer le produit. eur de gauche (D), le poteau avant supérieur de gauche •... - Page 10 INSTRUCTIONS POUR L’ASSEMBLAGE INSTRUCTIONS POUR L’ASSEMBLAGE 7. Installez la goujon de bois (CC) et le vis camloc (BB) 4. Insérez la goujon de bois (CC) dans le panneau d’étagère supérieur (A), fixez le poteau arrière supérieur dans le poteau arrière inférieur de gauche (M), le poteau avant inférieur de gauche (N), le poteau arrière inférieur de gauche (D), le poteau arrière supérieur de droit (F), de droit (O), le poteau avant inférieur de droit (P), fixez le...
-
Page 11: Soin Et Entretien
INSTRUCTIONS POUR L’ASSEMBLAGE INSTRUCTIONS POUR L’ASSEMBLAGE Installation au mur 10. Utilisez le attache camloc (AA) pour serrer le panneau Montant en bois d’étagère du milieu (J), et le panneau latéral gauche (k), 13. Pour les installations de poteau mural en bois, à l’aide le panneau latéral droit (L). -
Page 12: Garantie Limitée À Vie
GARANTIE LIMITÉE À VIE Ce produit est garanti à l’acheteur original. En cas de défaut de fabrication ou des matériaux, le fabricant réparera ou remplacera cet article, à sa discrétion, sans frais. La garantie est nulle si le produit a été mal assemblé, utilisé inadéquatement, abusé par la surcharge, modifi é de quelque manière que ce soit ou endommagé... - Page 13 PANEL PANEL leva REPISA DE PARED CON GANCHOS MODELO #LWSWMSW Français p. 13 1. Atornille los pernos de leva a los orificios pequeños pretaladrados en el panel. 2. Introduzca el cerrojo de leva al orificio pretaladrado grande en el panel.
- Page 14 CONTENIDO DEL PAQUETE CONTENIDO DE HERRAJE (no se muestran en tamaño real) Cerrojo de Perno de Espiga de Tornillo Tornillo leva leva madera M4 x 12 mm M4 x 32 mm Qty. 33 Qty. 33 Qty. 22 Qty. 8 Qty. 12 Tornillo M4 x 57 mm Qty.
- Page 15 INFORMACIÓN DE SEGURIDAD INSTRUCCIONES DE ENSAMBLAJE Lea y comprenda completamente este manual antes de intentar ensamblar, usar o instalar el 1. Inserte los perno de leva (BB) en el poste trasero superior producto. izquierdo (D), en el poste delantero superior izquierdo (E), •...
- Page 16 INSTRUCCIONES DE ENSAMBLAJE INSTRUCCIONES DE ENSAMBLAJE 7. Instale la espiga de madera (CC) y el perno de leva (BB) 4. Inserte la espiga de madera (CC) en el panel superior del estante (A), fije el poste trasero superior izquierdo (D), en el poste trasero inferior izquierdo (M), el poste delantero inferior izquierdo (N), el poste trasero inferior derecho (O), el poste trasero superior derecho (F), y el panel trasero...
- Page 17 INSTRUCCIONES DE ENSAMBLAJE INSTRUCCIONES DE ENSAMBLAJE Instalación colgante para pared 10. Utilice el cerrojo de leva (AA) para apretar el panel del Viga de madera estante central (J), y el panel lateral izquierdo (k), el panel 13. Para instalaciones en paredes de madera, utilizando lateral derecho (L).
- Page 18 GARANTIA LIMITADA Este producto (con exclusión de las repisas) está garantizado para el comprador original. Si hay un PIEZA DESCRIPCIÓN PIEZA # fallo en esta unidad debido a defectos en los materiales o mano de obra, el fabricante reparará o Espiga de madera 00LWSWMSW-23 reemplazará...
Need help?
Do you have a question about the LWSWMSW and is the answer not in the manual?
Questions and answers