Nikon WR-R10, WR-T10, WR-A10 - Wireless Remote Controller Manual
- Manual (6 pages) ,
- User manual (6 pages) ,
- Quick start manual (7 pages)
Advertisement
Introduction
Thank you for your purchase of a Nikon wireless remote controller. With a WR-R10 (transceiver) connected to the ten-pin remote or accessory terminal of your Nikon camera, photographs can be taken by remote control using a wireless WR-T10 (transmitter). The WR-A10 is a ten-pin remote terminal adapter for the WR-R10. Before using this product, read both this manual and the documentation provided with your camera. Additional instructions, including information on the regulations governing the use of this device, may be found in the Wireless Regulation Data sheet provided with this product.
For Your Safety
To prevent damage to your Nikon product or injury to yourself or to others, read the following safety precautions in their entirety before using this product. Keep these safety instructions where all those who use the product will read them.
The consequences that could result from failure to observe the precautions listed in this section are indicated by the following symbol:
 This icon marks warnings, information that should be read before using this Nikon product to prevent possible injury.

Do not disassemble. Failure to observe this precaution could result in fi re, electric shock, or other injury. Should the product break open as the result of a fall or other accident, disconnect the camera power source and take the product to a Nikon-authorized service representative for inspection.
Keep out of reach of children. Failure to observe this precaution could result in injury. In addition, note that small parts constitute a choking hazard. Should a child swallow any part of this product, consult a physician immediately.
Cut power immediately in the event of malfunction. Should you notice smoke or an unusual smell coming from the product, immediately turn the camera off. Continued operation could result in injury. Once the product has cooled, remove it and take it to a Nikon-authorized service representative for inspection.
Do not use in the presence of fl ammable gas. Failure to observe this precaution could result in explosion or fi re.
Keep dry. Do not immerse in or expose to water or rain. Failure to observe this precaution could result in fi re or electric shock.
Do not handle with wet hands. Failure to observe this precaution could result in electric shock.
Do not remain in contact with the camera or controller for extended periods while the products are on or in use. Parts of the product become hot. Leaving the product in direct contact with the skin for extended periods may result in low-temperature burns.
Do not expose to high temperatures. Do not leave the product in a closed vehicle under the sun or in other areas subject to extremely high temperatures. Failure to observe this precaution could result in fi re or in damage to the casing or internal parts.
Observe proper precautions when handling batteries. Batteries may leak, rupture, or overheat if improperly handled. Observe the following precautions when handling CR2032 lithium batteries for use in the WR-T10:
- Use only CR2032 lithium batteries. Dispose of used bat-teries as directed.
- Be sure to insert in the correct orientation.
- Do not short or disassemble.
- Do not expose to fl ame or to excessive heat.
- Do not immerse in or expose to water.
- Discontinue use immediately should you notice any chang-es in the battery, such as discoloration or deformation.
Follow the instructions of hospital and airline personnel. This product emits radio frequency radiation that could interfere with medical or navigational equipment. Do not use this product in a hospital or on board an airplane without fi rst obtaining the permission of hospital or airline staff.
Notices
- No part of this manual may be reproduced, transmitted, transcribed, stored in a retrieval system, or translated into any language in any form, by any means, without Nikon's prior written permission.
- Nikon reserves the right to change the specifi cations of the hardware and software described in this manual at any time and without prior notice.
- Nikon will not be held liable for any damages resulting from the use of this product.
- While every eff ort has been made to ensure that the infor-mation in this manual is accurate and complete, we would appreciate it were you to bring any errors or omissions to the attention of the Nikon representative in your area (address provided separately).
This product, which contains encryption software developed in the United States, is controlled by the United States Export Administration Regulations and may not be exported or reexported to any country to which the United States embargoes goods. The following countries are currently subject to embargo: Cuba, Iran, North Korea, Sudan, and Syria.
Supplied Accessories
The product is sold in the sets below. This manual assumes you have a WR-R10, WR-T10, and WR-A10.
| WR-R10 WR-T10 WR-A10 | ❑ Case ❑ Strap for WR-R10 ❑ CR2032 3 V lithium battery * ❑ User's Manual (this manual) | ❑ Warranty ❑ Strap for WR-T10 |
| WR-R10 | ❑ Case ❑ Strap for WR-R10 | ❑ Warranty ❑ User's Manual (this manual) |
| WR-T10 | ❑ Strap for WR-T10 ❑ CR2032 3 V lithium battery * ❑ User's Manual (this manual) | ❑ Warranty |
| WR-A10 | ❑ User's Manual (this manual) |
* Remove insulating sheet from WR-T10 before fi rst use.
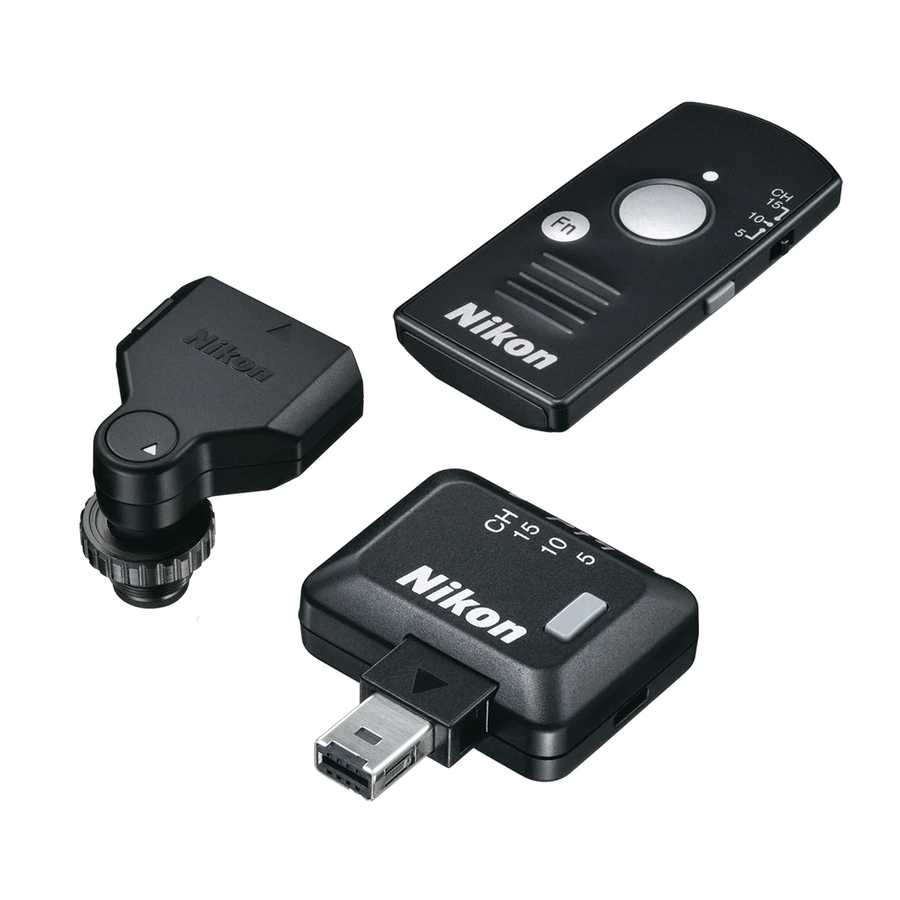
Parts of the Controller
(Figure 1)

| WR-R10 |
|
|
| WR-T10 |
|
|
| WR-A10 |  Release button Release button |  Mounting mark Mounting mark |
 Shutter-release button
 Strap eyelet
 Channel selector
 Fn button
 Red LED
 Pairing button
The WR-R10 Strap
Attach the WR-R10 to the camera strap as shown in Figure 2 to prevent the WR-R10 being lost or dropped.
(Figure 2)

Replacing CR2032 3 V Lithium Batteries
(Figure 3)

Replace the battery when the LED for the WR-T10 starts to dim. Insert a fi ngernail behind the battery-chamber latch and open the battery chamber ( ). Ensure that the battery is inserted in the correct orientation (
 ).
).
Using the WR-R10 (Transceiver)
Cameras with accessory terminals
(Figure 4-a)

Connect the WR-R10 as shown by the marks on the camera ( ) and WR-R10 (
 ).
).
Digital cameras with ten-pin remote terminals
(Figure 4-b)

Attach the WR-A10 WR adapter () as shown by the marks on the adapter () and WR-R10 () and connect the assembly to the ten-pin remote terminal ( ), keeping the mounting mark on the WR-A10 (
 ) aligned with the
  mark on the terminal. Tighten the WR-A10 locking screw ().
Film cameras with ten-pin remote terminals
(Figure 5) (F6 camera shown)

If the terminal is on the front of the camera, remove the lens or camera body cap (). Attach the WR-A10, keeping the mounting mark () aligned with the mark on the terminal ). After tightening the WR-A10 locking screw (), rotate the WR-A10 ( ) and attach the WR-R10 (
 ) as shown by the marks on the adapter () and WR-R10 ().
Note: Be sure the connectors are in the correct orientation; do not use force or insert the connectors at an angle. Note that the WR-R10 can not be used with certain accessories. Using force or inserting connectors at an angle could damage the camera or accessory.
To remove the WR-R10, reverse the above steps. To remove the WR-A10, press the release button (Figure 1-) while sliding the adapter from the WR-R10.
The Fn Button
When a WR-R10 is mounted on the cameras below, the Fn button on the WR-T10 performs the function currently assigned to the camera Fn button. See the camera manual for details.
Using the WR-T10 (Transmitter)
The shutter-release button on the WR-T10 performs the same functions as the camera shutter-release button whether pressed halfway or all the way down. See the camera manual for details.
 Channel Selection and Pairing
If the camera fails to respond to the shutter-release button on the WR-T10, re-establish the link between the WR-T10 and the receiver by matching channels and pairing the devices as described below.
- Set the units to the same channel.
Set the channel selectors on both units to the same channel (5, 10, or 15). Devices on diff erent channels can not be paired, while paired devices can only be used together when both are set to the same channel.

- Pair the devices.
After turning the camera on, place the two devices close together and press the pairing buttons on both units simultaneously. Keep the buttons pressed until the red and green LEDs on the WR-R10 fl ash on and off in sequence, indicating that pairing is complete.

To erase pairing data, turn the camera on and keep the WR-R10 pairing button pressed for about 3 seconds until the green LED fl ashes rapidly, and then quickly press the pairing button twice before the green LED stops fl ashing. The green and red LEDs will both fl ash twice simultaneously to show that all pairing data has been erased.


Controlling Multiple Cameras
The following options are available with multiple WR-R10 units, each mounted on a separate camera.
Using a WR-T10 (Simultaneous Release)
If the WR-R10 units are paired with and on the same channel as a WR-T10, the shutters on all cameras can be released simultaneously by pressing the WR-T10 shutter-release button all the way down.
")
Synchronizing Multiple Cameras (Synchronized Release)
A WR-R10 mounted on a camera with ten-pin remote terminal can be used to control WR-R10 units on multiple remote cameras.
")
- Attach the WR-R10 units.
Attach WR-R10 units to the master camera (any camera with a ten-pin remote terminal) and all remote cameras as described in "Using the WR-R10 (Transceiver)". - Set all the units to the same channel.
- Pair the cameras.
Turn the cameras on and press the pairing buttons on the WR-R10 on the master camera and one of the remote cameras. Keep the buttons pressed until the red and green LEDs fl ash on and off in sequence, indicating that pairing is complete. Repeat until the master camera is paired with all the remote cameras. - Take pictures.
The shutters on all cameras will be released when the shutter-release button on the master camera is pressed all the way down.
Multiple Channels
The remote cameras can be divided into up to three groups by selecting diff erent channels for the cameras in each group after pairing and then changing the channel for the WR-T10 or master WR-R10 to control only the remote cameras on the selected channel.

Precautions for Use
- To prevent malfunction, be sure the WR-R10 units are correctly attached.
- The shutter-release buttons on the camera and WR-T10 can not be used when the camera is in remote control (ML-L3) release mode.
- Disconnect WR-R10 units when they are not in use. Carrying a camera in a bag or by the strap with a WR-R10 attached risks damage to the camera or the WR-R10 in the event that the camera is exposed to strong physical shocks or vibration.
Compatibility
Wireless remote controllers can not be used with D1series cameras or the MB-D100. They can be used with the F100, D2X, D2Xs, D2Hs, and D200, but the shutter can not be released with the F100 in self-timer mode, while the D2X, D2Xs, D2Hs, and D200 will temporarily display  if the exposure meters are activated after the unit is attached.
Specifications
Wireless Remote Controller WR-R10
| Type | WR-R10 |
| Supported cameras Supported cameras | SLR cameras with ten-pin remote or accessory terminals |
| Wireless | |
| Channels | 5 (2.425 GHz), 10 (2.450 GHz), 15 (2.475 GHz) |
| Range (line of sight) * | 50 m (164 ft) between WR-R10s |
| Pairing | Can pair with up to 64 devices |
| Power consumption | Approximately 100 mW maximum |
| Operating environment |
|
| Approximate dimensions (W × H × D) | 31.5 × 26.0 × 10.0 mm (1.2 × 1.0 × 0.4 in.) |
| Weight | Approximately 6 g (0.2 oz), body only |
Wireless Remote Controller WR-T10
| Type | WR-T10 | |
| Wireless | ||
| Channels | 5 (2.425 GHz), 10 (2.450 GHz), 15 (2.475 GHz) | |
| Range (line of sight) * | 20 m (66 ft) from WR-T10 to WR-R10 | |
| Power source | One CR2032 3 V lithium battery | |
| Battery life | Approximately 10,000 releases | |
| Operating environment |
| |
| Approximate dimensions (W × H × D) | 28.0 × 60.0 × 8.5 mm (1.1 × 2.4 × 0.3 in.) | |
| Weight | Approximately 12 g (0.4 oz), including battery; approximately 9 g (0.3 oz), body only | |
* Approximate range at height of about 1.2 m (4 ft); varies with weather conditions and presence or absence of obstacles
WR Adapter WR-A10
| Type | WR-A10 |
| Approximate dimensions (W × H × D) | 26.5 × 32.0 × 23.5 mm (1.0 × 1.3 × 0.9 in.) |
| Weight | Approximately 10 g (0.4 oz), body only |
Unless otherwise stated, all fi gures assume a fresh battery and an ambient temperature of 23 ±3°C (73.4 ±5.4°F) as specifi ed by the Camera and Imaging Products Association (CIPA). Range and battery life may drop at low temperatures.
Refer to the camera manual for additional information on operating environment and use the products in the narrower of the two operating temperature ranges.

Documents / ResourcesDownload manual
Here you can download full pdf version of manual, it may contain additional safety instructions, warranty information, FCC rules, etc.
Download Nikon WR-R10, WR-T10, WR-A10 - Wireless Remote Controller Manual
Advertisement


Need help?
Do you have a question about the WR-R10 and is the answer not in the manual?
Questions and answers