Braun BNC014G-RC - Global Radio Controlled Wall Clock Manual
- User instructions (4 pages)
Advertisement
Battery precautions
- Do not use rechargeable batteries.
- Use only alkaline AA batteries of the same or equivalent type.
- Insert batteries with the correct polarity
- Keep batteries away from children.
- Dispose of exhausted batteries according to local legal requirements. Do not dispose them by throwing away with normal household rubbish.
- Avoid short circuiting the contacts in the battery compartment and battery terminals.
- Remove batteries from the unit if it will not be used for a long period of time.
- Exhausted batteries should be removed from the battery compartment to prevent over-discharging, which can cause leakage and may cause damage to the clock.
Getting started
- Insert 2xAA new batteries as indicated in the battery compartment, and press the RESET key to reset the clock.
- Slide the OFF/US/UK/DE/JP switch to your desired country mode. After 8 seconds, the clock will automatically start scanning for the radio controlled time signal.
Note:
In some cases, you may not receive the RC signal immediately. Due to the atmospheric disturbance, the best reception often occurs during nighttime.
Function keys
+ key
- In normal display, press to switch between 12/24 hour format. In setting mode press to increase the setting value. Press and hold to speed up the setting.
- key
- In normal mode, press to switch between Month&Date/Date&Month display. In setting mode, press to decrease the setting value. Press and hold to speed up the setting.
- In time zone setting mode, press to select the time zone. (US only)
OFF/US/UK/DE/JP switch:
- Slide to switch between OFF/US/UK/DE/JP mode and to turn off the RC function.
ALARM ON/OFF switch
- Slide to turn the alarm on /off.
DATE SET/TIME SET/ALARM SET/LOCK switch
- Slide to "DATE SET" position to set the date.
- Slide to "TIME SET" position to set the time.
- Slide to "ALARM SET" position to set the alarm time.
- Slide to "LOCK" position to return to normal mode.
RCC key
- Press to receive the RC signal in order to test the reception.
ºC/ºF key
- In normal mode, press to switch between ºC/ºF
RESET key
- Press by using a pin to reset all values to default. In case of a malfunction, the unit has to be reset.
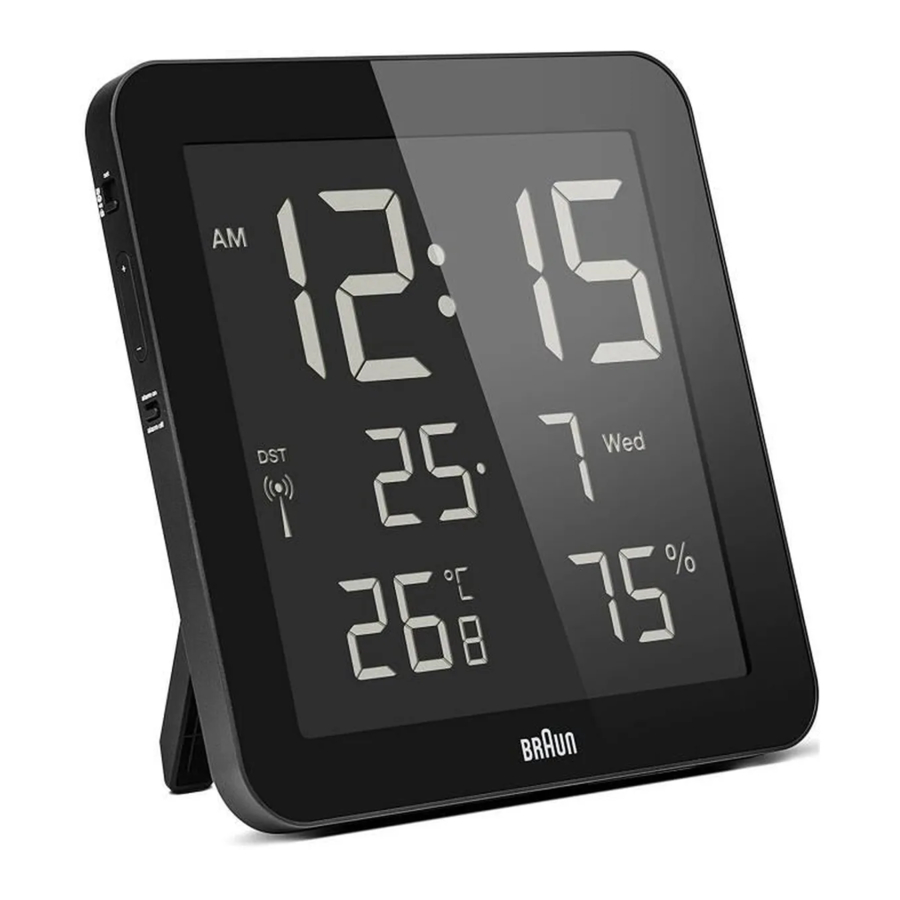
Product description

- LCD display
- DATE SET /TIME SET/ ALARM SET/ LOCK switch
- + key
- key
- ALARM ON/OFF switch
- OFF/US/UK/DE/JP switch
- ºC/ºF key
- RCC key
- RESET key
- Wall mounting holder
- Folding table stand
- Battery compartment
Display symbols

- Time
- Alarm time
- Alarm icon
- Day of the week
- Indoor temperature
- Indoor humidity
- RC signal strength indicator
- US time zone
Time zone setting (US only)
In US mode, the default time zone is PACIFIC. If your location is not in the Pacific zone, set the time zone as follows:
- In normal time mode, slide the OFF/US/UK/DE/JP switch to the US position in order to enter the time zone setting mode.
- Press "+"/ "-" key to select the relevant time zone: P=Pacific M=Mountain C=Central E=Eastern.
Signal strength indicator

Poor signal quality

Acceptable signal quality

Excellent signal quality
The signal indicator displays signal strength in 3 levels. Wave segment flashing means time signals are being received.
Note:
You may use the RCC key to receive the time signal manually. The receive mode stops automatically after 6-12 minutes.
Manual time setting
If the clock does not receive the RC time signal successfully or you turn off the RC function, you can set the time manually. As soon as the signal of the transmitter is received again, the clock will automatically synchronize with the received time.
- In normal mode, slide the "DATE SET/TIME SET/ ALARM SET/LOCK switch to "TIME SET" position to enter the time setting mode time.
- Press "+"/ "-" key to adjust the desired value. Press and hold to speed up the setting.
- Slide the "DATE SET/TIME SET/OFF/ALARM SET/ LOCK to "LOCK" position to save the setting and return to normal mode.
Calendar setting
- In normal mode, slide the "DATE SET/TIME SET/ALARM SET/LOCK " switch to "DATE SET" position to enter the date setting mode.
- Press "+"/ "-" key to adjust the desired value. Press and hold to speed up the setting.
- Slide "DATE SET/TIME SET/ALARM SET/LOCK" switch to "LOCK" position to save the setting and return to normal mode.
Setting the alarm
- In normal mode, slide the "DATE SET/ TIME SET/ ALARM SET/LOCK" switch to "ALARM SET" position to enter alarm setting mode time.
- Press "+"/ "-" key to adjust the desired value. Press and hold to speed up the setting.
- Slide "DATE SET/TIME SET/ALARM SET/LOCK" switch to "LOCK" position to save the setting and return to normal mode.
Using alarm
- Set the alarm time as the described in the previous section.
- Slide the "ALARM ON/OFF" switch to "ALARM ON" position to turn on the alarm. The bell icon "
![]() " will display on the LCD.
" will display on the LCD. - Slide the "ALARM ON/OFF" switch to "ALARM OFF" position to turn off the alarm. The bell icon will disappear.
 " will display on the LCD.
Note:
- When the alarm sounds, it will stop automatically without any operation after 60 seconds. The alarm will sound again at the same time the next day unless turned off.
Battery replacement
When the LCD becomes dim, replace with 2xAA new batteries into the clock compartment at once.

For best reception performance, please read the following instructions.
- We strongly recommend you start your clock at night. Allow the clock to receive the signal automatically overnight.
- Place the unit away from interfering sources such as TV set, computers, microwaves, etc.
- Avoid placing the unit on or next to metal surfaces.
- Avoid closed areas such as airports, basements, cement office buildings or factories.
Note: Exposure to an electrostatic environment may cause the clock to reset. In this event please follow the instructions as described in this manual to set the clock again.
Guarantee
2 year guarantee against material and workmanship defects (except battery). The guarantee is valid in those countries where the alarm clock is officially being sold.
Broken or cracked lens screens are not covered under the Guarantee.

Braun helpline
Should you have a problem with your product, please check your local service centre at:
www.braun-clocks.com
www.braun-watches.com
or contact +44 208 208 1833

This product is covered by the Waste Electrical and Electronic Equipment (WEEE) directive. It should not be discarded with normal household waste but taken to your local collection centre for recycling.

Braun is a registered trademark of Braun GmbH, Kronberg, Germany used under license by Zeon Ltd

Documents / Resources
References
![www.braun-clocks.com]() Braun-Clocks: Braun Shop online | Buy Braun Clocks & Watches
Braun-Clocks: Braun Shop online | Buy Braun Clocks & Watches![www.braun-watches.com]() Emit Collection | Buy Online Watches & Accessories Store
Emit Collection | Buy Online Watches & Accessories Store

Download manual
Here you can download full pdf version of manual, it may contain additional safety instructions, warranty information, FCC rules, etc.
Download Braun BNC014G-RC - Global Radio Controlled Wall Clock Manual
Advertisement


Need help?
Do you have a question about the BNC014G-RC and is the answer not in the manual?
Questions and answers