Advertisement
ref. 100872
QUICK INSTALLATION GUIDE
EN
Free available on
100m
Sirène intégrée
Free available on
Google Play
2.4GHz
The full instructions for your siren are
available on the www.avidsen.com website
or by scanning the below QR CODE using
your smartphone or tablet. Download these
instructions for more information on setting up
and using your Avidsen siren.
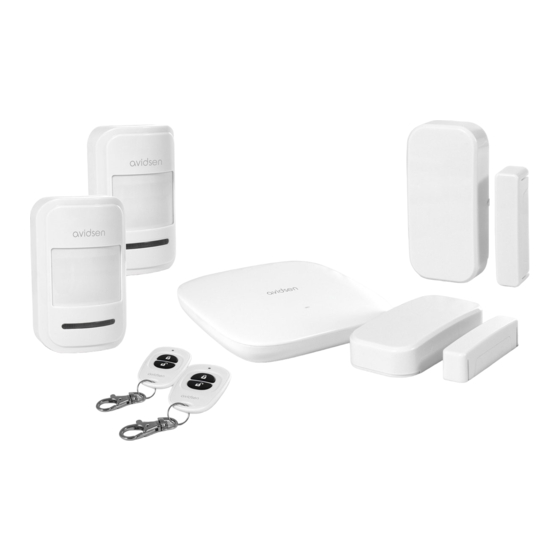
1. KIT CONTENTS
1
2
3
4
x 1
x 2
x 2
x 2
6
7
8
9
x 1
x 2
x 4
x 4
11
12
13
14
x 2
x 4
x 2
x 6
1
Siren
2
Opening sensor
3
Movement detector
4
Remote control
5
230V A/C 50Hz mains adaptor / 5V D/C 1A USB
V1
6
USB cable
7
Wall mount for movement detector
8
Wall plugs for attaching the wall mount
9
Screws for attaching the wall mount
10
Screws for attaching the opening detector
11
Self-adhesive strip for attaching the opening detector
12
Remote control batteries (CR2016)
13
Opening detector batteries (A23)
14
Movement detector batteries (LR03)
15
Narrow point for reset
2. CENTRAL UNIT CONNECTIONS
Caution: use only the mains adaptor supplied to power the
siren. No others may be used.
3. CONFIGURATION
Download the Avi-cam IP application
from the appstore or
Google Play and then launch the application.
Important: fi rst connect your smartphone or tablet to the WiFi
network that your siren should be using.
Network compatibility: 2.4GHz - 20/40 auto - WPA/WPA2
Not compatible with 5GHz WiFi, not compatible with WEP
encryption.
5
x 1
Special characters (#!»&@ etc.) in your security key or network
name as well as HT40 (forced 40MHz bandwidth) may lead to
connection diffi culties.
Please check the WiFi settings of your gateway with your Internet
service provider if you experience connection diffi culties.
10
x 4
• If you don't already have an account, tap "s'enregistrer"
[register]. • Otherwise, tap "se connecter" [log in] and
enter your username and password. Finish by tapping "se
15
x 1
connecter" [log in].
Fill in the "E-mail" [Email] and "Mot de passe" [Password] fi elds
"E-mail" [Email]: enter a valid email address.
"Mot de passe" [password]: choose a personal password
containing letters and numbers between 6 and 30 characters
long.
Click on "Envoyez le code de vérifi cation" [send the
confi rmation code]
Check your inbox in order to obtain the code, which you will
then enter into the "entrer le code de vérifi cation" [enter the
confi rmation code] fi eld.
Once you have entered the confi rmation code, fi nish by clicking
on "Terminer" [Finish] or "s'enregistrer" [Register].
:
Note
if, after 5 minutes, you still have not received the email
with the code, please make sure the message was not sorted
into your "courrier indésirable" [junk mail] or "SPAM"
[Spam] folder.
The countdown that appears once you tap "envoyer code de
vérifi cation" [Send confi rmation code] is not the time remaining
to enter the code, but rather a protective measure. You can only
request one code per minute.
• Once you have logged into your account for the fi rst time, tap
the shield icon at the bottom of the screen and then "Ajout
appareil" [Add device] in the centre of the screen
Make sure your alarm is plugged into power and that it
announces out loud that it is ready. Enter the password to the
WiFi network to which your smartphone or tablet is connected
and click next.
The app will return to the "Alarme" [Alarm] menu once WiFi
confi guration is complete.
Note: if the alarm does not speak, press and hold the "RESET"
[RESET] button next to the power supply for 3 to 5 seconds.
• You can access settings by tapping the shield icon in the
frame:
+
• To add detectors, tap the "
" icon at the top left and scan
the QR code on your detector. Repeat this operation for each
detector and remote control you own.
4 ACTIVATING THE DETECTORS
5. INSTALLING THE DETECTORS
5mm
maxi
Repères
The opening detectors can be fi xed to either a window or door
using the double-sided strip or screws and wall plugs suitable
for the type of surface. We recommend placing the magnet on
the mobile part (door or window) and the detector on the frame.
Ensure that you respect the mounting orientation: the markers
on the side of the magnet and those on the side of the detector
must line up when the door or window is closed.
Advertisement
Table of Contents

Related Manuals for Avidsen 100872


Summary of Contents for Avidsen 100872
- Page 1 The full instructions for your siren are Google Play and then launch the application. available on the www.avidsen.com website Note if, after 5 minutes, you still have not received the email or by scanning the below QR CODE using with the code, please make sure the message was not sorted Important: fi...
- Page 2 Declaration of conformity with the RED Directive SmartHome France hereby declares that the equipment designated below: Wireless alarm kit 100872 Complies with the RED 2014/53/EU directive and that its conformity has been assessed pursuant to the applicable standards in force:...
Need help?
Do you have a question about the 100872 and is the answer not in the manual?
Questions and answers