Table of Contents
Advertisement
Quick Links
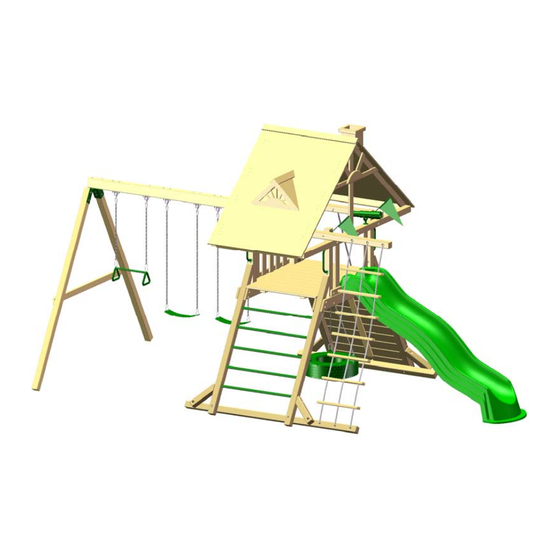
NOTE: Wooden parts to assemble a roof, chimney and two dormers are
included with this kit. All other wood components or accessories shown in
the picture above are NOT included.
Ella's Castle - Wood Roof Add-On
ASSEMBLY MANUAL
Copyright © 2011 PlayNation Play Systems, Inc.
All Rights Reserved
www.PlayNation.com. • 190 Etowah Industrial Court • Canton, GA 30114 • (800) 661-7295
Latest Revision: January 28, 2011
Advertisement
Table of Contents

Related Manuals for PlayNation Play Systems Ella's Castle - Wood Roof Add-On


Summary of Contents for PlayNation Play Systems Ella's Castle - Wood Roof Add-On
- Page 1 NOT included. Ella’s Castle - Wood Roof Add-On ASSEMBLY MANUAL Copyright © 2011 PlayNation Play Systems, Inc. All Rights Reserved www.PlayNation.com. • 190 Etowah Industrial Court • Canton, GA 30114 • (800) 661-7295 Latest Revision: January 28, 2011...
-
Page 2: Table Of Contents
TABLE OF CONTENTS Warranty and Safety Guidelines……………………………..………..……………… 3-7 General Information, Definitions and Site Plan…..........…..8-11 Tool List, Hardware, Lumber and Accessory Checklist………..…………………….12-15 Boards to REMOVE from your playset........…………......…16 Removal of Tarp, Tarp Boards and Center Posts…………………....……. Step 1 Attaching Center Posts…………..…………………………......….. Step 2 Drill holes for Roof Supports……………………………...……......……... - Page 3 IF YOU HAVE MISSING OR DAMAGED PARTS OR NEED ASSISTANCE ASSEMBLING, PLEASE CALL PlayNation Play Systems, Inc. MANUFACTURING DIRECT.(800) 445-7529 FACTORY HOURS – MON.–FRI., 8AM-5PM EST DO NOT RETURN THIS PRODUCT TO THE RETAILER OR CONTACT THE RETAILER DIRECT.
- Page 4 Our play set kits are designed for children ages 3 to 11. PlayNation Play Systems, Inc. believes every child should have a play set and with our kits they can! You can rest assured your new play set is safe, durable and designed to hold up to the elements.
- Page 5 Limited Manufacturers Warranty PlayNation Play Systems, Inc. (“PlayNation”) warrants its play sets to be free from defects in workmanship and materials, under normal use and conditions at its original installation, for 10 years for structural wood components and for one year for all other components (e.g., hardware, plastics, tarps, rope ladder, etc.)
- Page 6 Important Safety Guidelines This product is intended for residential use only and not intended for use in any public setting. A safety surface such as mulch or recycled tire should be used under the play set to prevent injury from falls. Also a 6 foot safety zone should be used around the entire play set.
- Page 7 Safety and Maintenance Tips for Your New Play Set: (continued) Playgrounds should be inspected on a regular basis. If any of the following conditions are noted, they should be removed, corrected, or repaired immediately to prevent injuries. • Hardware that is loose, worn or that has protrusions or projections. •...
- Page 8 General Info to Review Before Installation • Depending on your experience, assembly of PlayNation Playsets can take as little as 6 hours up to 24 hours, depending on size, after inventory of parts; therefore, we recommend you set aside a full two days for assembly. •...
- Page 9 This page is a list of definitions and explanations used throughout our instructions to aid you in the assembly of your play set. Offset Holes- Throughout the installation procedures we will refer to parts with offset holes. This refers to the orientation of the holes on the board. An offset hole is one that is closer to one side than it is to the other or in other words, it is not centered on the board.
- Page 10 Common Installation Practice Installing T-nuts When installing T-nuts into the wood, use a smooth faced hammer to set the face of the T-nut flush into the wood Corner Post Insert the barrel of the T-nut into the T-nut predrilled hole. Using a smooth faced hammer, drive the T-nut until the face of the T-nut is flush to the wood.
- Page 11 Please familiarize yourself with the manual, parts/components and general con- struction process of your new playset before getting started. SITE PLAN: 48.00 85.13 109.01 Rock Wall 16.00 16.00 Trapeze 60.78 Swing 127.70 125.79 Wave Slide 117.85 Swing Belts (2) 36.50 Ladder Rope Ladder...
- Page 12 REQUIRED TOOL LIST ___ Standard or Cordless Drill w/ Phillips Bit (#2 square bit provided) ___ 1/8” Drill Bit ___ 3/16” Drill Bit ___ ½” Wrench, Socket, and Deep Well Socket ___ 9/16” Wrench, Socket, and Deep Well Socket ___ Level ___ Tape Measure ___ Extension Cord (if using standard drill) ___ Hammer...
- Page 13 Use the ruler to the right to measure your bolts and screws. Picture views shown below are 1:1 scale and can be used to match bolt and screw sizes. #8 x 1-1/4” Wood Screw Qty: 8 #8 x 1-1/2” Wood Screw Qty: 152 #8 x 2”...
- Page 14 Picture Description Qty. 1 X 4 X 55” Roof Finisher (Tongue Only) 1 X 4 X 55” Roof Starter (Groove only) 1 X 5 X 55” Roof Board (Tongue and Groove) 2 X 4 X 48” Front Center Post 2 X 4 X 48” Roof End 2 X 4 X 70”...
- Page 15 Picture Description Qty. 2 X 4 X 73-3/4” Rear Center Post 2 X 6 X 16” 3-1/2” X 3-1/2” X 55” Roof Peak As- sembly 5/4 x 3 x 51” Sun Support 5/4 X 4 X 11-3/8” 5/4 X 6 X 13” Roof Peak Support Chimney...
- Page 16 THE BOARDS ON THIS SHEET WILL BE REMOVED FROM YOUR PREVIOUSLY CONSTRUCTED ELLA’S CASTLE PLAYSET. Picture Description Qty. 2 X 4 X 70” Rear Center Post 2 X 4 X 48” Center Tarp Board 2 X 4 X 54-1/2” Tarp Board 2 X 4 X 44-1/4”...
-
Page 17: Removal Of Tarp, Tarp Boards And Center Posts
Step 1: Removal of Tarp, Tarp Boards and Center Posts. 1: Remove the 1-1/4” screws which hold the Tarp to the Tarp Boards. 2: Remove the Tarp from the playset and set aside. 3: Remove the lag screws at the end of the 2 X 4 X 54-1/2” Tarp Boards and set the Tarp Boards aside. -
Page 18: Attaching Center Posts
Step 2: Center Posts 1: Take the 2 x 4 x 73-3/4” Rear Center Post, and line up the hole in the post with the through hole in the Swing Beam Side Rail. Take note that the hole in the Rear Center Post is not on center, and the shorter end of the post will face down. -
Page 19: Warranty And Safety Guidelines
Step 3: Drill holes for Roof Supports 1: On the end of the INSIDE surface of the 4 x 4 x 108” Swing Beam Side Rail and the 4 x 4 x 108” Side Rail you will need to drill two 3/16” diameter holes 2-1/2” deep. One hole per end. -
Page 20: Attaching Roof Supports
Step 4: Roof Supports 1: Find two 2 x 4 x 70” Roof Support - Left and two 2 x 4 x 70” Roof Support - Right. Lean the angled end of each roof support against the center posts. The other end of each roof support should have the counter-sunk hole facing the inside. -
Page 21: Attaching Roof Peak Supports
Step 5: Roof Peak Supports 1: Find two 5/4 x 6 x 13” Roof Peak Supports. Each Roof Peak Support will be attached on the outside of the roof supports and center post. 2: Make the top angled surfaces of the Roof Peak Supports flush with the top surfaces of the Roof Supports. -
Page 22: Attaching Roof Starters And Roof Peak
Step 6: Roof Starters and Roof Peak 1: Find two 1 x 4 x 55” Roof Starters (groove only) and one 3-1/2” x 3-1/2” x 55” Roof Peak. 2: Place the 1 x 4 x 55” Roof Starters (groove only) at the peak of the roof. The holes in the Roof Starters should be centered over the top of the triangular shaped Roof Peak Supports. -
Page 23: Attaching Roof Boards / Chimney And Dormers
Step 7: Roof Boards/Chimney and Dormers 1: Place the 1 x 5 x 55” Roof Board on top of the Roof Supports, fitting the tongue into the groove of the Roof Starter. The holes in the Roof Boards should be centered over the Roof Supports. -
Page 24: General Information, Definitions And Site Plan
Step 8: Roof Finishers & End Caps 1: Place the 2 x 4 x 48” Roof End Cap on the ends of the Roof Supports. The top surface of the Roof End Cap should be flush with the top of the Roof Supports. Attach the Roof End Cap to the Roof Supports with 2-1/2”... -
Page 25: Sun / Sun Support Assembly
Step 9: Sun/Sun Support Assembly 1: Place the 2 x 6 x 16” Sun on top of the 5/4 x 3 x 51” Sun Support as shown in the bottom picture. There should be a 1-1/4” distance between the bottom of the Sun and the bottom of the Sun Support. -
Page 26: Sun / Sun Support Assembly Installation
Step 10: Sun/Sun Support Assembly Installation 1: Place the Sun/Sun Support assembly on top of the Roof Supports as shown below. Level the Sun Support. 2: Attach the Sun Support to the Roof Supports with 2” wood screws. 3: Go underneath the roof to attach the Center Post to the Sun Support with one 2” wood screw. -
Page 27: Sun Ray Installation
Step 11: Sun Ray Installation 1: Place each 5/4 x 4 x 11-3/8” Sun Ray on top of the Roof Support and behind the Sun piece as shown below. 2: From the inside of the roof attach each Sun Ray to the Roof Support and the Sun with four 2”... -
Page 28: Tool List, Hardware, Lumber And Accessory Checklist
Step 12: Steering Wheel 1: Place the Steering Wheel Insert inside the Steering Wheel. 2: Use the hardware included with the Steering Wheel to mount it to the Rear Center Post and Swing Beam Side Rail. Do not over-tighten the lag screw inside the Steering Wheel Insert, or it will not turn. - Page 29 confident ial and w ill ONLY be us ed t o bet t er s erve our cus t omers . Remove t his page from t he manual and mail t o t he addres s below . Thank you from everyone here at PlayNat ion™! Mail to: PlayNation Play Systems Inc, 190 Etowah Industrial Court Canton, GA 30114...
Need help?
Do you have a question about the Ella's Castle - Wood Roof Add-On and is the answer not in the manual?
Questions and answers