D-Link DSL-2540U User Manual
Adsl/ethernet router with built-in switch
Hide thumbs
Also See for DSL-2540U:
- User manual (86 pages) ,
- Quick installation manual (17 pages) ,
- Quick installation manual (14 pages)
Table of Contents
Advertisement
Quick Links
Advertisement
Table of Contents

Subscribe to Our Youtube Channel
Related Manuals for D-Link DSL-2540U


Summary of Contents for D-Link DSL-2540U
- Page 1 User Manual DSL-2540U ADSL/Ethernet Router with Built-in Switch July 2012...
-
Page 2: Table Of Contents
DSL-2540U ADSL/Ethernet Router with Built-in Switch User Manual Contents Chapter 1. Introduction..........4 Contents and Audience............4 Conventions..............4 Document Structure............4 Chapter 2. Overview..........5 General Information............5 Specifications..............6 Product Appearance............9 Front Panel...............9 Back Panel...............10 Delivery Package............11 Safety Instructions............11 Chapter 3. Installation and Connection......12 Before You Begin............12 Connecting to PC............13... - Page 3 DSL-2540U ADSL/Ethernet Router with Built-in Switch User Manual Advanced..............58 UPnP..............58 Interface Grouping............59 DDNS..............61 DNS..............62 Routing..............63 ADSL..............65 Remote Access............66 Firewall..............68 IP Filters...............68 Virtual Servers............71 DMZ..............73 Application Rules............74 MAC Filter...............76 Control..............78 URL Filter...............78 System..............80 Administrator Password...........80 Configuration............81 System Log...............82 Firmware Upgrade............84 NTP Client...............85 Chapter 5.
-
Page 4: Chapter 1. Introduction
Chapter 2 gives an overview of the router's hardware and software features and describes its appearance and the package contents, and provides safety instructions. Chapter 3 explains how to install the router DSL-2540U and configure a PC in order to access its web-based interface. -
Page 5: Chapter 2. Overview
LAN. You can configure and manage the settings of the router DSL-2540U via the user-friendly web- based interface (the interface is available in several languages). -
Page 6: Specifications
DSL-2540U ADSL/Ethernet Router with Built-in Switch Overview User Manual Specifications Interfaces: ADSL: 1 RJ-11 port • LAN: 4 RJ-45 10/100BASE-TX Fast Ethernet ports with auto-MDI/MDIX. • ADSL Standards: ADSL: • ◦ full rate ANSI T1.413 Issue 2, ITU-T G.992.1 (G.dmt) Annex A, ITU-T G.992.2 (G.lite) Annex A, ITU-T G.994.1 (G.hs). - Page 7 DSL-2540U ADSL/Ethernet Router with Built-in Switch Overview User Manual ATM/PPP Protocols: Bridged and routed Ethernet encapsulation • VC-based or LLC-based multiplexing • ATM Forum UNI3.1/4.0 PVC (up to 8 PVCs) • ATM Adaptation Layer Type 5 (AAL5) • ITU-T I.610 OAM F4/F5 loopback •...
- Page 8 DSL-2540U ADSL/Ethernet Router with Built-in Switch Overview User Manual QoS: Interface grouping • 3 priority queues. • Configuration and Management: Multilingual web-based interface for configuration and management • Access via TELNET • Firmware update via web-based interface • Saving/restoring configuration to/from file •...
-
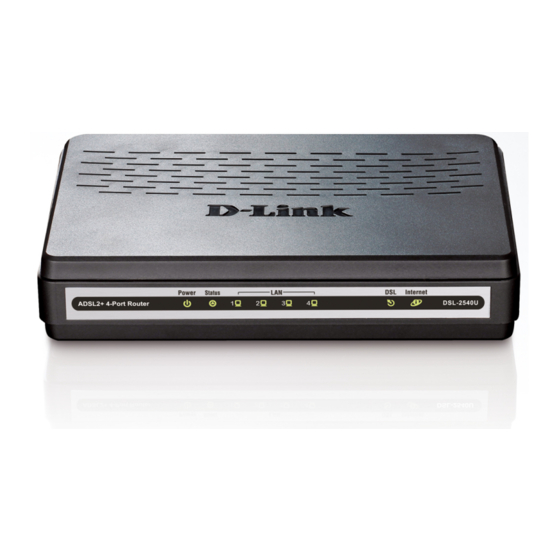
Page 9: Product Appearance
DSL-2540U ADSL/Ethernet Router with Built-in Switch Overview User Manual Product Appearance Front Panel Figure 1. Front panel view. Mode Description The router is powered on. Solid green The router is powered off. Power No light Solid red The router is in the crash recovery mode. -
Page 10: Back Panel
DSL-2540U ADSL/Ethernet Router with Built-in Switch Overview User Manual Back Panel Figure 2. Back panel view. Port Description A DSL port to connect the router to the telephone line. 4 Ethernet ports to connect Ethernet devices. One port can be used to connect to a LAN 1-4 private Ethernet line. -
Page 11: Delivery Package
DSL-2540U ADSL/Ethernet Router with Built-in Switch Overview User Manual Delivery Package The following should be included: Router DSL-2540U • Power adapter DC 12V/0.5A • RJ-11 telephone cable • Ethernet cable (CAT 5E) • Splitter • “Quick Installation Guide” (brochure). •... -
Page 12: Chapter 3. Installation And Connection
Please, read this manual prior to installing the device. Make sure that you have all the necessary information and equipment. Operating System Configuration of the router DSL-2540U (hereinafter referred to as “the router”) is performed via the built-in web-based interface. The web-based interface is available from any operating system that supports a web browser. -
Page 13: Connecting To Pc
DSL-2540U ADSL/Ethernet Router with Built-in Switch Installation and Connection User Manual Connecting to PC PC with Ethernet Adapter 1. Make sure that your PC is powered off. 2. Connect an Ethernet cable between any of Ethernet ports located on the back panel of the router and the Ethernet port of your PC. - Page 14 DSL-2540U ADSL/Ethernet Router with Built-in Switch Installation and Connection User Manual 3. In the Local Area Connection Properties window, on the General tab, select the Internet Protocol (TCP/IP) line. Click the Properties button. Figure 4. The Local Area Connection Properties window.
- Page 15 DSL-2540U ADSL/Ethernet Router with Built-in Switch Installation and Connection User Manual 4. Select the Obtain an IP address automatically and Obtain DNS server address automatically radio buttons. Click the OK button. Figure 5. The Internet Protocol (TCP/IP) Properties window. 5. Click the ОК button in the connection properties window.
-
Page 16: Obtaining Ip Address Automatically In Os Windows 7
DSL-2540U ADSL/Ethernet Router with Built-in Switch Installation and Connection User Manual Obtaining IP Address Automatically in OS Windows 7 1. Click the Start button and proceed to the Control Panel window. 2. Select the Network and Sharing Center section. (If the Control Panel has the category... - Page 17 DSL-2540U ADSL/Ethernet Router with Built-in Switch Installation and Connection User Manual 3. In the menu located on the left part of the window, select the Change adapter settings line. Figure 7. The Network and Sharing Center window. Page 17 of 86...
- Page 18 DSL-2540U ADSL/Ethernet Router with Built-in Switch Installation and Connection User Manual 4. In the opened window, right-click the relevant Local Area Connection icon and select the Properties line in the menu displayed. Figure 8. The Network Connections window. Page 18 of 86...
- Page 19 DSL-2540U ADSL/Ethernet Router with Built-in Switch Installation and Connection User Manual 5. In the Local Area Connection Properties window, on the Networking tab, select the Internet Protocol Version 4 (TCP/IPv4) line. Click the Properties button. Figure 9. The Local Area Connection Properties window.
- Page 20 DSL-2540U ADSL/Ethernet Router with Built-in Switch Installation and Connection User Manual 6. Select the Obtain an IP address automatically and Obtain DNS server address automatically radio buttons. Click the OK button. Figure 10. The Internet Protocol Version 4 (TCP/IPv4) Properties window.
Need help?
Do you have a question about the DSL-2540U and is the answer not in the manual?
Questions and answers