
Related Manuals for Verefa L11 Pro


Summary of Contents for Verefa L11 Pro
- Page 1 L11 Pro User Manual Please read the user manual carefully before use and keep it properly.
- Page 3 Welcome Welcome to use Verefa Robot Vacuum Cleaner. We hope you can have a pleasant experience! If you have any questions or suggestions, you can contact us through the contact information provided at the bottom of the robot, and we will try our best to solve the problem for you.
-
Page 4: Table Of Contents
Table of Contents 1. Safety Instructions Important Safety Instructions 2.1 What's in the Box 2. Product Overview 2.2 Product Anatomy(including Buttons and Indicators) 3.1 Important Tips Before Use 3. Installation 3.2 Get Started 4.1 Main Functions [õ ÝëÍ =ùפõÀÝ×ï 4. Operation Instructions 4.3 Other Functions 5.1 Routine Maintenance 5. -
Page 5: Safety Instructions
1. Safety Instructions )·Ýë ùïÀ׸ õ½ éëݪù¤õ éÐ—ï ·ÝÐÐÝ õ½ ·ÝÐÐÝ À׸ £—ïÀ¤ ï—·õ é뤗ùõÀÝ×ï n—ª —ÐÐ õ½ ¤Ý×õ×õï Ý· õ½ Ö—×ù—Ð ¤—ë·ùÐÐ —ת ·ÝÐÐÝ õ½ ïõéï ÀתÀ¤—õª À× õ½ Ö—×ù—Ð õÝ ùï the product. Keep the manual properly for future reference. If you need to transfer the product to a third party for use, please enclose the instruction manual Àõ½... - Page 6 x½ ¤½—ë¸À׸ £—ï ï½ÝùЪ £ éЗ¤ª —¸—À×ïõ õ½ —ÐÐ —ת À× — —õ —ë— Íéõ — — ·ëÝÖ Ýé× ë ½—õ ïÝùë¤ï —õë ×—ëëÝ —ë— Ýë —ë—ï ½ë õ½ ëÝ£Ýõ Ö— £ ïùïéתª ïÝ —ï õÝ éë ×õ õ½ ·ùפõÀÝ× Ý· õ½ éëݪù¤õ ·ëÝÖ £À׸ — ¤õª ZÝ...
- Page 7 Battery and Charging 0Ý ×Ýõ ùï £—õõëÀï —ª—éõëï Ýë éÝ ë ¤Ýëªï ¤½—ë¸À׸ £—ïï Ý· —× õ½Àëª é—ëõ x½Àï éëݪù¤õ ¤—× Ý×Ð £ ùïª Àõ½ õ½ £—õõë —ª—éõë Ýë éÝ ë ¤Ýëª —ת ¤½—ë¸À׸ £—ï ïùééÐÀª Àõ½ õ½ ëÝ£Ýõ =—ÀÐùë õÝ ªÝ ïÝ éëݪù¤õ ª—Ö—¸ ФõëÀ¤ ï½Ý¤Í Ýë ë ªù õÝ ½À¸½ ÝÐõ—¸ Ö— £ ëïùÐõª À× Fõ...
- Page 8 Laser safety information x½Àï Зïë ªÀïõ—פ ï×ïÝë ¤ÝÖéÐÀï Àõ½ õ½ ¤Ð—ïï Зïë éëݪù¤õ ïõ—ת—ëª Ý· F3* —ת ªÝï ×Ýõ ÖÀõ ª—׸ëÝùï Зïë ë—ªÀ—õÀÝ× CÝ ë ·Ýë £õõë ï—·õ éÐ—ï — ÝÀª Ýùë ·—ÖÀÐ (especially children and pets) from looking directly at the laser emitter at close range. SAVE THESE INSTRUCTIONS *½—׸ï...
-
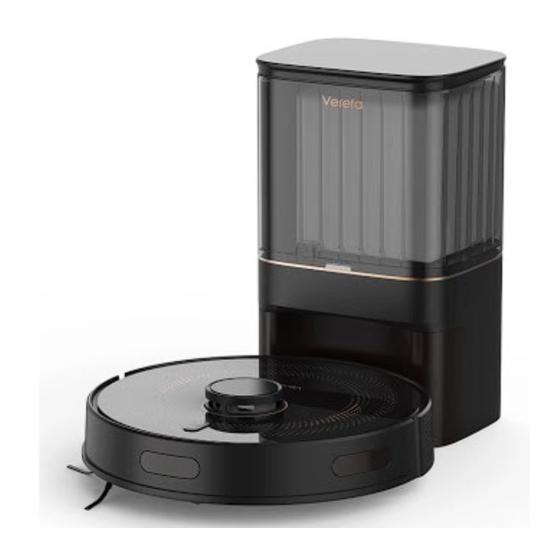
Page 9: Product Overview
2. Product Overview 2.1 What’s in the Box Side Brush (x1) Cleaning Brush nÝ£Ýõ ‡—¤ùùÖ (In the dust box) (Robot) Auto-empty Charging Base (Charging Base) Àõ½ ªùïõ £—¸ éë À×ïõ—ÐЪ User Manual Instruction Manual and Additional Additional Additional Other Documents Side Brush (x1) Filter (x1) Dust Bag (x2) - Page 10 2.2 Product Anatomy (including Buttons and Indicators) A) Robot Vacuum Top View Buttons lÝ ë £ùõõÝ× - xùë× Ý× Ý lëïï —×ª ½ÝЪ ·Ýë ï¤Ýתï õÝ éÝ ë Ý× Ýë Ý - Auto Cleaning ·õë éÝ ë Ý× ï½Ýëõ éëïï start Auto Cleaning.
- Page 11 Bottom View Main sensors Laser distance sensor Recharge sensor Wall sensor *ÐÀ ï×ïÝë *—ïõë ½Ð Side brush Roller brush Roller brush cover Roller brush cover buckle Wheels Recharge sensor Charging contact pins Dust box Filter cover buckle Filter cover CÀ¸½ éë·Ýë֗פ Ðõë Dust box cover buckle =ëÝ×õ...
- Page 12 B) Auto-Empty Charging Base ( Charging Base ) Front View Top cover Charging base status indicator À× éÝ ë Ý× ïõ—õ Solid White *Ý×פõª õÝ õ½ éÝ ë £ùõ the robot is not on the charging base* TÀ¸½õ Ý x½ ëÝ£Ýõ Àï —õõ—¤½ª õÝ õ½ ¤½—ë¸À׸...
- Page 13 Top View Dust bag guide rails *½—ë¸À׸ £—ï Ðõë Bottom View Àë ªù¤õ ¤Ý ë ï¤ë ï Air duct cover...
-
Page 14: Installation
3. Installation 3.1 Important Tips Before Use Prepare your home environment *Ð—× ùé —× ª£ëÀï Ýë Àëï Ý× õ½ ÝÝë õ½—õ Ö— ×õ—׸Рõ½ Robot before use, and remove easily fallen, fragile, valuable, and éÝõ×õÀ—ÐÐ ½— —ëªÝùï ÀõÖï ÝÀª éëïÝ×—Ð Ýë éëÝéëõ ª—Ö—¸ ¤—ùïª... - Page 15 3.2 Get Started 1) Remove protective items )·Ýë ùï éЗï ëÖÝ õ½ éëÝõ¤õÀ ïõëÀé Ýë ÐÖ on the robot to ensure the normal usage. 2) Install side brush Click 3) Place the charging base, connect the power supply and charge the robot lЗ¤...
- Page 16 Ð — ï ¤Ý×פõ õ½ ¤½—ë¸À׸ £—ï õÝ õ½ éÝ ë ïùééÐ —ת ×ïùë õ½—õ Àõ Àï Ðݤ—õª À× — ¤Ý×õÀ×ùÝùï ˆÀ =À ×õ ÝëÍ Àõ½ ¸Ýݪ ¤Ý ë—¸ [Ýõ lЗï Ö—Í ïùë õ½—õ õ½ ¤½—ë¸À׸ £—ï Àï —Ð — ï ¤Ý×פõª õÝ õ½ éÝ ë ïùééÐ Ýõ½ë Àï õ½...
- Page 17 0Ý ×ÐÝ—ª õ½ —éé r—뤽 ·Ýë ‡ë·— TÀ· —ééÐÀ¤—õÀÝ× À× õ½ —éé ‡ë·— TÀ· ïõÝë Ý· õ½ ÖÝ£ÀÐ é½Ý× x½× ªÝ ×ÐÝ—ª —ת install it. Reset Wi-Fi. lëïï —×ª ½ÝЪ £Ýõ½ £ùõõÝ×ï lÝ ë £ùõõÝ× —ת n¤½—ë¸ £ùõõÝ× —õ õ½ ï—Ö õÀÖ ·Ýë ï¤Ýתï...
-
Page 18: Operation Instructions
4. Operation Instructions 4.1 Main Functions xùë× Ý× Ý lëïï —×ª ½ÝЪ lÝ ë £ùõõÝ× ·Ýë ï¤Ýתï õÝ õùë× Ý× õ½ ëÝ£Ýõ ·õë õ½ éÝ ë ÀתÀ¤—õÝë ÐÀ¸½õï ùé ·Ýë — éëÀݪ Ý· õÀÖ õ½ ëÝ£Ýõ ×õëï õ½ ïõ—ת£ ïõ—õ lëïï —×ª ½ÝЪ lÝ... - Page 19 [Ýõ F· õ½ ëÝ£Ýõ Àï éùõ £—¤Í õÝ õ½ ¤½—ë¸À׸ £—ï ·Ýë ¤½—ë¸À׸ õ½ ¤Ð—×À׸ õ—ïÍ ÀÐÐ £ תª - When continuing to clean, please keep the robot to start in the original position and direction to avoid path disorder. x½...
- Page 20 [Ýõ - Make sure that the robot starts each cleaing from the charging base. 0Ý ×Ýõ ÖÝ õ½ ëÝ£Ýõ ·ëêù×õÐ ªùëÀ׸ ¤Ð—×À׸ F· ÖÝ ª éЗ¤ õ½ ëÝ£Ýõ £—¤Í õÝ Àõï ÝëÀ¸À×—Ð location. 1.5m Spot cleaning (only set via the app) - Use the remote control page of the app to start the ïéÝõ...
- Page 21 Room cleaning (only set via the app) - Using the app, you can select one or more rooms on õ½ ïÖ—ëõ Ö—é ·Ýë ëÝÝÖ ¤Ð—×À׸ x½ ëÝ£Ýõ ÀÐÐ ¤Ð—× the selected rooms, and automatically return to the charging base after cleaning. [Ýõ...
- Page 22 Auto-empty dirt ùõÝ Öéõ À׸ ·õë ¤Ð—×À׸ õ½ ëÝ£Ýõ ÀÐÐ ëõùë× õÝ õ½ ¤½—ë¸À׸ £—ï —×ª õ½ ëÝ£Ýõ ÀÐÐ —ùõÝÖ—õÀ¤—ÐÐ Öéõ the dust box. [Ýõ - The noise during auto-empty dirt is relatively loud. Please pay attention to the impact of noise on daily life.
-
Page 23: Other Functions
4.3 Other Functions Find my robot F· õ½ ëÝ£Ýõ Àï ïõù¤Í ïÝÖ ½ë Ýù ¤—× ×ª Àõ õ½ëÝù¸½ õ½ =Àת Ö ëÝ£Ýõ À× õ½ —éé Force Restart system ˆ½× õ½ £ùõõÝ× ªÝï ×Ýõ ëïéÝת Ýë ¤—××Ýõ £ õùë× Ý éЗï õë õÝ ëïõ—ëõ õ½ ï ïõÖ ˆ½×... -
Page 24: Routine Maintenance
5. Maintenance and Troubleshooting 5.1 Routine Maintenance [Ýõ lЗï õùë× Ý —ת ù×éÐù¸ õ½ éÝ ë ¤—£Ð £·Ýë ¤Ð—×À׸ —ת Ö—À×õ—À×׸ õ½ éëݪù¤õ =Ýë õ½ £ïõ éë·Ýë֗פ ë·ë õÝ õ½ ·ÝÐÐÝ À׸ õ—£Ð ·Ýë ëÝùõÀ× Ö—À×õחפ Parts Z—À×õחפ ·ëêùפ néЗ¤Ö×õ ·ëêùפ Dust box Monthly Weekly... - Page 25 [Ýõ ) ïùë õÝ ªë õ½ Ðõë õ½ÝëÝù¸½Ð £·Ýë ùï õÝ ×ïùë ×ÝëÖ—Ð Ýéë—õÀÝ× —ת ïë À¤ ÐÀ· - Do not put the incomplete dust box into the robot, so as to avoid mistakenly triggering õ½ ¤Ð—À׸ ½À¤½ ÀÐÐ £ÐÝ¤Í õ½ —Àë ªù¤õ Ý· õ½ ëÝ£Ýõ Ýë ª—Ö—¸ õ½ ·—× 0Ý...
- Page 26 3) Clean the side brush Pull out the side brush. *Ð—× õ½ ïÀª £ëùï½ Àõ½ — ¤Ð—×À׸ £ëùï½ —ת install it back. 4) Clean caster wheel Pry out the caster axle and pull out the caster £Ýª Àõ½ — ïÖ—ÐÐ ï¤ë ªëÀ ë —×ª Ýõ½ë õÝÝÐï Clean the hair and dirt from the caster axle and caster body, and then reinstall and press it tightly.
- Page 27 6) Clean sensors, charging contact pins and charging contacts ˆÀé —×ª ¤Ð—× Àõ½ — ïÝ·õ ªë ¤ÐÝõ½ [Ýõ x½ë —ë ï×ïÀõÀ ФõëÝ×À¤ ¤ÝÖéÝ××õï À×ïÀª õ½ éëݪù¤õ ïÝ éЗï Àé õ½Ö Àõ½ — ïÝ·õ ªë ¤ÐÝõ½ ½× ¤Ð—×À׸ 0Ý ×Ýõ ùï õ ë—¸ï õÝ éë ×õ —õë ª—Ö—¸ néЗ¤...
- Page 28 8) Clean the air duct F· õ½ —Àë ªù¤õ Àï £Ðݤͪ ¤Ð—× Àõ —¤¤ÝëªÀ׸ õÝ õ½ ·ÝÐÐÝ À׸ ïõéï lùõ — ïÝ·õ ¤ÐÝõ½ Ý× — —õ ïùë·—¤ —ת õ½× З õ½ —ùõÝ Öéõ ¤½—ë¸À׸ £—ï £—¤Í —ת —õ Àõ½ the front side facing up. [Ýõ...
-
Page 29: Troubleshooting
5.2 Troubleshooting F· —× ëëÝë Ýëëùëï ½ÀÐ õ½ ëÝ£Ýõ Àï ÝëÍÀ׸ õ½ ÀתÀ¤—õÝë ÐÀ¸½õ Ý· õ½ ëÝ£Ýõ Ýë õ½ —ùõÝ Öéõ ¤½—ë¸À׸ £—ï ÀÐÐ ÐÀ¸½õ ùé À× ëª À× ªÀ ë×õ ïõ—õï Àõ½ ¤ÝëëïéÝתÀ׸ éëÝÖéõ õÝ×ï lЗï ïÝÐ Àõ £... - Page 30 Error 12: Robot trapped. Please - The robot may be stuck or trapped. Please clear clear obstacles around. obstacles around the robot. - The area around the charging base may be Error 13: Charging base blocked. blocked by obstacles or dust. Please clean the —ë—...
- Page 31 Indicator light ‡ÝÀ¤ éëÝÖéõ Solution lÐ—ï ¤½¤Í ½õ½ë ïÀª £ëùï½ Àï ×õ—׸Ъ Àõ½ ªÀëõ lЗï ëÖÝ ¤Ð—× —ת ëÀ×ïõ—ÐÐ õ½ Error F1: Side brush module ïÀª £ëùï½ —ת õ½× õë õÝ õùë× Ý —ת õ½× õùë× fault. Please check and try on the system.
- Page 32 lÐ—ï ¤½¤Í ½õ½ë õ½ ªùïõ £—¸ Àï ÖÀïïÀ׸ ensure that the dust bag is installed in place, and Please check whether the dust Charging base - close the dust bag cover. bag is installed and close the Solid Red - Please check the status of the dust bag cover to cover properly.
-
Page 33: Faqs
5.3 FAQs Problem type Solution F×ïù ¤À×õ éÝ ë lЗï Ö—Í ïùë õ½—õ õ½ ¤½—ë¸À׸ £—ï ½—ï £× ¤Ý×פõª õÝ õ½ éÝ ë ïùééÐ —ת õ½× éЗ¤ õ½ ëÝ£Ýõ Ý× õ½ ¤½—ë¸À׸ £—ï —×ª —ÐÀ¸× Àõ½ õ½ ¤½—ë¸À׸ ¤Ý×õ—¤õï —×ª õ½ ª À¤ ÀÐÐ automatically start up. - Page 34 lÐ—ï ¤½¤Í ½õ½ë õ½ë Àï ¤ÝëëïéÝתÀ׸ ·—ùÐõ éëÝÖéõ lЗï ë·ë õÝ the chapter "Troubleshooting". Abnormal behavior. ˆÀé õ½ ï×ïÝë Àõ½ — ïÝ·õ ªë ¤ÐÝõ½ n·ë õÝ õ½ ¤½—éõë nÝùõÀ× Maintenance". 3) Reboot the robot. lÐ—ï —ªÊùïõ õ½ ïù¤õÀÝ× Ýë õùë× Ý õ½ —ùõÝ £ÝÝïõ õÝ ï À· õ½Àï ïõõÀ׸ causes the more noise The robot suddenly lЗï...
-
Page 35: Basic Parameters
6. Declarations Basic Parameters Robot vacuum cleaner Product name Robot vacuum cleaner Product model S212 Rated voltage ‡ F×éùõ éÝ ë ‡ n—õª éÝ ë Rated capacity of battery Lithium battery 4700mAh Charging time <6 hours Wireless connection ˆÀ =À F333 £... -
Page 36: Energy Saving And Battery
Energy Saving and Battery Holiday energy saving mode - On the charging base, press and hold Recharge button for 10 seconds until a tone is heard, at ½À¤½ õÀÖ õ½ ½ÝÐÀª— ×ë¸ ï— À׸ Öݪ Àï —¤õÀ —õª |תë õ½ ½ÝÐÀª— ×ë¸ ï— À׸ Öݪ õ½ ×õ ÝëÍ ï¤½ªùÐÀ׸ —ת Ýõ½ë ·ùפõÀÝ×ï ÀÐÐ £ õùëת Ý... -
Page 37: Customer Service
Customer Service Customer Service F· Ýù ½— —× êùïõÀÝ×ï —×ª ªÀïï—õÀï·—¤õÀÝ× À× ùïÀ׸ õ½ éëݪù¤õ Ýù ¤—× ¸õ ÖÝë õ¤½×À¤—Ð ïùééÝëõ £ ¤Ý×õ—¤õÀ׸ ùï À× õ½ ·ÝÐÐÝ À׸ — ï ï Ýùë éëÝ£ÐÖ Àï Ýùë ¸ë—õ ¤Ýפë× ÀÐÐ õë Ýùë best to help you solve it. - Page 38 Product warranty card User name Mailing address Email address Phone number Model No. S212 lëݪù¤õ r [ Product purchase date Product Ö— Ý× eBay ` ¤À—Ð £ïÀõ purchase channel Taobao Jingdong others, Repair record Repair Repair Repair Fault Replaced date location ÝëÍë...
- Page 40 rÀפë *—ë Ð — ï ·Ýë ŽÝù *ùïõÝÖë ïë À¤ —ëë—×õ õùõÝëÀ—Ð ÀªÝ = mï `ùë Зõïõ ×õï —×ª × ï ÖÝë ªõ—ÀÐï ë·—ÐÀ· ¤ÝÖ support@verefalife.com S2121110...
Need help?
Do you have a question about the L11 Pro and is the answer not in the manual?
Questions and answers