
Subscribe to Our Youtube Channel
Related Manuals for Excelitas Technologies pco.edge 4.2 bi XU

Summary of Contents for Excelitas Technologies pco.edge 4.2 bi XU
- Page 1 4.2 bi XU at the cutting edge with cooled back-illuminated sCMOS...
- Page 2 93309 Kelheim, Germany email: info@pco.de web: www.pco.de pco.edge 4.2 bi XU user manual 1.0.0 Released February 2023 ©Copyright Excelitas PCO GmbH This work is licensed under the Creative Commons Attribution-NoDerivatives 4.0 International License. To view a copy of this license, visit http://creativecommons.org/licenses/by-nd/4.0/...
-
Page 3: Table Of Contents
2.1. Camera pco.edge 4.2 bi XU ........ -
Page 4: Safety
Use the camera’s mounting threads to secure it. LENS MOUNTING: Do not force the lens onto the camera. Screw in the lens gently to avoid thread damage. pco.edge 4.2 bi XU user manual 1.0.0... - Page 5 PCO’s customer support. DAMAGED CAMERA HOUSING: If the camera has been dropped or the camera’s housing is damaged: Switch the camera off immediately, detach it from power and contact PCO’s customer support. pco.edge 4.2 bi XU user manual 1.0.0...
-
Page 6: System Components
USB interface card chapter 2.2 Cables (USB A-C) chapter 2.3 Power supply chapter 2.3 These accessories are alvailable for the pco.edge 4.2 bi series: Article Picture Details SMA cables chapter 2.3 Continued on next page pco.edge 4.2 bi XU user manual 1.0.0... -
Page 7: Camera Pco.edge 4.2 Bi Xu
PCO homepage. 2.1. Camera pco.edge 4.2 bi XU Thanks for choosing a pco.edge 4.2 bi XU camera. The pco.edge 4.2 bi XU is based on a back illuminated sCMOS sensor with a very specific coating which allows applications in the visible light down to extreme UV (EUV) and soft X-ray radiation. -
Page 8: Usb Interface Card
If the User Account Control is enabled, a dialog may ask you to launch the setup. Accept with Yes. Follow the instructions of the Installer. For more information on the installation and operation of the USB interface card, please consult the manufacturer. pco.edge 4.2 bi XU user manual 1.0.0... -
Page 9: Cables
4.2 bi XU Chapter 2 2.3. Cables The pco.edge 4.2 bi XU is delivered with an USB interface cable for data transfer and a power supply cable. Article Length Description Scope of delivery Interface cable USB 3.1 type A - type C, DELOCK 83668... -
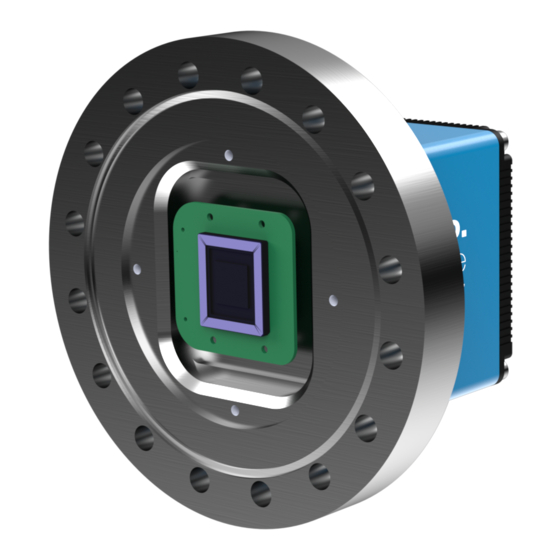
Page 10: Camera Overview
4.2 bi XU Chapter 3 3. Camera overview The following chapter provides an overview of the pco.edge 4.2 bi XU. Figure 3.1.: pco.edge 4.2 bi XU overview. Interfaces pco.edge 4.2 bi XU camera body Vacuum flange Protective cover 3.1. Camera interfaces Figure 3.2.: pco.edge 4.2 bi XU rear panel interfaces. -
Page 11: Hardware Setup
The functionality of the LEDs on the rear panel of the camera is listed in the following table. LED ”arm/rec” LED ”status” Meaning Orange Camera is booting Green Camera is ready for operation Error Orange Green Arm camera / rec state off Orange blinking Green Recording Camera without power pco.edge 4.2 bi XU user manual 1.0.0... -
Page 12: Camera Mechanics
4.2 bi XU Chapter 4 4. Camera mechanics Following illustrations show the mechanical outlines of the pco.edge 4.2 bi XU. 4.1. Mechanical outlines 1/4" - 20 UNC 16 x Figure 4.1.: outlines pco.edge 4.2 bi XU (all dimensions given in mm). -
Page 13: Mounting
4.2 bi XU Chapter 4 4.2. Mounting The pco.edge 4.2 bi XU provides different options for mounting. Please make sure that the camera is mounted in a stable way to avoid vibrations, which might disturb image quality. Bottom mounting The camera can be mounted via the thread at the bottom of the housing. -
Page 14: Mounting Of The Vacuum Flange
The screw must be loosened counterclockwise. 3. Remove the protective cover, by unscrewing the six identical screws. pco.edge 4.2 bi XU user manual 1.0.0... - Page 15 6. Now the camera flange can be screwed to its counterpart. Mount the flange crosswise to the vacuum setup using M8 stainless steel screws. This should be done with a torque of 20 Nm. pco.edge 4.2 bi XU user manual 1.0.0...
- Page 16 (Tip: Heat the head before using it for the first time, for outgasing reasons. It is recommended to use the water-cooling-system. Refer to the pco.edge 4.2 bi manual for more instructions.) Water connection pco.edge 4.2 bi XU user manual 1.0.0...
-
Page 17: Specifications
Horizontal: steps of 32 pixels, Vertical: steps of 8 pixels Non linearity < 0.6 % Cooling method Adjustable: from -25 °C to +20 °C peltier with forced air (fan) and water cooling Continued on next page pco.edge 4.2 bi XU user manual 1.0.0... - Page 18 2048 x 256 302 fps 2048 x 128 527 fps 1920 x 1080 76 fps 1600 x 1200 68 fps 1280 x 1024 80 fps 640 x 480 171 fps 320 x 240 320 fps pco.edge 4.2 bi XU user manual 1.0.0...
-
Page 19: Appendix
A.11.Errors ........... B. Troubleshooting C. Warranty D. Recycling E. About Excelitas PCO pco.edge 4.2 bi XU user manual 1.0.0... -
Page 20: Aquamatic
All these notes refer to the coolant Glysantin 50 %. Please also read the information the manufacturer provides in his documents. pco.edge 4.2 bi XU user manual 1.0.0... - Page 21 PCO’s customer support. DAMAGED COOLER HOUSING: If the cooler has been dropped or the cooler’s housing is damaged: Switch the cooler off immediately, detach it from power and contact PCO’s customer support. pco.edge 4.2 bi XU user manual 1.0.0...
- Page 22 4.2 bi XU Appendix A TIGHTLY SEALED GOGGLES: Wear eye/face protection. pco.edge 4.2 bi XU user manual 1.0.0...
-
Page 23: System Components
The pco.aquamatic III must be operated with the cooling fluid Protect Glysantin 50 %. If there are any questions regarding the pco.aquamatic III, please feel free to contact PCO or the local representative. pco.edge 4.2 bi XU user manual 1.0.0... -
Page 24: Overview
The cooling unit is equipped with various connections and signaling interfaces, as shown below. Figure A.2.: pco.aquamatic III front panel interfaces. Interfaces ON/OFF switch and status LEDs Power input Continued on next page pco.edge 4.2 bi XU user manual 1.0.0... -
Page 25: Specifications
Take care to place the unit on a flat and firm surface. Do not cover the cooling vents of the unit. Ensure free airflow around the pco.aquamatic III for maximum cooling performance. All tubes and pco.edge 4.2 bi XU user manual 1.0.0... -
Page 26: First Time Installation
Only use Protect Glysantin 50 % for the pco.aquamatic III. Do not use or add any other coolant or normal water. NOTE The recommended service interval for the change of the coolant is four years. Complete the following steps for a successful first-time installation. pco.edge 4.2 bi XU user manual 1.0.0... - Page 27 As shown, both are clearly marked and must be used as such. Regarding the camera, there is no prescribed flow direction concerning the water. Step 5 Connect to power. Continued on next page pco.edge 4.2 bi XU user manual 1.0.0...
- Page 28 While the cooling liquid flows back to the tank make sure there remains no air in the system - this may take a few minutes (move hoses if necessary). Continued on next page pco.edge 4.2 bi XU user manual 1.0.0...
- Page 29 The hose connectors are waterproof in not connected state. Maybe they lose one drop of cooling liquid from time to time. There is no need to empty the hoses while storing the camera system. pco.edge 4.2 bi XU user manual 1.0.0...
-
Page 30: Mechanical Dimensions
Max. system temperature 60 °C Input 12 VDC/ 2.0 A Operating temperature +5 °C to +40 °C Storage temperature -10 °C to +60 °C Storage conditions Dust-free and clean (Empty the cooler for storage) pco.edge 4.2 bi XU user manual 1.0.0... -
Page 31: A.11.Errors
(one time per second) flash alternately (once per second) If several errors occur in parallel, the signal priorities are as follows: Pump error: Priority 1 Fan error: Priority 2 Temperature error: Priority 3 pco.edge 4.2 bi XU user manual 1.0.0... -
Page 32: Troubleshooting
If any questions or problems should arise, feel free to use the following options: Contact us via email: support@pco.de Fill out the support ticket on our website (Click here for the chinese version) Read the pco.troubleshooting manual for help with PCO software product pco.edge 4.2 bi XU user manual 1.0.0... -
Page 33: Warranty
PCO GmbH, the guarantee ceases to be valid. This guarantee may not form the basis for any claims for damages, in particular not for compensation of consequential damages. The warranty is not transferable. pco.edge 4.2 bi XU user manual 1.0.0... -
Page 34: Recycling
To dispose your camera, send it to PCO or take it to a local recycling center. The camera and all its accessories include electronic devices, which contain materials harmful to the environment. These electronic devices must be recycled. pco.edge 4.2 bi XU user manual 1.0.0... -
Page 35: About Excelitas Pco
Appendix E E. About Excelitas PCO PCO, an Excelitas Technologies® Corp. brand, is a leading specialist and Pioneer in Cameras and Optoelectronics with more than 30 years of expert knowledge and experience of developing and manufacturing high-end imaging systems. The company’s cutting edge sCMOS and high- speed cameras are used in scientific and industrial research, automotive testing, quality control, metrology and a large variety of other applications all over the world. - Page 36 contact pco europe +49 9441 2005 50 info@pco.de pco.de pco america +1 866 678 4566 info@pco-tech.com pco-tech.com application stories please visit our website pco asia +65 6549 7054 info@pco-imaging.com pco-imaging.com pco china +86 512 67634643 info@pco.cn pco.cn...
Need help?
Do you have a question about the pco.edge 4.2 bi XU and is the answer not in the manual?
Questions and answers