Table of Contents
Advertisement
Quick Links
UNDER SINK
Reverse Osmosis Filtration Systems
VRO-3U
VRO-4U
Installation, Use & Care Guide
(Customer must read this manual thoroughly before installing the system)
Questions, problems, missing parts? Before returning to your retailer, call our customer service department at:
1 (877)-447-4768. 8:30am-4:30pm CST, Mon - Fri or email us at customerservice@ghpgroupinc.com
GHP Group
USA: 6440 W. Howard Street, Niles, Illinois 60714
Canada: 271 Massey Road, Guelph, Ontario, N1K 1B2
CONSUMER: Retain this manual for future reference.
www.ghpgroupinc.com
The VRO-3U has been tested and certified by
NSF International against NSF/ANSI Standard
42, 58 and CSA B483.1 for reduction of the
claims specified on the performance data sheet
The VRO-4U has been tested and certified by
NSF International against NSF/ANSI Standard
58 and CSA B483.1 for reduction of the claims
specified on the performance data sheet
2017-06-21
Printed in China
Advertisement
Table of Contents

Related Manuals for vitapur VRO-3U


Summary of Contents for vitapur VRO-3U
- Page 1 The VRO-3U has been tested and certified by NSF International against NSF/ANSI Standard 42, 58 and CSA B483.1 for reduction of the claims specified on the performance data sheet The VRO-4U has been tested and certified by NSF International against NSF/ANSI Standard UNDER SINK 58 and CSA B483.1 for reduction of the claims...
-
Page 2: Table Of Contents
Table of Contents: Safety Precautions ............1 * Connecting the Water Lines ........11 Conditions for Operation ..........1 * Tubing Connection with Push-in Fitting ...... 11 Package Contents ............2 * Icemaker Hook-up (Optional) ........11 Tools Required for Installation ......... 2 Start-up Instructions ............ -
Page 3: Package Contents
Package Contents: VRO-3U VRO-4U VRO-3U Accessories Kit Part Description Part Description Unit Assembly Air-gap Faucet Set Reverse Osmosis Membrane Inlet Valve Set Carbon Block Filter Saddle Drain Clamp Set Tank Ball Valve Storage Tank Mounting Screw 6’ of 1/4” Blue Tubing 6’... -
Page 4: System Layout And Components
Reverse Osmosis System Layout and Components: VRO-3U Filtration Process: Green Dot Green Dot Replacement Parts Filter Stage Part Number Description Service Life Filter Color Code VRFU-CTO Carbon Block Filter 5 Micron, 10” 6 to 12 Months Green Dot VRFU-RO RO Membrane 50 GPD... - Page 5 Reverse Osmosis System Layout and Components (continued): VRO-4U Filtration Process: Yellow Dot Green Dot Replacement Parts Filter Stage Part Number Description Service Life Filter Color Code VRFU-PP Sediment Filter 5 Micron, 10” 6 to 12 Months Yellow Dot VRFU-CTO Carbon Block Filter 5 Micron, 10” 6 to 12 Months Green Dot VRFU-RO...
-
Page 6: Installation Instructions
Installation Instructions: Tapping into Cold Water Line (See Figure 1 and 2): CAUTION: The water supply to your unit MUST be from the COLD WATER LINE. Hot water will severely damage your filtration system. 1. Turn off the cold water supply by turning off the shut off valve under the sink. If the cold water line does not have a shut off valve under the sink, turn off the main water line in the house. -
Page 7: Installing The Air-Gap Faucet
Installation Instructions (continued): CAUTION: Do not drill through a counter top that is more than 1” thick. CAUTION: Do not attempt to drill through a tiled, marble, granite or similar countertop. Consult a plumber or the countertop manufacturer for advice or assistance CAUTION: When drilling through a countertop make sure the area below the drilled area is free of wiring and piping. -
Page 8: Installing The Saddle Drain Clamp
Installation Instructions (continued): Installing the Air Gap Faucet Continued (see figure 5 and 6): 3. Loosen stem-nut on the faucet. 4. Slide Chrome Plate and Black Rubber Washer onto the faucet stem. The chrome plate, rubber washer and faucet body are installed above sink or countertop. 5. -
Page 9: Installing The Membrane Into Its Housing
Installation Instructions (continued): 5. Make sure the black rubber gasket is adhered to the inside wall of the clamp and place the clamp assembly over the drain pipe. Insert 3/8” black tube into the drilled hole. Tighten the clamp. CAUTION: Do not overtighten the screws, it may crack the clamp. CAUTION: The black 3/8”... -
Page 10: Installing The Filter Cartridges And Filter Housing Assembly
Figure 10. upright during assembly for maximum RO Membrane Housing performance. Mounting Bracket VRO-3U: 1. Insert a Carbon Block Filter into the 1st filter housing bowl which is the one on the water inlet side (red Water Water Rubber O-Rings... -
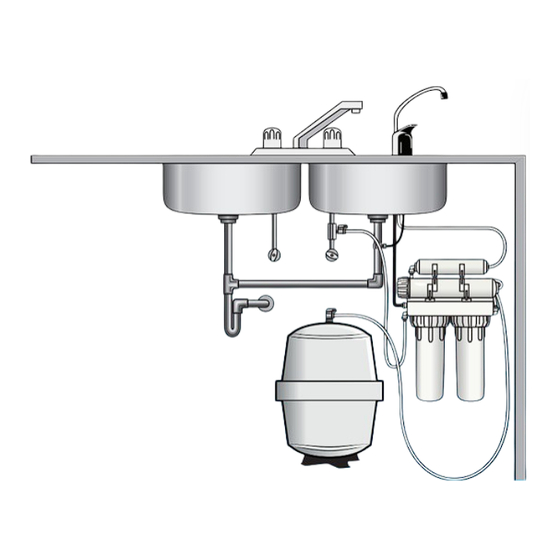
Page 11: Mounting Ro Unit Under Sink
2” of clearance is required underneath the filter housings. 2. Install mounting screws at least 15” from cabinet floor. Leave 1/4” space between the head of the screw and the wall to slip bracket onto the screws. System Dimensions: Model: VRO-3U Model: VRO-4U 15” 15”... -
Page 12: Connecting The Water Lines
Installation Instructions (continued): Connecting the Tubes CAUTION: Before cutting the supplied tubing measure the distance between the components. All tubing is colour-coded for ease of installation. ¼” Black - Connects the waste water from the RO membrane to the Air Gap faucet intake line. ¼”... -
Page 13: Start-Up Instructions
Model # Stage 1 Stage 2 Stage 3 Stage 4 5 micron Carbon 5 micron Block RO Membrane Carbon Block VRO-3U Filter Part # Part # VRFU-RO Filter Part # VRFU-CTO VRFU-CTO 5 micron Carbon 5 micron Sediment Inline Carbon Block... - Page 14 NOTE: Before re-installing the filter bowls back on the system, check O-rings to make sure they still are in place. For Model VRO-3U: 1. Insert a new Carbon Block filter (white end cap and plastic netting) into the 1st filter housing which is the one on the water inlet side of the RO system and re-install housings to the head.
-
Page 15: Annual System Maintenance
6. Open the membrane housing and re-install the RO membrane while making sure not to kink the O-rings. (Refer to Membrane Replacement Section). For Model VRO-3U: 1. Remove filter housings at stages 1 and 3 and empty the water. 2. Insert a new Carbon Block filter (white end cap and plastic netting) into the 1st filter housing which is the one on the water inlet side of the RO system and re-install housing to the head. -
Page 16: Ro Membrane Replacement
RO Membrane Replacement: The membrane has a life expectancy between 24 to 36 months, depending on the incoming water conditions and the amount of the water the system is used. The reverse osmosis membrane is critical for effective reduction of claims. The product water should be tested periodically to verify that the system is performing satisfactorily. -
Page 17: Check Air Pressure In Storage Tank
Inline Post Carbon Filter Replacement (continued): Removing the Expired Inline Post Carbon Filter: 1. Remove the blue horseshoe securing the ¼” blue tubing in the quick connect on the old inline post carbon filter. Then disconnect the blue tubing by pushing in the collet and pulling out the blue tubing. -
Page 18: Troubleshooting Guide For Ro Systems
Troubleshooting Guide for the RO Systems: Problem Possible Cause Solution It’s a normal occurrence during initial start-up of the system. Milky coloured water Air in system This milky colour will disappear during normal use within 1 to 2 weeks Air gap of faucet Inherent sound with an air-gap faucet Noise from faucet Location of drain saddle... -
Page 19: Performance Data
Performance Data: Reverse Osmosis Drinking Water System Model: VRO-3U and VRO-4U The system must be installed and operated in accordance with manufacturer’s recommended procedures and guidelines. Failure to follow the instructions may result in the leakage, malfunction and will void warranty. - Page 20 Performance Data Sheet: The VRO-3U has been tested and certified by NSF International according to NSF/ANSI 42 and 58 and the VRO-4U has been tested and certified by NSF International according to NSF/ANSI 58 for the reduction of the substances listed below.
-
Page 21: Replacement Parts List
Replacement Parts List: VRO-3U Part Description Part # Part Description Part # Storage Tank YY.VRO3U-1 RO membrane VRFU-RO Tank Ball Valve YY.VRO3U-2 1/4" QC Elbow, Plug-in YY.VRO3U-20 6’ of 1/4" Yellow Tubing YY.VRO3U-3 1/4" QC Elbow YY.VRO3U-21 Saddle Drain Clamp Set YY.VRO3U-4... - Page 22 Replacement Parts List: VRO-4U Part Description Part # Part Description Part # Storage Tank YY.VRO4U-1 Big O-ring, RO Sump YY.VRO4U-20 Tank Ball Valve YY.VRO4U-2 Cap, RO Sump YY.VRO4U-21 6’ of 1/4" Yellow Tubing YY.VRO4U-3 1/4" QC Elbow YY.VRO4U-22 Saddle Drain Clamp Set YY.VRO4U-4 Mounting Screw, Filter Head YY.VRO4U-23...
-
Page 23: Warranty
Warranty: Limited Warranty: This limited warranty is extended to the original retail purchaser of this filtration system and warrants against any defect in material and workmanship for a period of one (1) year from the date of retail sale. GHP Group, Inc., at its option, will either provide replacement parts or replace the unit, when properly returned to the retailer where purchased or one of our service centers as directed by GHP Group, Inc., within one (1) year of retail purchase.
Need help?
Do you have a question about the VRO-3U and is the answer not in the manual?
Questions and answers