
Related Manuals for Relassy NV4000

Summary of Contents for Relassy NV4000
- Page 1 NIGHT VISION BINOCULARS USER MANUAL 24 Hours Service Email: service-eu@relassy.com...
-
Page 2: Table Of Contents
Table Of Contents Table Of Contents Introduction Product Overview Power Supply Adjustment Mode MENU Function 9-10 LCD Display Information 11-13 Download Files To The PC Tips & Warnings 15-16 Manual en Español Descripción del Producto Fuente de Alimentación Modo de Ajuste 20-22 MENÚ... -
Page 3: Introduction
Introduction Introduction Thank you for purchasing the Relassy Night Vision Binoculars. This manual will help you optimize your viewing experience by explaining how to utilize the binoculars’ controls and features, and how to care for them. Read the instructions carefully before using your night vision binoculars. -
Page 4: Product Overview
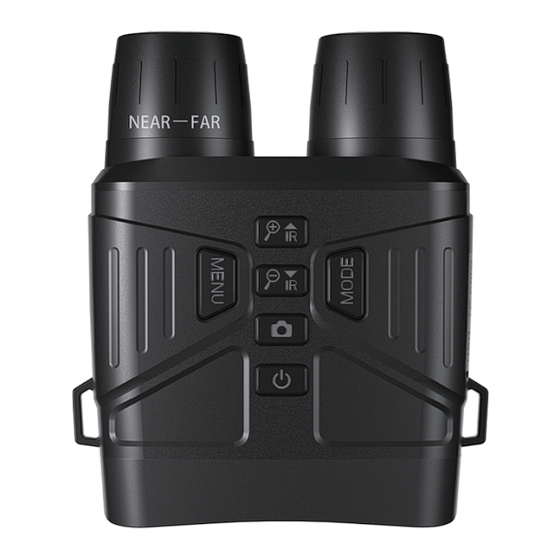
Product Overview 1. Lens 7. Power ON/OFF 2. Manual Focus Wheel 8. OK/Shoot Button 3. TF Slot 9. IR Down/Zoom Out/Down Button 4. USB Port 10. IR Up/Zoom In/Up Button 5. Menu Button/Return Button 11. Infrared Illuminator 6. Mode Button 12. -
Page 5: Power Supply
Power Supply Power Supply Relassy night vision binoculars have a built-in 4000mAh lithium battery, which can be used for up to 5 hours in night mode. Equipped with a charging cable with indicator light, you can directly observe whether the product is fully charged. (Red means charging, Green... -
Page 6: Adjustment Mode
Adjustment Mode Adjustment Mode The night vision binoculars have 3 modes and you can switch between them by pressing the button. Photo Mode Take photo Video Mode Video recording Playback Mode Play back pictures/video Photo Mode 1. The default is video mode after power on, please press the button to switch to photo mode. - Page 7 Adjustment Mode 2. Deleting Stored Videos and Photos: In playback mode, press the button. You can use the button to select to delete/lock the image you are viewing from the micro SD card, then press to delete/lock the image. Poor Image 1.
- Page 8 Adjustment Mode 3. There is no sound when the video is played back because the observation distance is long, the sound can not spread over a long distance. 4. On Photo / Video mode, if you need to observe the darker environment, press the button to turn on the infrared lamp, the image will become black and white, by pressing the...
-
Page 9: Menu Function
MENU Function Video: Resolution 4K/2K/1088P/1080P/720P/VGA/QVGA Loop recording OFF/1Minute/3Minutes/5Minutes/10Minutes OFF/ON Motion Detection OFF/ON Date Stamp OFF/ON Picture: 36MP/32MP/30MP/24MP/20MP/16MP/12MP/ Resolution 10MP/8MP/5MP/3MP/VGA Image Quality Fine/Normal/Economy Sharpness Strong/Normal/Soft White Balance Auto/Daylight/Cloudy/Tungsten/Fluorescent Anti-Shaking OFF/ON Quick Review OFF/2S/5S Date Stamp OFF/Date/Date Time Auto/100/200/400/800... - Page 10 MENU Function Settings: Date/Time YY/MM/DD 00:00:00 OFF/1Minute/2Minutes/3Minutes/5Minutes/ Auto Power Off 10Minutes Simple Chinese/Traditional Chinese/English/ Language Japan/Italy/France/Germany/Russia/Spain/Portugal Frequency 50HZ/60HZ Exposure +1/3 +0.0 -1/3 -2/3 -1.0 -4/3 -5/3 -2.0 Screen Save OFF/1Minute/3Minutes/5Minutes/10minutes Format TF Card (Delete All Files) Default Setting Cancel/OK...
-
Page 11: Lcd Display Information
LCD Display Information The Screen Display In Video Mode 1. Recording Mode Icon 2. Recording Time 3. Video Resolution 4. TF Card 5. Power Display 6. Recording Date 7. Zoom 8. IR Level 9. EV (Exposure) The Screen Display In Photo Mode 1. - Page 12 LCD Display Information Picture Anti-Shaking Function 1. Night vision device adjusted to 2. Press the button, then press photo mode. button to select “Anti- Shaking”, press the button to confirm. 3. Press the button to 4. When anti-shaking is enabled, select on/off, press the button the interface displays the anti-...
- Page 13 LCD Display Information Video Motion Detection 1. Night vision device adjusted to 2. Press the button, then press video mode. button to select “Motion Detection”, press the button to confirm. 3. Press the button to 4. When motion detection is select on/off, press the button enabled, the interface displays...
-
Page 14: Download Files To The Pc
Download Files To The PC Download Files To The PC There are two ways to download images from night vision memory cards to a computer. Use TF card reader 1. Pop up the TF card from the machine and insert the card reader to connect to the computer. -
Page 15: Tips & Warnings
Tips & Warnings Tips The device can not be activated. Please charge the device first, connect the USB to a DC 5V adapter or power bank, and then try to turn it on. Focusing the image. Target the object you would like to view and turn the object-focusing knob until the image on the screen comes sharp and clear. - Page 16 1. Whether or not the infrared light (IR) is turned ON, the device cannot observe objects through window glass. 2. Do not use the Relassy binoculars in water as it will damage the device and the damage will not be covered by the warranty.
-
Page 17: Manual En Español
Instrucciones en Español Instrucciones Gracias por comprar los binoculares de visión nocturna Relassy. Este manual lo ayudará a optimizar su experiencia de visualización al explicar cómo utilizar los controles y funciones de los binoculares y cómo cuidarlos. Lea las instrucciones cuidadosamente antes de usar sus binoculares de visión nocturna. -
Page 18: Descripción Del Producto
Descripción del Producto 1. Lente 7. Encendido/apagado 2. Rueda de enfoque manual 8. Botón Aceptar/Disparar 3. Ranura TF 9. Botón IR Abajo/Alejar/Abajo 4. Puerto USB 10. Botón IR Arriba/Acercar Zoom/Arriba 5. Botón de menú/botón de 11. Iluminador infrarrojo retorno 12. Pantalla/Ocular de 6,5 cm 6. -
Page 19: Fuente De Alimentación
Fuente de alimentación Fuente de alimentación I binocoli Relassy per la visione notturna hanno una batteria al litio integrata da 4000 mAh, che può essere utilizzata fino a 5 ore in modalità notturna. Dotato di un cavo di ricarica con spia luminosa, puoi osservare direttamente se il prodotto è... -
Page 20: Modo De Ajuste
Modo de Ajuste Modo de ajuste Los binoculares de visión nocturna tienen 3 modos y puede cambiar entre ellos presionando el botón 【MENU】. Foto Modus Foto machen Video Modus Videoaufnahme Wiedergabe Modus Bild/Video wiedergeben Modo foto 1. El modo predeterminado es el modo de video después de encender, presione el botón para cambiar al modo de fotografía. - Page 21 Modo de Ajuste 2. Eliminación de videos y fotos almacenados: en el modo de reproducción, presione el botón 【MENU】. Puede usar el botón para seleccionar borrar/bloquear la imagen que está viendo desde la tarjeta micro SD, luego presione para borrar/bloquear la imagen.
- Page 22 Modo de Ajuste Función de cámara de visión nocturna IR-LED 1. Función de cámara de visión nocturna IR-LED. 2. Con respecto al enfoque manual: la lente de la máquina está marcada con "←" y "→". De acuerdo con la distancia objetivo observada, gire la lente hacia la izquierda o hacia la derecha.
-
Page 23: Menú Función
MENÚ Función Video: Resolución 4K/2K/1088P/1080P/720P/VGA/QVGA APAGADO/1 Minuto/3 Minutos/5 Minutos Grabación en bucle /10 Minutos OFF/ON Detección de movimiento OFF/ON Sello de la fecha OFF/ON Imagen: 36MP/32MP/30MP/24MP/20MP/16MP/ Resolución 12MP/10MP/8MP/5MP/3MP/VGA Calidad de la imagen Fina / Normal / Economía Nitidez Fuerte/Normal/Suave Automático / Luz del día / Nublado / Balance de Blancos Tungsteno / Fluorescente Revisión Rápida... - Page 24 MENÚ Función Ajustes: Fecha y Hora YY/MM/DD 00:00:00 Apagado APAGADO/1 Minuto/2 Minutos/3 Minutos/ automático 5 Minutos/10 Minutos Simple Chinese/Traditional Chinese/English/ Idioma Japan/Italy/France/Germany/Russia/Spain /Portugal Frecuencia 50HZ/60HZ Exposición +1/3 +0.0 -1/3 -2/3 -1.0 -4/3 -5/3 -2.0 Guardar OFF/1 minuto/3 minutos/5 minutos Pantalla /10 minutos Formato Tarjeta TF (Eliminar todos los archivos)
-
Page 25: Información De La Pantalla Lcd
Información de la pantalla LCD La visualización de la pantalla en el modo de vídeo 1. Icono de modo de grabación 2. Tiempo de grabación 3. Resolución de vídeo 4. Tarjeta TF 5. Pantalla de potencia 6. Fecha de grabación 7. - Page 26 Información de la pantalla LCD Función antivibración de imagen 1. Dispositivo de visión nocturna 2. Presione el botón [MENU], luego ajustado al modo foto. presione el botón para seleccionar “Anti-Shaking”, presione el botón para confirmar. 4. Cuando la antivibración está 3.
- Page 27 Información de la pantalla LCD Detección de movimiento de vídeo 1. Dispositivo de visión nocturna 2. Presione el botón del icono ( configurado en modo video. MENU ), luego presione el botón para seleccionar "Detección de movimiento", presione el botón para confirmar.
-
Page 28: Descargar Archivos A La Pc
Descargar Archivos A La PC Descargar Archivos A La PC Hay dos formas de descargar imágenes de visión nocturna tarjetas de memoria a una computadora. Usar lector de tarjetas TF 1. Levante la tarjeta TF de la máquina e inserte el lector de tarjetas para conectarse a la computadora. -
Page 29: Consejos Y Advertencias
Consejos y Advertencias Consejos El dispositivo no se puede activar. Si prega di caricare prima il dispositivo, collegare l'USB a un adattatore DC 5V oa un power bank, quindi provare ad accenderlo. Enfocando la imagen. Apunte al objeto que le gustaría ver y gire el enfoque de objetos perilla hasta que la imagen en la pantalla sea nítida y clara. - Page 30 1. Ya sea que la luz infrarroja (IR) esté encendida o no, el dispositivo no puede observar objetos a través del vidrio de la ventana. 2. No use los binoculares Relassy en el agua, ya que dañará el dispositivo y la garantía no cubrirá los daños.
Need help?
Do you have a question about the NV4000 and is the answer not in the manual?
Questions and answers