
Summary of Contents for Relassy NV4000
- Page 1 NIGHT VISION BINOCULARS USER MANUAL 24 Hours Service Email: service-eu@relassy.com...
-
Page 2: Table Of Contents
Table Of Contents Table Of Contents Introduction Product Overview Power Supply Adjustment Mode MENU Function 9-10 LCD Display Information 11-13 Download Files To The PC Tips & Warnings 15-16 Manuel Français Présentation du Produit Source de Courant Mode de Personnalisation 20-22 Fonction MENU 23-24... -
Page 3: Introduction
Introduction Introduction Thank you for purchasing the Relassy Night Vision Binoculars. This manual will help you optimize your viewing experience by explaining how to utilize the binoculars’ controls and features, and how to care for them. Read the instructions carefully before using your night vision binoculars. -
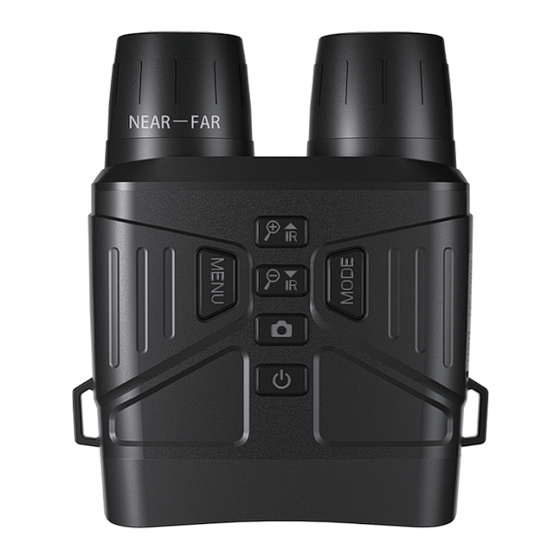
Page 4: Product Overview
Product Overview 1. Lens 7. Power ON/OFF 2. Manual Focus Wheel 8. OK/Shoot Button 3. TF Slot 9. IR Down/Zoom Out/Down Button 4. USB Port 10. IR Up/Zoom In/Up Button 5. Menu Button/Return Button 11. Infrared Illuminator 6. Mode Button 12. -
Page 5: Power Supply
Power Supply Power Supply Relassy night vision binoculars have a built-in 4000mAh lithium battery, which can be used for up to 5 hours in night mode. Equipped with a charging cable with indicator light, you can directly observe whether the product is fully charged. (Red means charging, Green... -
Page 6: Adjustment Mode
Adjustment Mode Adjustment Mode The night vision binoculars have 3 modes and you can switch between them by pressing the button. Photo Mode Take photo Video Mode Video recording Playback Mode Play back pictures/video Photo Mode 1. The default is video mode after power on, please press the button to switch to photo mode. - Page 7 Adjustment Mode 2. Deleting Stored Videos and Photos: In playback mode, press the button. You can use the button to select to delete/lock the image you are viewing from the micro SD card, then press to delete/lock the image. Poor Image 1.
- Page 8 Adjustment Mode 3. There is no sound when the video is played back because the observation distance is long, the sound can not spread over a long distance. 4. On Photo / Video mode, if you need to observe the darker environment, press the button to turn on the infrared lamp, the image will become black and white, by pressing the...
-
Page 9: Menu Function
MENU Function Video: Resolution 4K/2K/1088P/1080P/720P/VGA/QVGA Loop recording OFF/1Minute/3Minutes/5Minutes/10Minutes OFF/ON Motion Detection OFF/ON Date Stamp OFF/ON Picture: 36MP/32MP/30MP/24MP/20MP/16MP/12MP/ Resolution 10MP/8MP/5MP/3MP/VGA Image Quality Fine/Normal/Economy Sharpness Strong/Normal/Soft White Balance Auto/Daylight/Cloudy/Tungsten/Fluorescent Anti-Shaking OFF/ON Quick Review OFF/2S/5S Date Stamp OFF/Date/Date Time Auto/100/200/400/800... - Page 10 MENU Function Settings: Date/Time YY/MM/DD 00:00:00 OFF/1Minute/2Minutes/3Minutes/5Minutes/ Auto Power Off 10Minutes Simple Chinese/Traditional Chinese/English/ Language Japan/Italy/France/Germany/Russia/Spain/Portugal Frequency 50HZ/60HZ Exposure +1/3 +0.0 -1/3 -2/3 -1.0 -4/3 -5/3 -2.0 Screen Save OFF/1Minute/3Minutes/5Minutes/10minutes Format TF Card (Delete All Files) Default Setting Cancel/OK...
-
Page 11: Lcd Display Information
LCD Display Information The Screen Display In Video Mode 1. Recording Mode Icon 2. Recording Time 3. Video Resolution 4. TF Card 5. Power Display 6. Recording Date 7. Zoom 8. IR Level 9. EV (Exposure) The Screen Display In Photo Mode 1. - Page 12 LCD Display Information Picture Anti-Shaking Function 1. Night vision device adjusted to 2. Press the button, then press photo mode. button to select “Anti- Shaking”, press the button to confirm. 3. Press the button to 4. When anti-shaking is enabled, select on/off, press the button the interface displays the anti-...
- Page 13 LCD Display Information Video Motion Detection 1. Night vision device adjusted to 2. Press the button, then press video mode. button to select “Motion Detection”, press the button to confirm. 3. Press the button to 4. When motion detection is select on/off, press the button enabled, the interface displays...
-
Page 14: Download Files To The Pc
Download Files To The PC Download Files To The PC There are two ways to download images from night vision memory cards to a computer. Use TF card reader 1. Pop up the TF card from the machine and insert the card reader to connect to the computer. -
Page 15: Tips & Warnings
Tips & Warnings Tips The device can not be activated. Please charge the device first, connect the USB to a DC 5V adapter or power bank, and then try to turn it on. Focusing the image. Target the object you would like to view and turn the object-focusing knob until the image on the screen comes sharp and clear. - Page 16 1. Whether or not the infrared light (IR) is turned ON, the device cannot observe objects through window glass. 2. Do not use the Relassy binoculars in water as it will damage the device and the damage will not be covered by the warranty.
-
Page 17: Manuel Français
Manuel Français Introduction Merci d'avoir acheté les jumelles de vision nocturne Relassy. Ce manuel vous aidera à optimiser votre expérience visuelle en vous expliquant comment utiliser les commandes et les fonctions de vos jumelles et comment en prendre soin. Veuillez lire attentivement les instructions avant d'utiliser vos jumelles de vision nocturne. -
Page 18: Présentation Du Produit
Présentation du Produit 1. Lentille 7. Marche/Arrêt 2. Molette de mise au point 8. Bouton OK/Prise de vue manuelle 9. Bouton IR bas/zoom arrière/bas 3. Fente TF 10. Bouton IR haut/zoom avant/haut 4. Prise USB 11. Illuminateur infrarouge 5. Bouton Menu/Bouton Retour 12. -
Page 19: Source De Courant
Source de Courant Source de courant Les jumelles de vision nocturne Relassy ont une batterie au lithium intégrée de 4000 mAh, qui peut être utilisée jusqu'à 5 heures en mode nuit. Équipé d'un câble de charge avec voyant lumineux, vous pouvez observer directement si le produit est complètement chargé. -
Page 20: Mode De Personnalisation
Mode de Réglage Mode de réglage Les jumelles de vision nocturne ont 3 modes et vous pouvez basculer entre eux en appuyant sur le bouton【MENU】. Foto Modus Foto machen Video Modus Videoaufnahme Wiedergabe Modus Bild/Video wiedergeben Mode photos 1. Le mode vidéo par défaut après la mise sous tension, veuillez appuyer sur le bouton pour passer en mode photo. - Page 21 Mode de Réglage 2. Suppression de vidéos et de photos stockées : En mode lecture, appuyez sur le bouton 【MENU】. Vous pouvez utiliser le bouton pour supprimer/verrouiller l'image que vous visualisez depuis la carte micro SD, puis appuyez sur pour supprimer/verrouiller l'image.
- Page 22 Modalità di Regolazione Fonction de Caméra de Vision Nocturne IR-LED 1. Fonction de caméra de vision nocturne IR-LED. 2. Concernant la mise au point manuelle : l'objectif de la machine est marqué "←" et "→ ". En fonction de la distance cible observée, veuillez faire pivoter l'objectif vers la gauche/droite.
-
Page 23: Fonction Menu
Fonction MENU Vidéo: Résolution 4K/2K/1088P/1080P/720P/VGA/QVGA Enregistrement en boucle OFF/1Minute/3Minutes/5Minutes/10Minutes OFF/ON Détection de mouvement OFF/ON Timbre dateur OFF/ON Image: 36MP/32MP/30MP/24MP/20MP/16MP/ Résolution 12MP/10MP/8MP/5MP/3MP/VGA Qualité d'image Fin/Normal/Economique Acuité Fort/Normal/Doux Auto/Lumière du jour/Nuageux/Tungstène Balance des blancs /Fluorescent Anti-Scuotimento OFF/ON Recensione Veloce OFF/2S/5S Il Timbro Della Data ARRÊT/Date/Date Heure Auto/100/200/400/800... - Page 24 Fonction MENU Réglages: Date/Heure YY/MM/DD 00:00:00 Arrêt OFF/1Minute/2Minutes/3Minutes/5Minutes/ automatique 10Minutes Simple Chinese/Traditional Chinese/ Langue English/Japan/Italy/France/Germany/ Russia/Spain/Portugal La fréquence 50HZ/60HZ Exposition +1/3 +0.0 -1/3 -2/3 -1.0 -4/3 -5/3 -2.0 Sauvegarde OFF/1Minute/3Minutes/5Minutes/10minutes d'écran Format Carte TF (supprimer tous les fichiers) Paramètres Annuler/OK par défaut...
-
Page 25: Informations Sur L'écran Lcd
Informations sur l'écran LCD The Screen Display In Video Mode 1. Recording Mode Icon 2. Recording Time 3. Video Resolution 4. TF Card 5. Power Display 6. Recording Date 7. Zoom 8. IR Level 9. EV (Exposure) The Screen Display In Photo Mode The Screen Display In Photo Mode 1. - Page 26 Informazioni sul display LCD Fonction anti-tremblement d'image 1. Dispositivo di visione notturna 2. Appuyez sur le bouton [MENU ], regolato in modalità foto. puis appuyez sur le bouton pour sélectionner "Anti-Shaking", appuyez sur le bouton pour confirmer. 4. Lorsque l'anti-tremblement est 3.
- Page 27 Informations sur l'écran LCD Détection de mouvement vidéo 1. Appareil de vision nocturne réglé 2. Appuyez sur le bouton icône ( en mode vidéo. MENU ), puis appuyez sur le bouton pour sélectionner "Détection de mouvement", appuyez sur le bouton pour confirmer.
-
Page 28: Télécharger Des Fichiers Sur Le Pc
Télécharger des Fichiers sur le PC Télécharger des Fichiers sur le PC Il existe deux façons de télécharger des images à partir de la vision nocturnecartes mémoire à un ordinateur. Utiliser le lecteur de carte TF 1. Ouvrez la carte TF de la machine et insérez le lecteur de carte pour se connecter à... -
Page 29: Conseils Et Avertissements
Conseils et EvertissementsConseils Conseils L'appareil ne peut pas être activé. Veuillez d'abord charger l'appareil, connectez l'USB à un adaptateur DC 5V ou à une banque d'alimentation, puis essayez de l'allumer. Mise au point de l'image. Ciblez l'objet que vous souhaitez voir et tournez la mise au point sur l'objet jusqu'à... - Page 30 1. Que la lumière infrarouge (IR) soit allumée ou non, l'appareil ne peut pas observer des objets à travers une vitre. 2. N'utilisez pas les jumelles Relassy dans l'eau car cela endommagera l'appareil et les dommages ne seront pas couverts par la garantie.
Need help?
Do you have a question about the NV4000 and is the answer not in the manual?
Questions and answers