Table of Contents
Advertisement
Quick Links
Advertisement
Table of Contents

Related Manuals for Retrotec DM32X


Summary of Contents for Retrotec DM32X
- Page 1 Pressure Gauge Operation Manual For Model DM32X...
- Page 2 Made by Retrotec 1060 East Pole Road Everson, WA USA 98247 For support: Call 1 (888) 330-1345 in USA +1 (360) 738-9835 outside USA support@retrotec.com or Fax +1 (360) 647-7724 Page 2 of 80 © Retrotec 2022...
- Page 3 Retrotec makes no warranties with respect to this documentation and disclaims any implied warranties of merchantability, quality, or fitness for any particular purpose. The information in this document is subject to change without notice. Retrotec reserves the right to revise this publication without obligation to notify any person or entity of any such changes.
-
Page 4: Table Of Contents
Charge the battery in the gauge ..................... 10 Power the gauge on and off ......................11 Read Results and control the gauge from the DM32X Gauge App Home screen ......11 Observe icons to monitor gauge status ..................12 2.5.1. - Page 5 4.10 Reset gauge ............................ 35 5. Remotely run tests and save results with Retrotec software ......36 Connect single gauge to a computer with Ethernet cable ............. 36 Connect multiple gauges to a computer via WiFi Hotspot, USB Tethering, or Bluetooth® ... 37 Connect computer or phone to the DM32X “WiFi”...
- Page 6 Appendix F: Tables to correct Flow if range selected did not match the installed range ........................75 Appendix G: Measure Supply or Exhaust flow with a gauge and box ....76 Glossary ....................... 78 Page 6 of 80 © Retrotec 2022...
-
Page 7: Important Equipment-Related Safeguards
Important equipment-related safeguards Read and save these instructions When using electrical appliances, basic safety precautions should always be followed. If Retrotec equipment is used in a manner that does not follow the information provided in this manual, safety to the operator and equipment performance may be impaired. -
Page 8: Introducing The Retrotec Dm32X Digital Gauge
While still keeping your favorite DM32 features such as an ergonomic design and color-coded ports, we have now re-engineered it with all new technology, features, and abilities. Meet the DM32X: air tightness testing and building diagnostics will never be the same again. This refreshing new testing experience will open new doors and extend your diagnostic abilities. -
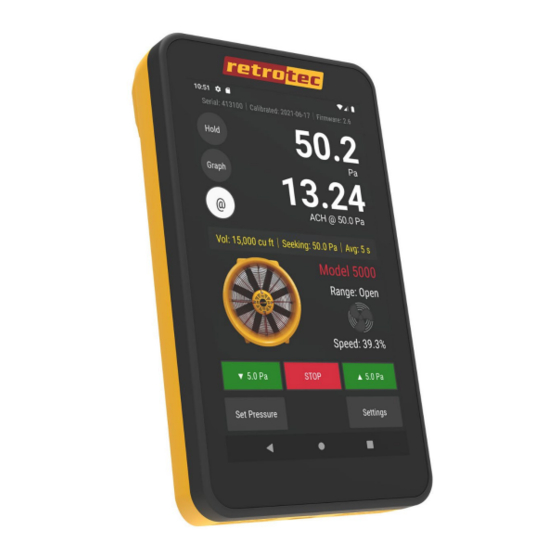
Page 9: Gauge Overview
Pressure tube ports on the top of the gauge are color-coded to distinguish where pressure tubes are connected. Retrotec has a specially designed pressure tube port that grips pressure tubes well, but releases them without tearing after long-term use. This exclusive connector is designed by Retrotec to make contact with both the tube internally and externally with a shallow taper. -
Page 10: Charge The Battery In The Gauge
With the AC adapter, a full charge will be completed in about four hours. A fully charged gauge will last for approximately 8 hours without a recharge. For details see 2.5.5 DM32X charging port When connected to the computer USB port, the gauge still discharges very slowly. Connection to the computer USB is just a way to extend the time available on a charge, so that you can run longer tests if you have a computer nearby. -
Page 11: Power The Gauge On And Off
Read Results and control the gauge from the DM32X Gauge App Home screen The DM32X Gauge App Home Screen is the main display that allows a user to control the gauge. The gauge includes convenience functions to support operation of pressure measurement systems with calibrated fans, and calculate results for air leakage testing. -
Page 12: Observe Icons To Monitor Gauge Status
Readings are averaged over. 1 second Time Averaging is shown in 7. Regardless of the time averaging setting, the display will update every second. Time Averaging periods of 1s, 5s, 10s, 30s can be selected directly, or another time to spend averaging can be entered manually. Page 12 of 80 © Retrotec 2022... -
Page 13: Result Display Can Be Frozen To Write Down Values
The [Channel A] display always shows the pressure difference between the blue pressure port “input A” and the red pressure port “ref A”. If the pressure tubes are connected as illustrated in Retrotec’s Door Fan Operation manual, [Channel A] shows the building pressure. -
Page 14: Channel B] Pressure Reading Or Result
The [Channel B] display can show the pressure difference between the yellow pressure port “ref B” and the green pressure port “input B”. If the pressure tubes are connected as illustrated in Retrotec’s Door Fan Operation manual, [Channel B] shows the Fan Pressure. - Page 15 TEC fan, in line with the Speed Control cable as shown in the image below. The Minneapolis fan speed control must have the cruise input. Connecting the pressure tubing to your TEC fan as described in Retrotec literature allows the gauge to correctly calculate results.
-
Page 16: Estimate Results With [@ Pressure]
[Channel A] is close to the target pressure. As a rule of thumb, extrapolation can be used if the actual enclosure pressure reaches at least 80% of the target pressure. If 80% cannot be reached, more fans are needed to complete the test (See Retrotec’s Manual for Large Building Multi Family Testing). -
Page 17: Setting "N Value" For @Pressure Extrapolation
[Settings][…] [Ducts=0.6, House=0.65]. Set it to 0.65 for houses, and 0.60 for ductwork. Set to 0.5 for tests using the Retrotec House or duct simulator, air handler flow and any large hole that is not composed of long thin cracks. -
Page 18: Get Results Directly From The Gauge
Refer to section 2.1 which describes the connection ports from the gauge to a device such as a Retrotec calibrated fan. The connections for pressure tubing between a DM32X and a device are the same as the connections between a DM32X gauge and that device. -
Page 19: Tap [Range/Device] [Change Device] To Change Device In Use
Change Device in use 3.3.3. Tap [Set Speed] to run the fan at a particular speed The gauge can automatically control the fan speed on Retrotec systems to achieve a specific fan speed, entered by the user. Set gauge speed control output... -
Page 20: Tap [Jog] Keys To Adjust Speed Up Or Down Incrementally
The gauge can achieve a target enclosure pressure entered by the user. The gauge controls pressure by automatically adjusting the speed control output based on the pressure reading on Channel A. Retrotec fans can be controlled directly from the gauge. -
Page 21: Tap [Area] Or [Volume] To Enter Dimension For Particular Results
Set gauge to achieve target pressure Fans manufactured by TEC can also be controlled if the optional Retrotec-TEC speed control Adapter is connected between the gauge and the TEC fan as shown in the image below. Pressure tubing needs to be attached to the gauge using the Retrotec conventions described in the Retrotec literature. -
Page 22: Tap "Hold" To Hold Readings And Results
[Channel B] acts as a key, so by tapping it you can change the Result to be displayed at [Channel B]. The Result to be displayed can also be changed by tapping on [Settings]. Page 22 of 80 © Retrotec 2022... -
Page 23: Tap [@ Pressure] To Estimate Result At A Different Pressure
If setting target pressure to zero, then the gauge does not allow @ pressure extrapolation to be used. For mathematical details on @Pressure extrapolation, see Appendix D. For practical information on extrapolation, see 2.6.4. Page 23 of 80 © Retrotec 2022... - Page 24 Tapping [@ Pressure] so that it “is On” extrapolates the [Channel B] Result to the [Set Pressure] target entered, using the “n” value specified in the second “Settings” screen. Tapping a [Jog] key so that target pressure changes causes the “@ Pressure” label to change as • well. Page 24 of 80 © Retrotec 2022...
- Page 25 Tapping [@ Pressure] so that it “is Off” will turn extrapolation off. Tapping [STOP] will also turn extrapolation off and make it unavailable, as long as “HOLD!” is not • being used to freeze the Result display. Page 25 of 80 © Retrotec 2022...
-
Page 26: Change [Settings] For Gauge Operating Parameters
1. Tap and record a sampling [Settings] [Baseline Pressure] 2. Record a sample for 30 to 60 seconds. The displayed Baseline pressure is now subtracted from all future readings on [Channel A] Page 26 of 80 © Retrotec 2022... -
Page 27: Set [Area] If Using A Result Per Area
The key on the “Settings” menu operates exactly the same as the [Area] key on the Home screen, but allows the user to enter the area without changing the “Result to be displayed” to one of the normalized or permeability results to make the Home screen [Area] key appear. Page 27 of 80 © Retrotec 2022... -
Page 28: Set [Volume] If Using Ach
Hour). The [Volume] key will appear on the Home screen if ACH is chosen as the “Result to be displayed”. Set the [Volume] needed for ACH Result from Home screen The [Volume] key on the “Settings” menu provides another way to enter the volume of the enclosure or building under test. Page 28 of 80 © Retrotec 2022... -
Page 29: Use Metric Units For Dimensions
Set [Area] using metric units when Display units are in metric The choice of metric or imperial for “Volume” units follows the last chosen “Flow” or other Result using area. Page 29 of 80 © Retrotec 2022... -
Page 30: Set The [Default @ Pressure]
If the [Set Speed] function is used and @Pressure “is On”, the [Default @ Pressure] that is chosen with this Setting will be the reference pressure for the Result displayed on [Channel B] that is extrapolated and displayed (see section 3.3.10) Page 30 of 80 © Retrotec 2022... - Page 31 Set the default @ pressure to be used as extrapolation pressure during set speed operation Page 31 of 80 © Retrotec 2022...
-
Page 32: Set [Time Averaging] Period
Time averaging of 1s, 5s, 10s, 30s can be selected directly, or another value for time averaging (in seconds) can be entered manually. For details on time averaging, see section 2.5.2. Change time averaging depending on wind conditions Page 32 of 80 © Retrotec 2022... -
Page 33: Change Result And Units To Be Displayed
2. Tap any other Result to select it for display on [Channel B]. The “Display Result” can also be changed by tapping the [Channel B] display on the Home screen (See section 3.3.9). Tap [Settings] to change Result being displayed Page 33 of 80 © Retrotec 2022... -
Page 34: Set Up Ethernet Connection
Set up Ethernet connection 1. From the DM32X Main Home screen, swipe upwards starting at the bottom right of the screen 2. Tap the [Ethernet] App & Enable. Activate Ethernet for Network connection View and update the [Firmware] version, check serial number Firmware is the underlying software installed on the gauge. -
Page 35: Reset Gauge
A computer with Retrotec’s “DM32X Configurator” software installed is required to update the firmware version on the gauge. For instructions, see Retrotec’s DM32X Software Configurator at https://retrotec.com/software.html. 4.10 Reset gauge If the touchscreen is frozen or your gauge is not functioning as normal, you can reset your gauge. Press the Power button on the righthand side of the gauge. -
Page 36: Remotely Run Tests And Save Results With Retrotec Software
Virtual Gauge software Connect single gauge to a computer with Ethernet cable The USB-C charging cable doubles as a way to connect your DM32X to a computer and setup a “Wired” Network. USB-C Cable acts as the connection to setup a “Wired” Connection Page 36 of 80 ©... -
Page 37: Connect Multiple Gauges To A Computer Via Wifi Hotspot, Usb Tethering, Or Bluetooth
There are three options when connecting multiple gauges to a computer: Wifi, Bluetooth®, or Wired. Navigating to all options happen in a similar manner. Swipe down from the DM32X Main Home Screen. You will see a white bar (image below); swipe down again here. Hit the “Settings” wheel icon. Select “Network &... - Page 38 The Retrotec GaugeRemote App runs on Android and iOS phones and can connect to the DM32X WiFi hotspot and control the gauge. Details of the GaugeRemote App are found in the DM32 WiFi GaugeRemote manual. Similarly a PC can connect to the WiFi hotspot being generated by the DM32 and, if running the Virtual Gauge or Data Logger software or FanTestic, can control and monitor the gauge.
-
Page 39: Make The Dm32X Join An Existing "Wifi" Network
Make the DM32X join an existing “WiFi” network Another possibility for the operation of the WiFi is to have the DM32X connect to the same wireless network to which the computer is connected, described here as “WiFi-Join”. This connection requires a router or hotspot separately generated to which both the computer and DM32X can connect. - Page 40 In some markets, rCloud will provide existing housing data. Simply setup your equipment and open the rCloud app on the DM32X. Visit https://retrotec.com/rcloud.html for full information on how to use rCloud.
-
Page 41: Firmware Updates & Embedded Resources
New features are occasionally released for the gauge, in the same way that new features are released for your smartphone. Updates can be pushed live by Retrotec, however, you can also check for updates using the DM32X Configurator Software. To check for updates, you must use the DM32X Configurator software on a computer connected to the Internet. -
Page 42: Rresources App
USB. rResources App The rResources App is pre-installed app on the DM32X gauge. The app is found from the Main Home Screen, placed next to the Main Gauge App and the rCloud App. - Page 43 QuickGuides serve as a shortened version of a manual and outline the essential steps of setting up a test. The documented versions of each QuickGuide are found under the QuickGuides section. Additional QuickGuides are found at www.retrotec.com. Refer to the Videos section of rResouces for QuickClips (a video version of QuickGuides).
- Page 44 Manuals Manuals, such as the one currently reading, serve as a more in-depth user guide for each product. Retrotec Manuals are also embedded into the rResources App and found under the Manuals section. A full list of Manuals is also found at www.retrotec.com.
-
Page 45: Verify Your Gauge Accuracy Between Factory Calibrations
7. Verify your gauge accuracy between factory calibrations Recommended calibration interval for the DM32X is 5 years. The question is when did the gauge go out of calibration? Last week or last year? What is needed is a quick field check to check your gauge regularly and before any important test. - Page 46 Gauge field check configuration: Cross port check, input ports (left) and reference ports (right) To perform a cross port check 1. Set both channels to measure pressure in Pascals (Pa). Page 46 of 80 © Retrotec 2022...
- Page 47 When performing a gauge calibration with two gauges, if one gauge is known to be calibrated accurately, it can be used as a reference for the second gauge. In that case, the measured pressure on the tested gauge should be within 2% of the measured pressure on the calibrated gauge. Page 47 of 80 © Retrotec 2022...
-
Page 48: What To Do If You Have Trouble With The Gauge
If the results just don't make sense, check to make sure the “Range” and “Device” selected on the gauge are the same as the Range and Device being used. Each Device and Range configuration has its own Page 48 of 80 © Retrotec 2022... -
Page 49: Moving Tubes Might Cause Fluctuating Pressure Readings
3. Move across the row and record the flow value beneath the column heading with the actual Range that was used. Note: Retrotec 1000, 2000 and 3000 series fans have the same flow curves. Moving tubes might cause fluctuating pressure readings If the measured values on Channel A or B are fluctuating back and forth, in a way that doesn't correspond with any of the current testing conditions, it's possible that the pressure tube is moving. -
Page 50: Pressure Can Overshoot When Using The Set Pressure Key
For an example using a 1000 fan, set Device to 1000, range to C1, time averaging to 10 seconds. Set the leakage area on an enclosure by adjusting the size of the hole. When using the Retrotec simulator, use the sliding panels to adjust the size of the hole. -
Page 51: Check If Large Fixed Errors Are Caused By Pinched Tubes
It will appear as if the fan is creating a pressure in the building, but in fact the results are way off. Particularly unusual behavior in the gauge could mean that there is water in the end of the tube. Page 51 of 80 © Retrotec 2022... -
Page 52: Check If Large Fixed Errors Are Caused By Sun Heating The Tubes
Be aware that if the fan is increasing or decreasing in speed, it will take 20 seconds at least for the gauge to register its reading. For example, if during the initial 10 seconds there was no building Page 52 of 80 © Retrotec 2022... -
Page 53: Let Time Averaging Take Effect Before Making Readings
4. Establish a Baseline pressure. 5. Notice that once a Baseline pressure is taken, the measured pressure drops closer to zero, negating the effects of the wind on the actual measured pressure. 6. Stop the fan. Page 53 of 80 © Retrotec 2022... - Page 54 7. Notice now that the measured pressure is negative, even though no pressure is being received by the gauge. With the Baseline feature still active, the gauge is compensating for a pressure that does not exist. Clear the baseline reading to eliminate this error. Page 54 of 80 © Retrotec 2022...
-
Page 55: Technical Specifications
-4,976 Pa to +4,976 Pa (-20 to +20 in W.C.) Pressure Range DM32X-4A -995 Pa to +995 Pa (-4 to +4 in W.C.) * DM32X-10A started shipping Oct 2017 * DM32X-20A started shipping Jan 2015 DM32-10A +/- 0.4% of pressure reading or +/- .07 Pa @ 22 degree (C) - Page 56 EN 300 328 V1.7.1 (2006-10) 4.3.3 Frequency Range 5.7.4 EN 300 328 V1.7.1 (2006-10) 4.3.6 Transmitter Spurious Emissions 5.7.5 EN 300 328 V1.7.1 (2006-10) 4.3.7 Receiver Spurious Emissions 5.7.6 EN 300 328 V1.7.1 (2006-10) Page 56 of 80 © Retrotec 2022...
-
Page 57: Appendix A: Understanding Pressures On The Gauge
A higher pressure on the positive (“input”) port than on the negative (“ref”) port displays a positive pressure on the gauge. Alternatively, a higher pressure on the negative (“ref”) port than on the positive (“input”) port displays a negative pressure. Measure a negative pressure Page 57 of 80 © Retrotec 2022... -
Page 58: Why Static And Fluctuating Pressures Occur, Causing Bias
Stagnation pressures are reduced by moving the outdoor pickup point about 15 feet from the building or away from any object that the wind will strike. Place the tube at ground level with a flat plate covering the Page 58 of 80 © Retrotec 2022... -
Page 59: Reduce Uncertainty In Results By Taking Lots Of Readings
1.5 Pa 1.5 Pa 10 s 8.6% 10 s 1.5 Pa 10 s 7.9% 10 s 1.5 Pa 100 s 6.5% 20 s 0.5 Pa 100 s 5.9% Page 59 of 80 © Retrotec 2022... -
Page 60: Appendix B: Flow Equations Used With Devices
The gauge can be used for testing either on its own, or connected to a specialized, calibrated fan which is identified on the gauge as a Device. Read the Retrotec Manual-Door Fan Operation which might also be called the Blower Door Operation Manual (available at Retrotec’s website) for how to properly use Blower Door Test Fans as Devices. - Page 61 FP, value in the following flow equation: ���� Where: FP is the fan pressure from Channel B displayed on gauge RP is the room pressure from Channel A displayed on gauge Case 2: Flow Toward Operator Page 61 of 80 © Retrotec 2022...
- Page 62 “B” is left as the raw measured value and does not have the [Channel A] value already subtracted. If using a raw measured value read from [Channel B] on a Retrotec gauge, use the following equation to �������� ���� ���� ������������������������ ������������������������ ���� ���� ������������ = � ( �������� − �������� ) − (�������� × ����1)�...
- Page 63 438.7000 0.000 0.4952 160.8000 0.000 0.4968 48.0800 0.000 Mn Model 4 230 V 0.5157 11.3600 0.000 0.5032 7.2460 0.000 0.5166 2.8020 0.000 0.5000 43.7300 0.000 Mn Exhaust 0.5000 20.7200 0.000 0.5000 10.0700 0.000 Page 63 of 80 © Retrotec 2022...
- Page 64 51.5800 0.000 0.0000 1.0530 Retrotec 800 / 900 0.4670 30.4200 0.000 0.0000 1.0480 0.4420 27.7100 0.000 0.0000 1.0230 0.4830 17.2600 0.000 0.0000 1.0310 0.4740 12.7100 0.000 0.0000 0.9850 0.5100 5.7700 0.000 0.0000 1.0570 Page 64 of 80 © Retrotec 2022...
-
Page 65: Appendix C: Manually Estimate Flow If Required Test Pressure Cannot Be Reached
The [@ Pressure] values should only be used if the pressure achieved is within 10 Pa of the required test pressure, unless you have measured the actual n value for the building using a multiple point test and have entered that “n” in the gauge. Page 65 of 80 © Retrotec 2022... -
Page 66: Cannot Reach 50 Pa Factors
1.88 1.10 1.94 1.12 2.02 1.14 2.10 1.16 2.19 1.18 2.29 1.20 2.40 1.22 2.53 1.24 2.68 1.26 2.85 1.28 3.05 1.31 3.29 1.34 3.59 1.36 3.97 1.39 4.47 1.42 1.46 1.49 1.53 Page 66 of 80 © Retrotec 2022... -
Page 67: Cannot Reach 25 Pa Factors
Table 7: Factors for when a building pressure of 25 Pa cannot be reached (n value of 0.6) Pressure Cannot reach achieved 25 factor 1.00 1.02 1.05 1.08 1.11 1.14 1.18 1.22 1.26 1.31 1.36 1.42 1.48 1.55 1.64 1.73 1.85 1.98 2.15 2.35 2.63 Page 67 of 80 © Retrotec 2022... -
Page 68: Appendix D: Details About The @Pressure Extrapolation Function
For example: If we guess at the n value of a duct as being 0.6 and measure 100 CFM at 20 Pa (by accident or by design), then the gauge will complete the following calculation to estimate the flow at 25 Pa: Page 68 of 80 © Retrotec 2022... -
Page 69: N Value" For @Pressure Extrapolation
[Channel A]. It can be changed by tapping [Settings][…] [Ducts=0.6, House=0.65]. Set it to 0.65 for houses, and 0.60 for ductwork. Set to 0.5 for tests using the Retrotec House or duct simulator, air handler flow and any large hole that is not composed of long thin cracks. -
Page 70: Errors Occur In Estimated Flow If Gauge And Actual "N" Don't Match
Table 8: Errors in Estimated Flow at 50 Pa if gauge "n"= 0.65 differs from actual n Actual Flow Exponent (n) of Enclosure 0.50 0.55 0.60 0.65 0.70 0.75 Achieved -21.4% -14.9% -7.7% 0.0% 8.4% 17.5% Pressure (Pa) -16.5% -11.3% -5.8% 0.0% 6.2% 12.8% Page 70 of 80 © Retrotec 2022... - Page 71 In the tables, the Pressure of Interest is 50Pa, and Assumed n is 0.65 or 0.60 The actual flow exponent n for an enclosure can be calculated by measuring building leakage at multiple pressure differences, from 10 to 50 Pa, and determining the slope of the line: Page 71 of 80 © Retrotec 2022...
- Page 72 ���� Flow = C ×�������������������������������� The graph of pressure versus flow will be linear if graphed on a log-log scale, and the slope will be n. Page 72 of 80 © Retrotec 2022...
-
Page 73: Appendix E: Tables To Adjust Flow Values For Temperature Difference
Multiply the flow you measured by the factor to get the air flow corrected for temperature difference. Retrotec’s FanTestic software automatically corrects flow values for any temperature difference when inside and outside temperatures are entered into the software. - Page 74 0.970 0.979 0.988 0.998 1.007 1.016 0.938 0.947 0.956 0.965 0.975 0.984 0.993 1.002 1.011 0.934 0.943 0.952 0.961 0.970 0.980 0.989 0.998 1.007 0.930 0.939 0.948 0.957 0.966 0.975 0.984 0.993 1.003 Page 74 of 80 © Retrotec 2022...
-
Page 75: Appendix F: Tables To Correct Flow If Range Selected Did Not Match The Installed Range
Here is where to find those tables depending on the type of system you are using: For Blower Doors see: Door Fan Operation Manual, Appendix D: Flow Conversion Tables For DucTesters see: DucTester Operation & Testing Manual, Appendix C: Flow Tables Page 75 of 80 © Retrotec 2022... -
Page 76: Appendix G: Measure Supply Or Exhaust Flow With A Gauge And Box
Appendix G: Measure Supply or Exhaust flow with a gauge and The Retrotec gauge can be used to measure the amount of air flowing through a hole. This feature enables the gauge to be used as an Exhaust Fan Flow Meter, by simply cutting a couple of holes in a cardboard box. - Page 77 Box pressures below 3 Pa are less accurate because small fluctuations in pressure will affect the flow a lot. One Pa is a practical limit for measuring flow, below which readings cannot be taken. Try the same fan with different holes to see the different results. Page 77 of 80 © Retrotec 2022...
-
Page 78: Glossary
Glossary Definition Term Air Current Tester Neutrally buoyant smoke (manufactured by Retrotec Inc.) used to locate leakage locations, and to observe the direction of air flow, or to see if pressure neutralization between two zones is reached. air leakage Pertains to how leaky an enclosure may be; The movement/flow of air through the building Envelope, which is driven by either or both positive (infiltration) or negative (exfiltration) pressure differences or test pressures across the building Envelope. - Page 79 The Open Range, the Range Plate or Range Ring that is used on the fan during a Door Fan test. See Retrotec’s Range Configuration QuickGuide Range Plate The Range attachment on the Retrotec Door, which holds Ranges C8, C6, C4, C3, C2, C1, L4, L2, and L1. See Retrotec’s Range Configuration QuickGuide. Range Ring The plastic Range attachments on the Retrotec Door, which include Range A and Range B.
- Page 80 Averaging can be block averages that will update for the length of the average or rolling (moving) averages that will update continuously by displaying the average over the past time period. Page 80 of 80 © Retrotec 2022...
Need help?
Do you have a question about the DM32X and is the answer not in the manual?
Questions and answers