Table of Contents
Advertisement
Available languages
Available languages
Advertisement
Table of Contents

Related Manuals for NEC MultiSync FE772


Summary of Contents for NEC MultiSync FE772
- Page 1 MultiSync FE772 & FE992 FE772FE992FEcovercontents111604 12/28/04, 2:58 PM...
-
Page 2: Table Of Contents
Index Warning ... 1 Contents ... 2 Quick Start ... 3 Controls ... 6 Recommended Use ... 12 Specifications ... 14 Features ... 16 Troubleshooting ... 17 References ...18 Limited Warranty ... 19 Avertissement ... 21 Contenu ... 22 Mise en marche rapide ... 23 Commandes ... -
Page 3: Canadian Department Of Communications Compliance Statement
CAN/CSA C22.2 No.950. FCC Information 1. Use the attached specified cables with the MultiSync FE772 or FE992 color monitor so as not to interfere with radio and television reception. (1) Please use the supplied power cable or equivalent to ensure FCC compliance. -
Page 4: Contents
Contents Your new NEC MultiSync monitor box* should contain the following: ™ • MultiSync Monitor with tilt/swivel base • Power Cord • Captive Signal Cable • User’s Manual Captive Signal Cable Power Cord User’s Manual * Remember to save your original box and packing material to transport or ship the monitor. -
Page 5: Quick Start
3. Insert the hooks into slots. 4. Slide the tilt/swivel stand toward the front of the monitor until the latches click into the locked position. NOTE: For correct use of monitor, completely attach tilt/swivel base to the monitor. - Page 6 2. If necessary, install the display card into your system. For more information, refer to the display card manual. 3. For the PC: Plug the end of the video signal cable of the monitor in the video signal connector of the computer. (Figure A.1). Tighten all screws.
- Page 7 Quick Start –continued Figure B.1 Mac Adapter (Not Included) 15-pin mini D-SUB Captive Signal Cable Figure C.1 Power Outlet Power Cord FE772FE992FEMANUAL122804.p65 12/28/04, 4:21 PM...
-
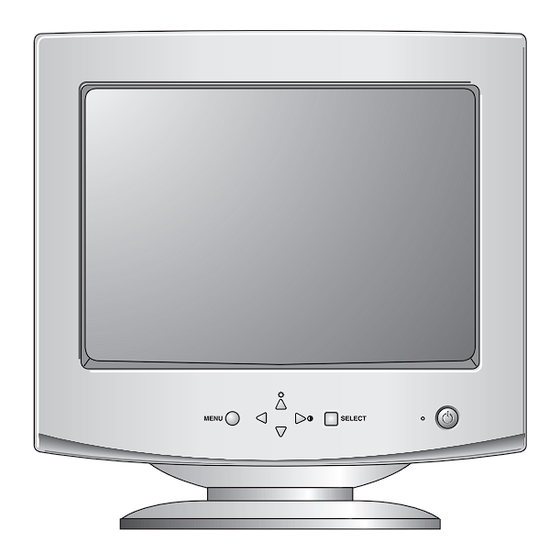
Page 8: Controls
Controls (MultiSync FE772/FE992) OSD (On Screen Display) control buttons on the front of the monitor function as follows: MENU Control Power Button Power (DPMS) Indicator MENU (or OSD) Button Buttons SELECT (or SET) Button Control Button Button The Contrast and Brightness functions are also available in the On Screen Display (OSD) menu. -
Page 9: Screen Adjustment
Screen Adjustment Making adjustments to the image size, position and operating parameters of the monitor is quick and easy with the On Screen Display Control system. A short example is quick and easy given below to familiarize you with the use of the controls. - Page 10 Controls –continued The following table indicates all the On Screen Display control, adjustment, and setting menus. Main menu Sub menu Brightness BRIGHTNESS/ Contrast CONTRAST V Position H Position POSITION V Size H Size SIZE Tilt Side Pincushion GEOMETRY S Pincushion Balance Parallelogram Trapezoid Top Corner...
- Page 11 Controls –continued Brightness To adjust the brightness of the screen. Contrast To adjust the contrast of the screen. Vertical Position To move image up and down. Horizontal Position To move image left and right. Vertical Size To adjust image height. Horizontal Size To adjust image width.
- Page 12 Trapezoid (These recalled options may differ depending on the mode selected: Preset, User, or New). If you don’t want to recall the monitor to these modified settings, use the ton to select CANCEL and then press the SELECT (or SET) button.
- Page 13 Moire (These reset options may differ depending on the mode selected: Preset, User, or New). If you don’t want to reset the monitor, use button to select CANCEL and then press the SELECT (or SET) button. This item allows you to reduce the degree MOIRE of moire.
-
Page 14: Recommended Use
• Do not place any heavy objects on the power cord. Damage to the cord may cause shock or fire. • Do not place this product on a sloping or unstable cart, stand or table, as the monitor may fall, causing serious damage to the monitor. - Page 15 • If reflected light makes it hard for you to see your screen, use an anti-glare filter. • Clean your monitor regularly. Use a lint-free, non-abrasive cloth and a non-alcohol, neutral, non-abrasive cleaning solution to minimize dust.
-
Page 16: Specifications
Power cord Detached NOTE: Information in this document is subject to change without notice. *MOU 4.0 criterion. 1152 X 864@75Hz;Window=Normal X 80%;Brightness=100cd/m FE772FE992FEMANUAL122804.p65 (MultiSync FE772) 30 - 71kHz (Automatic) 50 - 120Hz (Automatic) Separate TTL, Positive/Negative 15 pin D-Sub Connector Separate, RGB Analog, 0.7Vp-p/75 ohm, Positive... - Page 17 Specifications Picture Tube 19 inches (18.0 inches viewable) 90 degree deflection 0.25mm dot pitch AGARAS (Anti-Glare Anti-Reflective, Anti-Static) coating Sync Input Horizontal Freq. Vertical Freq. Input Form Signal Input Video Input Input Form DDC 2B Plug & Play Window* Power Sleep Consumption Resolutions...
-
Page 18: Features
(Intelligent Power Manager) System: Provides innovative power-saving ® methods that allow the monitor to shift to a lower power consumption level when on but not in use, saving two-thirds of your monitor energy costs, reducing emissions and lowering the air conditioning costs of the workplace. -
Page 19: Troubleshooting
Macintosh compatible and that the card is properly seated in the computer. LED on monitor is not lit (no green, orange, orange color can be seen) • Power Switch should be in the ON position and power cord should be connected. -
Page 20: References
References NEC-Mitsubishi Monitor Customer Service & Support Customer Service and Technical Support: Parts and Accessories/ Macintosh Cable Adapter: Warranty Information Online Technical Support Sales and Product Information Sales Information Line: Canadian Customers: Government Sales: Government Sales email: Electronic Channels World Wide Web:... -
Page 21: Limited Warranty
Product may vary. Therefore, suitability of a Product for a specific purpose or application must be determined by consumer and is not warranted by NMD-A. For the name of your nearest authorized NEC-Mitsubishi Electronics Display service facility, contact NEC-Mitsubishi Electronics Display at 1-800-632-4662. FE772FE992FEMANUAL122804.p65... -
Page 22: Declaration Of The Manufacturer
We hereby certify that the color monitor Council Directive 73/23/EEC: Council Directive 89/336/EEC: and marked with NEC-Mitsubishi Electric Visual FE772FE992FEMANUAL122804.p65 MultiSync FE772 or FE992 is in compliance with – EN 60950 – EN 55022 – EN 61000-3-2 – EN 61000-3-3 –... -
Page 23: Avertissement
Informations FCC 1. Utiliser les câbles spécifiés fournis avec les moniteurs couleur MultiSync FE772 ou FE992 afin de ne pas provoquer d'interférences avec la réception radio et télévision. (1) Prière d'utiliser le câble d'alimentation fourni ou équivalent pour assurer la conformité FCC. -
Page 24: Contenu
Contenu La boîte de votre nouveau moniteur NEC MultiSync • Moniteur MultiSync avec socle inclinable/rotatif • Cordon d'alimentation • Câble d’interface captif • Manuel de l’utilisateur Cordon d'alimentation Ne pas oublier de conserver la boîte et le matériel d'emballage d'origine pour transporter ou expédier le moniteur. -
Page 25: Mise En Marche Rapide
Mise en marche rapide Raccorder Socle Inclinable/Rotatif 1. Le moniteur étant débranché du système et de la prise de courant, renverser soigneusement le moniteur sur une table solide. 2. Alignez les crochets du socle inclinable et pivotant par rapport aux logements correspondants dans la base du moniteur. - Page 26 15 broches du câble d’interface à l'adaptateur de câble Macintosh sur l'ordinateur (Figure B.1). Serrer toutes les vis. REMARQUE : Pour obtenir un adaptateur de câble Macintosh, appeler NEC-Mitsubishi Electronics Display of America, Inc. au (800) 632-4662. 4. Connecter une extrémité du cordon d'alimentation au moniteur et l'autre extrémité à...
- Page 27 Mise en marche rapide –suite Figure B.1 Adaptateur Mac (non fourni) Mini-fiche D-SUB à 15 broches Câble d’interface captif Figure C.1 Prise de courant Cordon d’alimentation FE772FE992FEMANUAL122804.p65 12/28/04, 4:21 PM...
-
Page 28: Commandes
Commandes (MultiSync FE772/FE992) Les boutons de réglage OSD situés sur l’avant du moniteur fournissent les fonctions suivantes : MENU Commande Bouton d'alimentation Témoin d'alimentation (DPMS) Bouton MENU (ou OSD) Boutons Bouton SELECT (ou SET) Commande Boutons Boutons Les fonctions de contraste et de luminosité sont également accessibles par le menu sur écran (OSD). -
Page 29: Réglage De L'affichage
Commandes –suite Réglage de l'affichage Le réglage de la taille et de la position de l'image ainsi que des paramètres de fonctionnement du moniteur se fait facilement et rapidement à l'aide du système de commande OSD (menu sur écran). Le bref exemple ci-dessous vous permettra de vous familiariser avec ces commandes. - Page 30 Commandes –suite Le tableau ci-dessous détaille les menus de contrôle, de réglage et de paramétrage de l'OSD. Menu principal Sous-menu Luminosité LUMINOSITÉ/ Contraste CONTRASTE Position V Position H POSITION Taille V Taille H TAILLE Inclinaison Coussin Latéral GÉOMÉTRIE Coussin Balance Parallélogramme Trapèze Angle Supérieur...
- Page 31 Commandes –suite REMARQUE: L'ordre des icônes peut varier en fonction du modèle. Luminosité Réglage de la luminosité de l'écran. Contraste Réglage du contraste de l'écran. Position V Positionnement de l'image en hauteur. Position H Positionnement de l'image en largeur. Taille V Réglage de la hauteur de l'image.
- Page 32 Commandes –suite PRÉDÉF 6500K/ 9300K Sélectionez la couleur voulue. • 6500K : blanc tirant sur le rouge. • 9300K : blanc tirant sur le bleu. TEMP Sélectionnez la température d'écran que vous préférez parmi les couleurs allant du rouge au bleu. ROUGE Paramétrez les niveaux de couleur VERT...
- Page 33 Commandes –suite Si vous ne voulez pas redonner les paramètres modifiés au moniteur, utilisez le bouton sélectionner ANNULER puis appuyez sur le bouton SELECT (ou SET). RESET Retour à toutes les valeurs d'usine sauf pour le paramètre "LANGUE": Luminosité, Contraste, Inclinaison, Couleur 9300K, Niveau Vidéo, Heure OSD, Moirage (le retour aux valeurs d'usine peut donner des résultats...
-
Page 34: Usage Recommandé
Usage recommandé Consignes de sécurité et de maintenance POUR UN FONCTIONNEMENT OPTIMAL, PRIÈRE DE NOTER CE QUI SUIT POUR LE RÉGLAGE ET L'UTILISATION DU MONITEUR COULEUR MultiSync • NE PAS OUVRIR LE MONITEUR. Aucune pièce intérieure ne nécessite l'intervention de l'utilisateur, et l'ouverture ou la dépose des couvercles peut entraîner des risques de décharges électriques dangereuses ou d'autres risques. - Page 35 Usage recommandé LA MODIFICATION DE LA POSITION ET DU RÉGLAGE DU MONITEUR PEUT RÉDUIRE LA FATIGUE DES YEUX, DES ÉPAULES ET DE LA NUQUE. OBSERVER LES DIRECTIVES CI-APRÈS LORS DU POSITIONNEMENT DU MONITEUR : • Régler la hauteur du moniteur de sorte que le dessus de l'écran soit au niveau ou légèrement en-dessous du niveau des yeux.
-
Page 36: Fiche Techniques
Fiche techniques Tube cathodique 17 pouces (pour une zone visualisable de 16 pouces) déflection à 90 ° pas de masque de 0,25 mm revêtement AGARAS (anti-éblouissement, anti-reflet et anti-statique) Entrée sync Fréquence horiz. Fréquence vertic. Forme Entrée signal Forme Entrée vidéo Plug&Play DDC 2B Consommation... - Page 37 Fiche techniques 19 pouces (pour une zone visualisable de 18 pouces) Tube cathodique déflection à 90 ° pas de masque de 0,25 mm revêtement AGARAS (anti-éblouissement, anti-reflet et anti-statique) Entrée sync Fréquence horiz. Fréquence vertic. Forme Entrée signal Entrée vidéo Forme Plug &...
-
Page 38: Fonctions
Fonctions Écran cathodique à masque perforé ClearFlat™ Vous offre une vision exceptionnelle avec une image virtuellement plate, en éliminant la distorsion et en réduisant les reflets, ainsi ce que vous voyez à l’écran est aussi réaliste et proche de la réalité que ce que vous pouvez voir sur une copie imprimée. -
Page 39: Dépannage
Dépannage Pas d'image • La carte vidéo doit être complètement introduite dans sa fente. • La touche d'alimentation et le commutateur d'alimentation de l'ordinateur doivent être en position ON (Marche). • Le câble de signal doit être bien connecté à la carte vidéo /l'ordinateur. •... -
Page 40: Références
Références Service à la clientèle et assistance technique du moniteur NEC-Mitsubishi Service à la clientèle et assistance technique: Télécopieur: Pièces et accessoires/adaptateur de câble Macintosh: Information sur la garantie Assistance technique en lign: Ventes et information produit Ligne d’information sur les ventes: Clientèle canadienne:... -
Page 41: Garantie Limitée
à l ’autre. Par conséquent, l’adéquation d’un produit à un besoin ou une application spécifique doit être déterminée par le consommateur et n’est pas garantie par NMD-A. Pour connaître le nom du centre de service technique agréé NEC-Mitsubishi Electronics Display le plus proche, appeler NEC-Mitsubishi Electronics Display au 1-800-632-4662. FE772FE992FEMANUAL122804.p65... -
Page 42: Déclaration Du Fabricant
89/336/EEC du Counseil: – EN 55022 – EN 61000-3-2 – EN 61000-3-3 – EN 55024 et porte le sigle NEC-Mitsubishi Electric Visual FE772FE992FEMANUAL122804.p65 que les moniteurs MultiSync FE772 ou FE992 Counseil: Systems Corporation 4-13-23, Shibaura, Minato-Ku Tokyo 108-0023, Japan 12/28/04, 4:21 PM... -
Page 43: Déclaration De Conformité
à condition que ces droits n'ont pas été directement délivrés à d'autres. Les produits de NEC-Mitsubishi Electronics Display of America dont il est question dans ce document sont garantis conformément aux termes de la déclaration de garantie limitée accompagnant chaque produit. Cependant, les performances réelles de chaque produit dépendent de facteurs tels que la configuration du système, les données du client... -
Page 44: Declaration Of Conformity
NEC-Mitsubishi Electronics Display of America. To allow for design and specification improvements, the information in this document is subject to change at any time without notice.
Need help?
Do you have a question about the MultiSync FE772 and is the answer not in the manual?
Questions and answers