
Related Manuals for Samsung SID-600P


Summary of Contents for Samsung SID-600P
- Page 1 00356A SID-600P-eng 12/10/02 12:14 PM Page 1 ANTI-VANDAL DOME CAMERA SID-600P User’s Manual Bedienungsanleitung Guide de l’utilisateur Guía del Usuario Manuale d’uso...
- Page 2 00356A SID-600P-eng 12/10/02 12:14 PM Page 2 Important Safety Instructions Read these instructions. This symbol indicates high voltage CAUTION Keep these instructions. is present inside. It is dangerous RISK OF ELECTRIC to make any kind of contact with Heed all warnings.
-
Page 3: Table Of Contents
00356A SID-600P-eng 12/10/02 12:14 PM Page 4 Table of Contents Chapter 1 Chapter 1 Overview Introduction Overview Part Names and Functions Chapter 2 Installing the Camera Checking the Contents of the Package Precautions for Installation and Use This chapter briefly introduces the Camera and Preparing Cables describes its key features, part names and functions. -
Page 4: Introduction
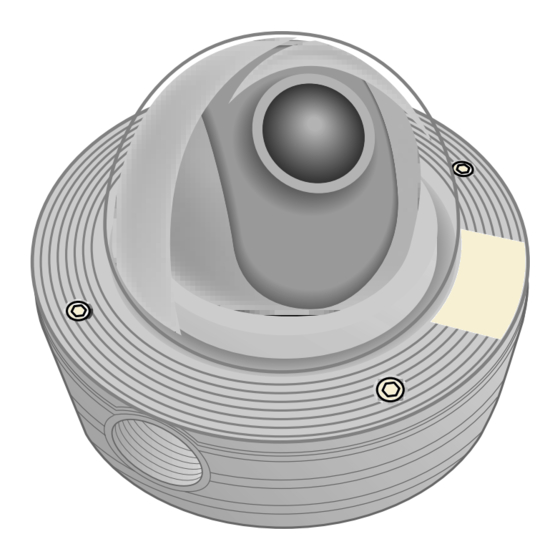
00356A SID-600P-eng 12/10/02 12:14 PM Page 6 Introduction Part Names and Functions The Anti-Vandal Dome Camera is a dome-typed surveillance device that Front View offers the best features of surveillance for banks, retail stores, commercial buildings, industrial settings, and etc. It is designed to withstand intentional or accidental impact or vandalism, and is waterproof, dustproof, and shockproof. -
Page 5: E Chapter
00356A SID-600P-eng 12/10/02 12:14 PM Page 8 Part Names and Functions Chapter 2 Camera Operation Switches (Setup Switches) The functions of the camera operation switches change depending on whether Installing the Camera the Camera is currently in the usual operation mode (i.e., the setup menu is not showing on the screen) or the setup menu mode. -
Page 6: Checking The Contents Of The Package
00356A SID-600P-eng 12/10/02 12:14 PM Page 10 Before Installation Checking the Contents of the Package PLASTIC ANCHOR 2 ea. ❙ ❙ for ceiling installation Be sure to check that the following items are included in the package. ASSY SCREW TAPPING 2 ea. ❙ ❙ for ceiling installation (TH M4 X L30 BLK + 0 RING) ASSY SCREW MACHINE 2 ea. -
Page 7: Precautions For Installation And Use
00356A SID-600P-eng 12/10/02 12:14 PM Page 12 Before Installation Precautions for Installation and Use Installation Examples Please check whether the installation site can sufficiently support the weight of It can be directly installed on ceilings. the Camera before installation. It can be directly installed on pipes coming down from the ceiling. -
Page 8: Preparing Cables
00356A SID-600P-eng 12/10/02 12:14 PM Page 14 Preparing Cables Installing the Camera The following cables are required to install and use the Camera. For installing directly on a ceiling 1. Choose an installation site that can sufficiently support the weight of the equip-... - Page 9 00356A SID-600P-eng 12/10/02 12:14 PM Page 16 Installing the Camera For installing on a pipe 6. Adjust the LENS direction. 1. Choose an installation site that can sufficiently sup 1) Turn the STOPPER RING counter-clockwise as shown in the port the weight of the equipments to be installed.
- Page 10 00356A SID-600P-eng 12/10/02 12:14 PM Page 18 Installing the Camera 5) Remove the CAMERA body from the CASE. 6. Remove the DOME COVER to adjust the LENS (Completely separate the power cable from the direction. video cable.) 1) Use the supplied L WRENCH to unfasten the 4...
- Page 11 00356A SID-600P-eng 12/10/02 12:14 PM Page 20 Installing the Camera 7) Route the cables through the PIPE assembly hole on the side of the PIPE, 9) After arranging the connected power align the INDEX KEY arrow mark ( ) of the CAMERA body to the groove...
-
Page 12: Connecting Cables And Checking Operations
00356A SID-600P-eng 12/10/02 12:14 PM Page 22 Connecting Cables and Checking Operations 4. Decide on the type of power source you want to use and then adjust the power 1. First connect one end of the BNC cable to the VIDEO OUT. -
Page 13: Chapter 3 Setup Menu Overview
00356A SID-600P-eng 12/10/02 12:14 PM Page 24 Structure of the Setup Menu CAMERA ID SETUP ON... CAMERA ID Chapter 3 CAMERA ID ON.../OFF POSITION SETUP ALC... IRIS AREA SETUP Setup Menu Overview ALC.../MANU... BLC SETUP LEVEL SETUP AUTOFOCUS AF/ONEAF/MF LEVEL SETUP MANU... -
Page 14: Camera Menu Organization
00356A SID-600P-eng 12/10/02 12:14 PM Page 26 CAMERA MENU Organization ALC (Auto Light Control) CAMERA ID If you set the IRIS to ALC and press the [ENTER] key, a submenu screen where In the CAMERA ID menu, you can assign an ID to the Camera that appears on the you can set the video output level and BLC will be displayed. -
Page 15: Auto Focus
00356A SID-600P-eng 12/10/02 12:14 PM Page 28 CAMERA MENU Organization SIZE SIZE AUTO FOCUS In the AUTO FOCUS menu, you can specify the Focus method. You can set the Focus to ONEAF, AF, or MF. Using the [LEFT, RIGHT, TOP,... -
Page 16: Shutter
00356A SID-600P-eng 12/10/02 12:14 PM Page 30 CAMERA MENU Organization SHUTTER AGC/MOTION In the SHUTTER menu, you can specify the speeds of the high-speed electronic AGC (Auto Gain Control) shutter, AUTO low-speed shutter, and FIX low-speed shutter. You can specify whether to control the AGC GAIN when the obtained video is... -
Page 17: White Bal
00356A SID-600P-eng 12/10/02 12:14 PM Page 32 CAMERA MENU Organization When the SHUTTER is set to the low illumination mode in the setup MEUN, use the UP/DOWN keys to position the cursor to the MOTION and use the [LEFT/RIGHT] keys to execute the MOTION function. -
Page 18: Sync
00356A SID-600P-eng 12/10/02 12:14 PM Page 34 CAMERA MENU Organization CTRL TYPE SYNC This function is not used on the Anti-Vandal Dome Camera. RS485 Select INT when using the interal synchronization. LINE... is necessary when syn- Select the Baud Rate (4800, 9600, 19200, or 38400 bps) and Camera Address chronizing the camera phases to operate multiple cameras by using the external (0~255) for RS485 communication. - Page 19 00356A SID-600P-eng 12/10/02 12:14 PM Page 36 CAMERA MENU Organization You can store up to 10 Zoom and Focus positions with the PRESET. The PRESET function can be used when you connect the SSC-1000(Controller[Sold Separately]) CAMERA ID OFF... CTRL TYPE and RS485.
-
Page 20: Motion Det
00356A SID-600P-eng 12/10/02 12:14 PM Page 38 CAMERA MENU Organization LANGUAGE CTRL TYPE CTRL TYPE You can move the cursor to the SENSITIVITY position and use the [LEFT/RIGHT] RS485 RS485 keys to set the sensitivity for MOTION detection (LOW, MEDIUM, HIGH). -
Page 21: External Connector Pin Specifications
00356A SID-600P-eng 12/10/02 12:14 PM Page 40 External Connector Pin Specifications Product Specifications CN 753 : Camera Power Input and Video Signal Output ITEM DESCRIPTION Product Type Anti-Vandal Dome Camera Pin No Pin Specifications Power Source Voltage AC 24V ± 10% (NTSC:60Hz ± 0.1Hz, PAL:50Hz ± 0.1Hz),... - Page 22 00356A SID-600P-eng 12/10/02 12:14 PM Page 42 Product Specifications ITEM DESCRIPTION Back Light Compensation Off/On (Area Setting) Sense Up Off/Auto 2x~28x/Fix 2x~128x Digital Zoom Off/On(x10), PIP Motion Detection Off/On (Area/Sensitivity Setting) Video Control POSI/NEGA, MIRROR, Detail Setting Signal Output Composite Video Out : 1.0 Vp-p 75 ohms/BNC Lens Focal length : 3.6 ~ 43.2 mm...
Need help?
Do you have a question about the SID-600P and is the answer not in the manual?
Questions and answers