2gig Technologies Go!Control Panel User Manual
Hide thumbs
Also See for Go!Control Panel:
- Installation & programming manual (78 pages) ,
- User manual (52 pages) ,
- Installation and programming technical training (110 pages)

Related Manuals for 2gig Technologies Go!Control Panel


Summary of Contents for 2gig Technologies Go!Control Panel
- Page 1 Go!Control Panel User Guide ENGLISH (International) WIRELESS SECURITY SYSTEM WARNING: OWNER ’S I NS TRUCTION NOTICE Not to be removed by anyone except occup ant...
-
Page 3: Table Of Contents
CONTENTS System Overview . . . . . . . . . . . . . . . . . . 3 Do Not Mount an Alarm Here: . . . . . . . 21 Emergency Action Plan . . . . . . . . . . . . . 22 Features . . . . . . . . . . . . . . . . . . . . . . . . . . . . . 3 Basic Operation . . . . . . . . . . . . . . . . . . . . . . . 4 Emergency Functions . . . . . . . . . . . . . 23 Sensor Types/Zones . . . . . . . . . . . . . . . . . 4 24‐Hour Emergency Buttons. . . . . . . . . . . 23 Smoke, Heat, and Freeze Protection . . . . 4 System Trouble Alerts. . . . . . . . . . . . . 24 Burglary Protection . . . . . . . . . . . . . . . . . . 4 Trouble Alert Icon . . . . . . . . . . . . . . . . . . . 24 User Codes . . . . . . . . . . . . . . . . . . . . . . . . . 4 View the Current Trouble Alerts . . . . . . . . 24 Alarms . . . . . . . . . . . . . . . . . . . . . . . . . . . . 4 Trouble Alert Beep Hold‐off . . . . . . . . . . . ... - Page 4 Go!Control Wireless Security System | User Guide Auto Stay . . . . . . . . . . . . . . . . . . . . . . . . . 42 Key Fob Sound. . . . . . . . . . . . . . . . . . . . . 42 Key Fob Disarm After Sound . . . . . . . . . 43 Key Fob Options . . . . . . . . . . . . . . . . . . . 43 Wireless Keypad Emergency Keys . . . . . 43 Exit Delay Restart . . . . . . . . . . . . . . . . . . 43 Cancel Display . . . . . . . . . . . . . . . . . . . . . 44 Cancel Time . . . . . . . . . . . . . . . . . . . . . . . 44 Dialer Delay . . . . . . . . . . . . . . . . . . . . . . . 44 2‐Way Voice. . . . . . . . . . . . . . . . . . . . . . . 44 Telephone Remote Control Answer . . . 44 Installer Specific Information . . . . . . . 45 Service Information . . . . . . . . . . . . . . . 46 Alarm Dialing Equipment . . . . . . . . . . 47 Regulatory Information. . . . . . . . . . . . 48 Important Notice . . . . . . . . . . . . . . . . . 49 Alarm System Limitations . . . . . . . . . . . . . 49 Limited Warranty. . . . . . . . . . . . . . . . . 51 Copyright © 2015 Nortek Security & Control LLC...
-
Page 5: System Overview
SYSTEM OVERVIEW This system provides three (3) forms of protection: burglary, fire, and emergency, depending on the options set by your installer. The system consists of the Control Panel with a color touch screen, wireless sensors that provide perimeter and interior burglary protection, and wireless smoke and carbon monoxide detectors. In addition, optional remote control key fobs, wireless panic buttons and keypads may have been provided or installed. The system monitors all protection “zones” and the system’s status. The Control Panel displays monitoring information and controls the alarm siren. Your system may also have been setup to send alarm and status reports to a Central Station and has the capability for 2‐way voice communications with the alarm monitoring operator. FEATURES Following is a list of standard features and options that can be included in your system. Ask your installer which options are available to you and check the boxes that apply. • Stay and Away arming modes: Stay mode arms the system perimeter only and is used typically at night when the premises are occupied. Away mode arms the system perimeter and interior; it’s used when the premises are unoccupied. • 32 user‐unique 4‐digit codes to operate the system: The system supports one (1) master user code that can assign and maintain the other user codes. • One of the 32 user codes functions as a duress code. Controlling the system with this code gives the appearance of normal operation, but using it sends a silent duress report to the Central Station to initiate a silent alarm call for help. • Voice announcements from the Control Panel: The system has a vocabulary of descriptive words that can be assigned to sensors so each has a unique announcement such as “front door” or “bedroom window” if desired. • Home automation with the built‐in Z‐Wave controller for remote controlling Z‐Wave enabled home appliances (optional feature). • Alarm history with system event log: Each alarm and system alert is logged into the system’s memory. These events can be displayed and reviewed at the Control Panel or remotely by the Central Station. • Real time clock and calendar shows on the system’s display and is used to time stamp items in the event log. 2‐way voice communication: After an alarm, the system can automatically connect with a Central Station operator so they can converse with people in the premises. -
Page 6: Basic Operation
Go!Control Wireless Security System | User Guide BASIC OPERATION User Codes Following are general operational concepts The system installer has already that your system supports. Understanding programmed a master user code for your these concepts will help you to use your system. This code can be used to control the security system to its fullest extent. system as well as assign and change the other user codes. The master user code can Sensor Types/Zones also access several system setup settings in the User Toolbox. The system’s wireless sensors have been assigned to selected “types” (often called Alarms “zones”). The sensor type determines how and when the system will react to a signal When an alarm occurs, the Control Panel’s from the sensor. Some sensors are armed 24 siren and an external siren (if installed) hours a day, other sensors are only armed sounds for a preset time. During alarms and when the system is armed. after disarming, the alarm history button displays all the alarms that have occurred, Smoke, Heat, and Freeze and which sensors were involved. The alarm ... -
Page 7: Control Panel Features
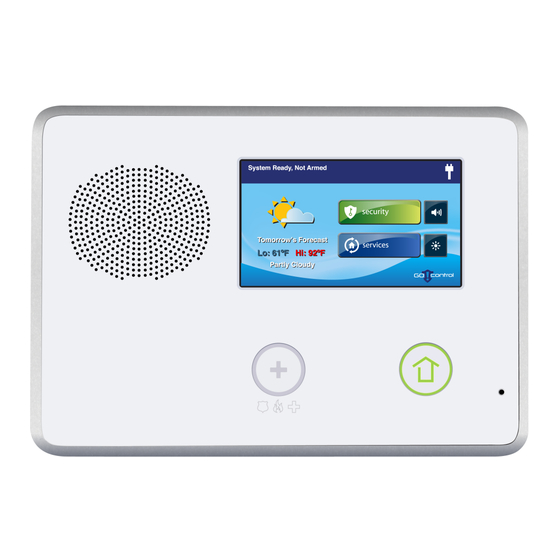
System Overview CONTROL PANEL FEATURES See the table below for full descriptions of Control Panel Features. A Alarm Sounder and Speaker Sounds all system local alarms, voice prompts, system sounds, and audio for 2‐way voice communications with the Central Station B Color Display with Shows all system information, status, programming, and functions as Touchscreen the keypad. Tap to switch between the clock, calendar, and weather and weather display. C Microphone For voice communication with the Central Station D Emergency Button/Indicator Lights WHITE when enabled for emergency alarms. Flashes WHITE during emergency alarms E Home Button/Indicator Sensor Status Lights GREEN when all sensors are closed (ready to arm) Not lit when any sensor is open (not ready to arm) Arming Status Lights RED when system is armed Flashes RED during the Entry Delay Alarm Memory Flashes RED during an alarm Flashes RED after an alarm while system is still armed Power Outage Flashes WHITE during power outage (system on battery backup) Flashes GREEN when all sensors are closed (ready to arm) Flashes ORANGE when any sensor is open (not ready to arm) Flashes RED while system is armed Copyright © 2015 Nortek Security & Control LLC... -
Page 8: Main Display Screens
Go!Control Wireless Security System | User Guide MAIN DISPLAY SCREENS Ready to Arm Screen Use the touch screen to control and operate Use the Ready to Arm screen to arm the the Control Panel. The touch screen includes security system in Stay and Away mode. You a variety of buttons, indicators, and text for also have the option to select the Entry navigation and system operation. Delay and Silent Exit check boxes to turn those features ON. At the top‐left of the Home screen, you can view the current system state. Scrolling text showing any pending alerts. The right side of the screen reveals a variety of system status icons. Home Screen The Home screen shows system status with icons to indicate system conditions. It also displays the time and date. The Home screen has Security, Services, Silent Control and Menu Screen Display Off buttons. Use the Menu screen to gain access to the Ready to Arm, Emergency, or Toolbox screen. TIP: Tap the Services button to gain acess to ... -
Page 9: Burglary Protection
BURGLARY PROTECTION When your system was setup by your installer, wireless sensors were placed to monitor specific doors and windows. The installer selected these doors and windows as likely places where an unlawful intrusion might occur and could be detected. Each sensor was programmed to have the system react in a specific way. See “Installer Programmed Options” on page 41 for specifics about each sensor. Some sensor types such as smoke detectors, carbon monoxide detectors, panic buttons, etc. are always active and can trigger an alarm at any time. Other sensors on protected doors and windows are part of the burglary protection part of the system, and can be turned on or off. Turning on the burglary protection part of the security system is called “Arming the System”. The burglary protection part of the system can be armed in two modes: Stay mode or Away mode. SAMPLE FLOOR PLAN Refer to the floor plan below. It shows a typical residential installation and the various types of wireless sensors and their functions. Front and side door sensors have Exit/Entry delay SMKE Smoke detector Side and main garage door sensors have Exit/Entry delay Carbon monoxide detector Control panel Glass break sensor Door/window sensor Wireless keypad Motion detector External siren Copyright © 2015 Nortek Security & Control LLC... -
Page 10: Sensor Status
Go!Control Wireless Security System | User Guide SENSOR STATUS The security system constantly monitors all of the sensors attached to the protected doors and windows in your home or business. The Control Panel knows if each door or window with sensors is open or closed. The open or closed condition of the protected doors and windows is called the sensor status. For maximum security, all the doors and windows on your premises should be closed when you leave the building. In some cases, such as when using the security system when you stay at home, you may want to leave some doors or windows open. The system recognizes bypasses to resolve the open doors or windows. See "Bypassing/Un‐Bypassing Sensors" on page 10. NOTE: Before you can arm the system, you must close or bypass all doors and windows with sensors. CHECKING FOR CLOSED SENSORS In most cases, you will be arming the security system with all of the sensor‐protected doors and windows closed. The Control Panel provides easy ways to verify that all the sensor‐ protected doors and windows are closed before arming the system: • The Home button lights green when all perimeter sensors are closed. The Home button is not lit if any perimeter sensor is open. Open interior sensors do not change this indication. • The Security button on the display’s Home screen lights green when all perimeter sensors are closed. The Security button is lit orange if any perimeter sensor is open. Open interior sensors do not change this indication. • The Arm button on the display’s Security screen and Menu screen lights green when all perimeter sensors are closed. If any interior sensors are open (or when any motion ... -
Page 11: Viewing Each Sensor's Status
Burglary Protection VIEWING EACH SENSOR’S STATUS The Control Panel will also show you which sensor‐protected doors and windows are open. Your installer has programmed descriptive names for each sensor‐protected door and window. The Control Panel’s color display will show the names of which doors and windows are open. • The top of the display on the Home, Security, and Menu screens sensor status. See “System Status Icons” on page 25. Tapping the Status button also displays a list of open sensors and general system status and alerts. A The Status Bar shows the system mode and shows system status icons. See “System Status Icons” on page 25. B The Arm button on the security and menu screens lights green when all perimeter sensors are closed. The Arm button lights orange if any perimeter sensor is open. C The Home button lights green when all perimeter sensors are closed. The Home button is not lit if any perimeter sensor is open. D The icon displayed shows that an interior sensor is open. Other icons can appear here as well. See “System Status Icons” on page 25. DEALING WITH A SENSOR FALSE ALARM The Control Panel reports alarm conditions on all sensors when armed both visually (on the status bar, and through a system alert icon) and audibly (through voice and chime announcements). There are times, though rare, that an sensor will send an alarm condition to the Control Panel when no alarm exists. The conditions of a false alarm vary depending on the type of sensor and how that sensor communicates with the Control Panel. • Perform a System, Sensor, and Panel Test to find any false alarm conditions. See "System Test" on page 34. See "Sensor Test" on page 35. See "Panel Test" on page 35. -
Page 12: Sensor Bypassing
Go!Control Wireless Security System | User Guide SENSOR BYPASSING Force Bypass All Sensors Before the system can be armed, all If any sensors are open when the system is protected doors and windows must be disarmed, the Arm button on the panel turns closed or bypassed. You can bypass open YELLOW. When you tap the Arm button, the sensors on protected doors or windows system automatically reveals the Bypass before arming the system. When a sensor is screen which lets you arm the system while bypassed, the system ignores that the door forcing it to bypass all open sensors. or window is open. There are two types of To force bypass all open sensors: sensor bypasses available: Ensure a sensor is open, such as a door • Forced or window. • Manual At the Security or Menu screen, tap the In some cases (such as when using the YELLOW Arm button. security system for protection when staying At the Bypass screen, tap Bypass All. at home) it may be desirable to leave some This forces the system to bypass all of ... -
Page 13: Stay Mode
Burglary Protection • View Only Bypassed Sensors. Place door and disarm the system before an alarm a checkmark in the Show Bypassed is triggered. Only box. To arm the system using an Entry Delay: • Remove a sensor from the bypassed At the Security or Menu screen, tap the list. Tap the YELLOW button that Arm button. corresponds to the desired sensor. At the Ready to Arm screen, place a The button turns BLUE when it is no checkmark in the Entry Delay box. This is longer on the bypassed list. the default setting. NOTE: If you remove the checkmark from the Entry Delay box, an alarm will be triggered when the sensor is opened while the system is armed in Stay mode. Tap Stay to arm the system When finished, tap Back. STAY MODE Use Stay mode to partially arm the system when individuals will be occupying the premises. This arms only the sensor‐ protected perimeter doors and windows. It leaves interior motion sensors or other NOTE: When re‐entering the premises, interior doors unarmed. In a home setting, the user must enter through the Stay mode is typically used during the door(s) programmed to use the ... -
Page 14: Quick Exit In Stay Mode
Go!Control Wireless Security System | User Guide system is ready to arm. The Security and Quick Exit in Stay Mode Arm buttons on the display is GREEN A programmable option, called Quick Exit when all sensors are closed. may be displayed on the Security screen while the system is armed in Stay mode. Tap the Quick Exit button to start a timer to allow someone to exit or enter through a sensor‐protected door programmed for delay without having to disarm the entire system. When the delay timer runs out, the system returns to the normal Stay mode. NOTE: If you want to arm the system quietly without sounding any announcements, tap before performing these steps: • At Ready to Arm screen, place a checkmark in the Silent Exit box. Or The Quick Exit option can be turned on or off • During exit delay tap Silence. by your installer, see "Installer Programmed At the Security or Menu screen, tap Options" on page 41 to understand the Arm. -
Page 15: Away Mode
Burglary Protection AWAY MODE Exit Delay Restart Away mode is for arming the system when The Exit Delay Restart option extends the everyone is leaving the premises. Away Exit Delay one time if you need to re‐enter mode arms all sensor‐protected perimeter the premises. With the Exit Delay Restart doors and windows, interior motion sensors, option, when you re‐enter the premises interior glass break sensors, and any other after you have left, but before the Exit Delay sensor‐protected interior doors. The timer expires, will restart the Exit Delay premises must be unoccupied while the timer, giving you the full length of time to system is armed. Away mode is typically leave again. used for arming the system during the TIP: The Exit Delay Restart option only works daytime hours in a residential location, and once, each time the system is armed. non‐business hours in a commercial location. When the system is armed in Away mode, Silent Control in Away Mode you cannot move about the premises Three options for silencing the beeps and without triggering the burglary alarm (if the announcements are available when arming system is installed with interior motion or disarming the system in Away mode. -
Page 16: Quick Exit In Away Mode
Go!Control Wireless Security System | User Guide Verify that the button on the Control Quick Exit in Away Mode Panel is lit green, indicating that the A programmable option called Quick Exit system is ready to arm. The Security may be displayed on the Security screen button and Arm button on the display while the system is armed in the Away will also be green when all perimeter mode. Tapping the Quick Exit button starts a sensors are closed. If the icon is timer to allow someone to exit or enter displayed on the status bar, an interior through a sensor‐protected door sensor is open, be sure to close or programmed for delay without having to manually bypass the interior sensors or disarm the entire system. When the delay an alarm will occur. timer runs out, the system returns to the normal Away mode. To arm the system quietly without sounding any announcements, tap the TIP: If interior sensors are installed in the button before performing the next system in certain areas, do not violate steps: those sensors when using the Quick Exit ... -
Page 17: Disarming The System
Burglary Protection Tap Away. When you enter your home to disarm the system, if you hear To arm the system, enter a user code if fast repeated beeps instead of your installer has turned off the system’s the normal entry delay beeps, Quick Arming feature. Use Extreme Caution! An intruder may The system arms and shows the Exit still be present inside the building! Wait Delay counting down. When the Exit outside and use a Cell Phone to call law Delay expires, the system is fully armed enforcement for assistance. in the Away mode. NOTE: When the system is armed in Disarming from Stay Mode the Away mode, beeps sound Disarm the system from Stay mode before during the Exit Delay (faster beeps exiting the premises. during the last 10 seconds). At the Home screen, tap for Silent Control. DISARMING THE SYSTEM At the Security screen or the Menu To stop the Control Panel from triggering screen, tap Disarm. This action displays burglary alarms, the system needs to be the Disarm Code screen. disarmed. Disarming turns off the burglary ... -
Page 18: Disarming From Away Mode
Go!Control Wireless Security System | User Guide time and date of the alarm and the sensor(s) Disarming from Away Mode that triggered the alarm. The system should be disarmed from Away mode while entering the premises. Enter the premises through a designated Entry Delay sensor‐protected door. The Disarm Code screen displays on the Control Panel and the Entry Delay beeps sound. The left side of the screen shows events that have occurred while the system was armed. Enter a valid user code to disarm the After the system is disarmed, the Alarm system. Memory screen appears. The Alarm Memory • In case you tap the wrong key, the screen shows the sensor(s) that have caused button erases the entire entry. the alarm. If more than one sensor has been triggered, the display shows the order in which the alarms occurred. IF A BURGLARY ALARM OCCURS If an armed sensor is tripped while the system is armed in the Stay or Away mode, an alarm occurs and the siren sounds. ... -
Page 19: Optional 2-Way Voice Communications
Burglary Protection Optional 2-Way Voice Away Mode To arm the system to Away mode using a key Communications fob, tap the button. 2‐way voice communications provides a method for alarm verification and can NOTE: Depending on setup options, if there are open perimeter doors or provide emergency assistance. The Control windows, the system may not Panel contains a built‐in microphone that allow arming to Away mode with a can monitor sounds around the area of the wireless key fob. See “Installer Control Panel. The built‐in microphone and Programmed Options” on page 41. speaker allows 2‐way voice communications with a Central Station operator after an Disarm the Keyfob alarm. The operator can converse with Using a key fob to disarm the system from people in the premises through the Control Stay or Away mode, tap the Disarm Panel’s speaker and microphone. button. Your installer can set the system to use 2‐ NOTE: To use your key fob to disarm way voice communications after an alarm your system, this option must ... -
Page 20: Wireless Keypad: Arming And Disarming . 18 Arm The Keypad
Go!Control Wireless Security System | User Guide WIRELESS KEYPAD: ARMING NOTE: If there are open perimeter doors or windows, the system does AND DISARMING not permit you to use a Wireless Your system may be equipped with one or Keypad to arm the system in Away more wireless keypads. Up to four (4) mode. All open sensor‐protected wireless keypads can be used to control the doors and windows must either be system remotely from the main Control closed or bypassed at the Control Panel before arming with a Panel. wireless keypad. Two types of wireless keypads are available. A wireless keypad without a screen, and the Disarm the Keypad wireless touch screen keypad. To disarm the system from Stay or Away The wireless touch screen keypad operates mode, enter a user code. virtually the same as the Control Panel. Each standard wireless keypad has buttons for Activate a Fire Emergency entering user codes, Stay and Away mode ...
Need help?
Do you have a question about the Go!Control Panel and is the answer not in the manual?
Questions and answers