Advertisement
Quick Links
Advertisement

Subscribe to Our Youtube Channel
Related Manuals for ITRON 6049-0662

Summary of Contents for ITRON 6049-0662
- Page 1 Smart Video Doorbell with AI User Instructions...
-
Page 2: Packing List
Packing list 1. Doorbell *1 2. Indoor Chime *1 3. Mounting Brackets (Optional) *2 4. USB Power Cord *2 5. Screw Pack *1 6. Removal Pin*1 7. Doorbell Installation Wire (optional)*2 8. Wiring Cap (optional)*1 9. User Instructions *1... -
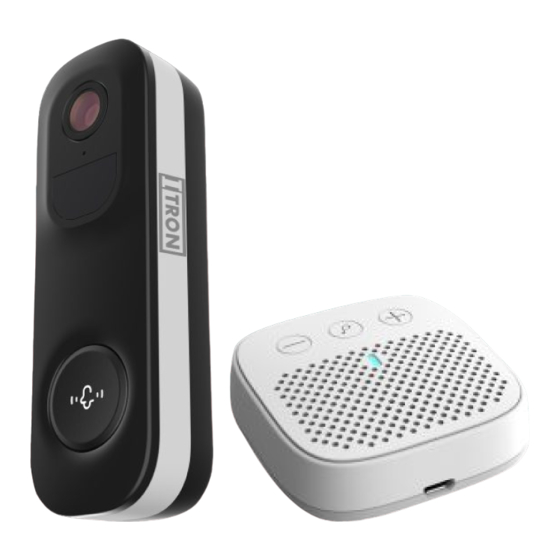
Page 3: Product Appearance
Product Appearance Removal hole Lens Microphone Human bodyinfrared sensor Infrared light Doorbell button Indicator light Speaker Micro-USB Exploded views Micro-SD port card slot Left & Right with Power button Reboot hole Back cover off iTronBELL... - Page 4 Volume Speaker plus Key Indicator Pairing light selection Volume reduction Pairing Micro-USB port IndoorChime...
-
Page 5: Getting Started
Getting Started The smart iTronBELL supports both wireless battery power supply and wired power supply. Downloading and installing the App The iTronBELL can be connected to and operated through smart phones running on Android and iOS platforms. For best experience, please scan the QR code below, download and install the App and follow the prompts to complete user registration. - Page 6 Future Supported Function Alexa and Google Home Auxiliary installation tools Phillips head screwdriver *1 Electric drill 1/4" *1 (drill bit 6.35 mm) How the iTronBELL works The unpacked doorbell comes in two parts: a doorbell to be affixed to the porch, powered by the built-in battery, and an indoor door chime unit placed in your home powered by USB power socket (Not Included),iTronBell charged by USB, connected to an indoor USB power...
- Page 7 How to remove the iTronBELL When you need to dismantle the iTronBELL from the bracket, please use the removal pin to press and insert the removal hole at the top of the iTronBELL, and then take out the doorbell from the back to the front. The version with electronic tamper will trigger a 10s tamper alarm when it is removed, and you can turn it off to cancel the alarm via the App or by long pressing...
- Page 8 Choosing a suitable location Y ou can mount the video iTronBELL on the side wall of a porch or door, or on wooden walls and doors. After the indoor unit is powered on and paired, it should be placed near a socket that is convenient for power supply.
- Page 9 Factors to consider ①Check if you can reuse the existing screw holes and expansion bolts on the walls and door frames. ②It is recommended that the installation height is 1.2m(48inch) above the ground when you drill the mounting holes for the first time. ③If you want to install the iTronBELL on a wooden wall or door, you can mount the bracket directly with screws instead of drilling holes with a drill first.
- Page 10 (2)Selecting an installation scenario The iTronBELL can be installed with or without iTronBELL wire. You may choose the installation method according to the situation in your home; (3)Selecting an installation method Y ou can use the included 3M adhesive to fix the doorbell, but please ensure that the surface is clean and smooth.
- Page 11 Special Tips ①In order to improve the adhesive effect of the backing, when installing the backing to smooth walls (such as glass, tile, and latex walls), you need to wipe it clean, press evenly and hard, and paste from top to bottom to ensure that the backing is fully activated.
- Page 12 Wireless Installation 1 )Installation of expansion bolts and bracket pre-assembly If you have installed an iTronBELL before, you can install it in the original doorbell location. If you have not installed a doorbell before, you need to measure the installation height in advance and choose a location where the doorbell wire can easily pass through the bracket for installation (using 3M adhesive is also recommended).
- Page 13 2)Fixing the bracket Fixing with screws: After the bracket is aligned with the positioning hole, tighten the screws to the wall to fix the bracket with a Phillips screwdriver, and ensure that the installation position is flat and the surrounding environment is not blocked. Fixing with 3M: Place the bracket with the 3M adhesive attached to the corresponding marked position, and press hard on the bracket to ensure that...
- Page 14 Optional: If you need to see images from different angles, you can use the 20° left and right inclined brackets or 10° up and down inclined brackets as supplementary mounting brackets for installation. 10° Notes ①The left and right inclined bracket needs to be fixed on the flat bracket by screws and installed on the doorbell.
- Page 15 Power On/Off and Network Configuration Press and hold the power button for 3 seconds when removing the iTronBELL bracket to switch the device on and off. Double click the power button to hear the prompt tone for scanning the QR code and enter the network configuration mode.
- Page 16 Adding iTronBell to iTronCAM APP 1)Click the Add Now button in the App, press and hold the doorbell switch button for 3 seconds to turn on the doorbell, and the App will automatically search for devices that are on and not bound. Select the device you want to bind in the search results for the next step.
- Page 17 2)Enter the name and password of the Wi-Fi network you want the doorbell to connect to. In order to ensure long-distance connection, the doorbell only supports 2.4 Ghz Wi-Fi network with stronger wall penetration capability, and does not support Wi-Fi with enterprise-level authentication.
- Page 18 3)After a while, the doorbell will play a sound indicating that the connection is successful. At this point, please set a name for the doorbell on the App and select the location where you want to place the doorbell. Click Finish to complete the pairing. Possible problems with binding: When you hear "Password error", check if the Wi-Fi password you entered in the App is correct;...
- Page 19 When you hear "Server connection failed", please check if your router is properly connected to the external network. This is usually the case when your home network is disconnected or the router you choose is a server on the LAN. Please make sure the network connection is normal, and try to connect again by temporarily turning off the firewall.
- Page 20 iTronBell Charging When the battery is low, the App will prompt you to charge it. Please refer to the doorbell tamper-proof method, remove the doorbell from the bracket with the tamper-proof tool, and use the micro USB cable to plug in the 5 V/1.5 A charging adapter to charge the doorbell.
- Page 21 iTronBELL indicator status Mode Status Working mode Solid blue light Sleep mode Indicator off Charging mode Solid yellow light Charging mode completed Solid green light Indicator status of the indoor unit Mode Status The Blue light flashes Waiting for pairing every 1 sec Pairing code The solid blue light goes out...
- Page 22 Wired Installation / Existing Bell Trigger This doorbell does not support electronic Ding Dong chimes. The list of mechanical Ding Dong models it supports is as follows: Brand Model NuT one LA139WH-1 newhouse Hardware NuT one LA11WH Heath Zenith B3E521 NuT one LA-126WH Honeywell home...
- Page 23 1)Mains Power off Before connecting the doorbell wire to the terminal, please disconnect the power through the breaker in your house, which will ensure the safety of yourself and the device...
- Page 24 If there is no indicator label for the breaker on the line where the doorbell is located, try pressing the old doorbell to make sure the power is off. 2)Removal of the old doorbell Before installing the doorbell, please use a Phillips screwdriver to remove the old doorbell from the wall or door and remove all other hardware.
- Page 25 Disconnect the cable from the old doorbell and make sure it does not fall into the hole; 3)Installation of expansion bolts and bracket pre-assembly If you have installed a doorbell before, you can install it in the original doorbell location. If you have not installed a doorbell before, you need to measure the installation height in advance and choose a location where the doorbell wire can easily pass through the...
- Page 26 4)Fixing the bracket & connecting the doorbell wire After the bracket is aligned with the positioning hole, tighten the screws to the wall to fix the bracket with a Phillips screwdriver, pass the doorbell wire through the bracket, connect the doorbell wire and the AC connection and insulate.
- Page 27 5)Connecting the AC line of the mechanical Ding Dong chimes If you need to install a new mechanical Ding Dong chime, prepare the required device, and refer to the installation guide of the purchased device for wiring. Some models can also be installed by referring to the conventional wiring methods of mechanical Ding Dong chimes as follows;...
- Page 28 7)Power on the doorbell Power on the breaker at your home. The doorbell is ready for use...
-
Page 29: Product Specification
Specification of indoor unit Item Specification Power port Micro USB Ringtone type Chord music Number of ringtones Communication protocol Adapter requirements 5V/1A Dimension 65×65×20(mm) Product Specification Item Specification Doorbell camera FOV 160° Image resolution Up to 2048 × 1536 Video bitrate Adaptive... -
Page 30: Firmware Upgrade
Item Specification Storage medium Micro SD card (up to 128 GB) Battery capacity 5200 mAh Adapter requirements 5V/1.5A Dimension 144×46×31(mm) Firmware Upgrade When you connect your doorbell via the App, it will automatically detect if there is new firmware available for your doorbell and prompt for an upgrade when there is a firmware update. -
Page 31: Faq And Troubleshooting
FAQ and T roubleshooting Q: Doorbell permission distribution manage- ment: How can I invite my family and friends to use my doorbell together? A:Open the App, select your doorbell in the main menu, click the share button in the main interface or "Share"... - Page 32 Q:What are the requirements for Wi-Fi? A:Please use a 2.4 G wireless network. The doorbell does not support 5 G wireless network. Meanwhile, please set the Wi-Fi authentication method to a security method below wpa2-psk, which requires a password. Q:How far away from the router should the doorbell be placed? A:It has been tested that the Wi-Fi connection distance is up to 150 meters in an open environment.
- Page 33 Q:How can I review videos in a quick and categorized way? A:Click the icon on the top left corner of the "Album" screen to set filtering conditions, check the conditions and save them to quickly review the video playback by category.
- Page 34 iTronCAM…. AI Smart CCTV Camera is also available to purchase which is compatible with the same APP Contact your Local supplier or visit www.iTronCAM.com www.iTronBELL.com New Zealand...
Need help?
Do you have a question about the 6049-0662 and is the answer not in the manual?
Questions and answers