Advertisement
- 1 Important safety instructions
- 2 Controls
- 3 Display icons
- 4 Battery operation
- 5 Using the AC power adaptor
- 6 Setting clock time
- 7 Seek and Scan Tuning – FM / AM
- 8 ATS tuning (Auto Tuning System) – FM / AM
- 9 Manual tuning – FM / AM
- 10 Presetting stations – FM / AM
- 11 Recalling a preset station – FM / AM
- 12 Setting the alarm
- 13 When the alarm sounds
- 14 Disabling / cancelling alarm setting
- 15 Snooze function
- 16 Sleep function
- 17 Software version / Setting the time format / tuning step
- 18 Listening to music via Bluetooth streaming
- 19 Factory reset
- 20 Headphone socket
- 21 Specifications
- 22 Documents / Resources
Important safety instructions
- Please read all instructions carefully.
- Please keep these instructions for future reference.
- Heed all warnings.
- Follow all instructions.
- Do not use this apparatus near water.
- Clean only with clean dry cloth.
- Do not block any ventilation openings. Install in accordance with the manufacturers instructions.
- Do not install near any heat sources such as radiators, heat registers, stoves, or other apparatus (including amplifiers) that produce heat.
- Do not defeat the safety purpose of the polarized or grounding type plug. A polarized plug has two blades with one wider than the other. A grounding type plug has two blades and a third grounding prong. The wide blade or the third prong is provided for your safety. If the provided plug does not fit into your outlet. Consult an electrician for replacement of the obsolete outlet.
- Protect the power cord from being walked on or pinched particularly at plugs, convenience receptacles, and the point where they exit from the apparatus.
- Only use attachments / accessories specified by the manufacturer.
- Use only with the cart, stand, tripod, bracket, or table specified by the manufacturer, or sold with the apparatus. When a cart is used, use caution when moving the cart / apparatus combination to avoid injury from tip-over.
![]()
- Unplug this apparatus during lightning storms or when unused for long periods of time.
- Refer all servicing to qualified service personnel. Servicing is required when the apparatus has been damaged in any way, such as power-supply cord or plug is damaged, liquid has been spilled or objects have fallen into the apparatus, the apparatus has been exposed to rain or moisture, does not operate normally or has been dropped.
- To Reduce the Risk of Fire or Electric Shock, Do not Expose This Appliance To Rain or Moisture.
- The Shock Hazard Marking and Associated Graphical Symbol is provided on the rear of unit.
- Apparatus shall not be exposed to dripping or splashing and no objects filled with liquids, shall be placed on the apparatus.
- Long term exposure to loud music may cause hearing damage or hearing loss. It is best to avoid long term extreme volume listening while using Earbuds or headphones with this device.
- The power plug should be close to the radio, and easy to unplug in case of an emergency. To disconnect the power from the radio, just unplug the power plug from the AC power outlet.


When your radio has any interference in AM band by its adaptor, please move your radio away from its AC power adaptor over 30cm.
Please note not all AC adapters are alike.
The AC adapter that is included with this radio is designed to be used exclusively with this device. Do not use an AC adapter that differs from the specifications on the AC adapter that is included.
Do not use an AC adapter that does not meet the correct specifications.
Important information on charging and using rechargeable batteries
- Recharge the batteries in any case at least every 2 months.
- Make sure the Battery Select switch inside the battery compartment is set to the "NiMH" position.
- Put the batteries in the compartment while paying attention to the correct polarity of the batteries (+ and -).
- First use: Charge new batteries in one continuous, uninterrupted, charge until they are full. This first charge may take longer than normal. For longer battery life it is advised to always recharge in one continuous, uninterrupted charge until batteries are full and to not recharge again while the batteries are still full.
- New batteries will only reach their full capacity after some time of use (several charge and discharge cycles).
- Leave the complete group of batteries in place inside the radio and do not use these batteries or a few of them for other purposes. This will result in a mix of (fully) charged and (partly) empty batteries. This can seriously damage the batteries and radio when recharged.
- It is advised to only charge batteries at room temperatures between 5 degrees C – 35 degrees C. In lower or higher temperatures full charge cannot be achieved.
- Depending on the capacity of the batteries, charging from "empty" to "full" can take several hours, even up to 6 hours or more.
- Do not charge batteries when the radio is hot or exposed to heat or heat sources.
- It is advised to clean the metal contacts of the batteries and of the charger inside the radio e.g. with a contact-spray from time to time.
- Do not use a mix of old and new rechargeable batteries.
- Do not use a mix of rechargeable and non-rechargeable batteries.
- Do not use a mix of full and empty rechargeable batteries.
- Do not use batteries that have a different mAh capacity.
- Do not use damaged, deformed or leaking batteries.
- Battery level indication is an approximate indication only and can vary with battery type that is used.
- Batteries can become hot during charging.
- In cold conditions the capacity of batteries will be much lower than when used at normal room temperature.
- Batteries (even when supplied with the radio), as being consumables, do not fall under the warranty conditions of the radio.
- Batteries should not be disposed of by incineration and with household waste.
- Disposable batteries should be taken to a suitable recycling center if possible.
![]()
Risk of explosion if the battery is replaced by an incorrect type.

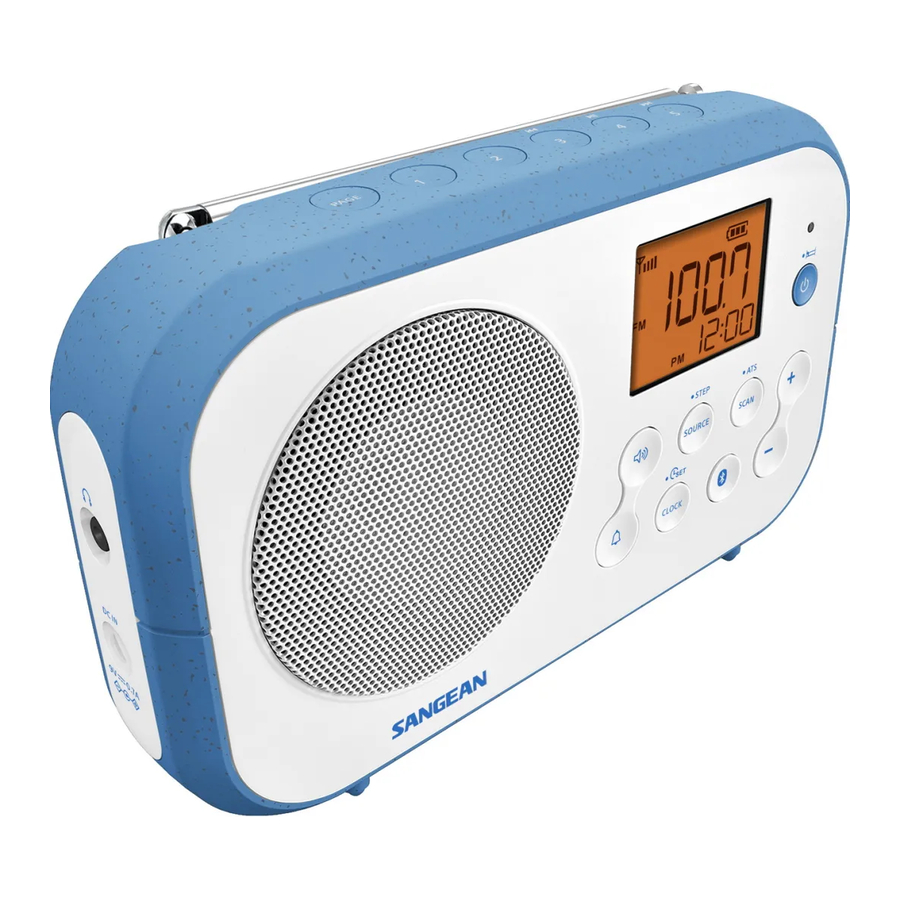
Controls

- Page button
- Preset 1
- Preset 2
- Preset 3 / Rewind button
- Preset 4 / Play / Pause button
- Preset 5 / Fast-forward button
- Speaker
- LCD display
- Battery charging / Bluetooth LED indicator
- Power / Standby / Sleep button
- Tuning control knob / Select / Seek button
- Scan / ATS button
- Volume up button
- Volume down button
- Bluetooth pairing button
- Source / Tuning step button
- Clock / Time setting button
- Buzzer alarm button
- Radio alarm button
- Battery compartment
- NiMH / Alkaline batteries switch
- USB socket for software upgrade (for customer service only)
- Telescopic antenna
- Headphone socket
- DC IN socket
Display icons
- Signal strength meter
- FM stereo indicator (for Headphone)
- Sleep / Snooze indicator
- Battery power indicator
- Bluetooth indicator
- Frequency / Clock / Volume level display
- Clock display / Preset number display
- PM indicator
- Battery error indicator
- Buzzer alarm indicator
- Radio alarm indicator
- Indicates Band in use
- PM indicator
Battery operation
- Open the battery cover on the rear of the unit by lifting the latch.
![warning]() NOTE
NOTE
Before you insert the batteries, check the NiMH / Alkaline switch position. If you use non-rechargeable batteries, make sure the NiMH / Alkaline switch which located inside the battery compartment is switched to Alkaline position. If you use rechargeable batteries, make sure to switch NiMH / Alkaline switch to NiMH position. - Insert 4xLR6 (AA size) batteries into the spaces in the compartment.
- Make sure all batteries are inserted with correct polarity as shown in the battery compartment. Replacethe battery cover.
![]()
![]()
When using alkaline batteries the battery switch must be placed in the alkaline position. Failure to do so could result in serious damage to the batteries or radio. - Reduced power, distortion, "stuttering sound" and the symbol "E" flashing or empty battery icon flashing on the display are all signs that the batteries need replacing.
- If the radio is not to be used for an extended period of time, it is recommended that the batteries are removed from the radio.

- If extended listening using batteries is anticipated, then the use of rechargeable batteries is recommended.
Charging the batteries
When using rechargeable batteries the battery switch must be placed in the NiMH position. Batteries will only be charged when the radio is switched off and connected to the AC adaptor.

The charge indicator will flash red indicating that batteries are charging. Batteries will be fully charged in around 4-6 hours depending on their capacity. The charge indicator shows a steady red light when battery charging is complete.
 NOTE
NOTE
Duration for charging your batteries fully can vary according to the mAh capacity of the batteries. Higher mAh batteries require a longer charging time.
During the charging process, if a battery is detected as faulty / damaged, the display will show the battery error icon with the corresponding battery number.  will flash on the display.

Using the AC power adaptor
The AC power adaptor included with this unit is 9 volts DC at 1.2A center pin positive.
Insert the adaptor plug into the DC socket on the left side of the radio. Plug the adaptor into a standard AC outlet.
Whenever the adaptor is used, the batteries are automatically disconnected. The AC adaptor should be disconnected from the main supply when not in use.
The AC adaptor is used as the means of connecting the radio to the power supply. The AC Adapter used for the radio must remain accessible during normal use in order to disconnect the radio from the power supply completely.
Setting clock time
Upon initial use of the radio after the batteries have been installed or the AC adaptor is plugged in, the display will flash  .
.
Rotate the Tuning control knob to set the required hours. Press the Select button. The minute digits will flash. Rotate the Tuning control knob to set required minute. Press the Select button to complete the time setting. The display will then show the current time.
If you want to adjust the time, the clock can be set when the radio is in power on or standby mode. Press and hold the Time setting button until it beeps, the hour digits will flash on the display. Follow the above instructions to set hour / minute.
Seek and Scan Tuning – FM / AM
- Press the Power button to turn on the radio.
- Select the required frequency band by pressing the Source button. For the FM band fully extend and rotate telescopic antenna to get best reception. For the AM band, rotate the radio to get the best signal. (Please note this radio has a built-in AM antenna.)
- To seek up in frequency, rotate the Tuning control knob in a clockwise direction, then press the Seek button. Your radio will seek in an upwards direction (low frequency to high frequency) and stop automatically when it finds a station of sufficient strength.
To seek down in frequency, rotate the Tuning control knob in an anti-clockwise direction, then press the Seek button. Your radio will seek in a downwards direction and stop automatically when it finds a station of sufficient strength.
Scan Tuning: press the Scan button, the radio will search and stop automatically about 6 seconds when it finds a radio station. Press the Scan button again within 6 seconds to listen to the found station. If you do not press the Scan button when it finds a radio station, after 6 seconds the radio will continue to search for the next available stations. - If you want to view the current time, simply press the Clock button.
- Press the Volume up / down button to set your required sound level.
- To turn off the radio, press the Power button. The display will show "OFF".
ATS tuning (Auto Tuning System) – FM / AM
The radio features an Auto Tuning System (ATS) that will automatically store radio stations into the memory presets on the FM and AM band upon the signal strength of the incoming stations. ATS FM / ATS AM can be operated only when the radio is on.
- Turn on the radio. Select either the FM or AM band by pressing the Source button.
- Press and hold the ATS button. The radio will start the Auto Tuning System (ATS), and store the found stations based upon the signal strength into the memory presets. The radio allows a maximum of 20 presets in 4 memory pages both on the FM and AM bands. The Weather band does not feature Auto Tuning System. All previously stored preset stations will be erased when ATS operation commences and stations are found. The station stored on
![]() will be recalled after the ATS operation is completed.
will be recalled after the ATS operation is completed.
 will be recalled after the ATS operation is completed.
Manual tuning – FM / AM
- With your radio switched on, press the Source button to select the required frequency band.
- Rotate the Tuning control knob to tune to a station. The frequency will change in steps of 50kHz / 100kHz / 200kHz in FM or 9kHz / 10kHz in AM.
- When the frequency band end is reached the radio will recommence tuning from the opposite frequency band end.
- Press the Volume up / down button to set your required sound level.
Presetting stations – FM / AM
The radio has 20 memory presets each for FM and AM radio.
- With your radio switched on, press the Source button to select the desired waveband.
- Tune to the required radio station as previously described.
- To store the FM / AM station as a preset, press the Page button to select the required preset page from 1 to 4 and then press and hold the required preset button (1-5) until you hear a beep and the display will show the page and the memory pre-set you selected. e.g. "
![]() ".
".
Recalling a preset station – FM / AM
- With your radio switched on, press the Source button to select the desired waveband.
- To recall a preset station, press the Page button to select the required preset page (1-4) and momentarily press the required Preset button (1-5), your radio will tune to the station stored in the selected preset memory.
NOTE
The display will flash "---" if no station has been stored to that preset.
Setting the alarm
Your radio has two types of alarms which can be set to wake you with AM / FM radio or buzzer alarm. Ensure that the time setting is complete before setting the alarm time. The alarms can be set while the unit is off or while playing. Alarms will be retained in the event of a power failure.
Setting the radio alarm
Press and hold the radio alarm button until the radio alarm symbol  flashes on the display followed by two beeps. Rotate the Tuning control knob to select the desired hour and press the Select button to confirm the hour setting. Rotate the Tuning control knob to select the desired minute and press the Select button to confirm the minute setting. The radio alarm setting is now completed. The active radio alarm symbol is shown on the display. The radio alarm is set to the station last listened to.
NOTE
The radio alarm will automatically switch to buzzer alarm when the selected radio alarm station signal is too weak.
- To quick change the On / Off status of the radio alarm, press and release the radio alarm button.
Setting the buzzer alarm
- Press and hold the buzzer alarm button until the buzzer alarm symbol
![]() flashes on the display followed by two beeps.
flashes on the display followed by two beeps. - Rotate the Tuning control knob to select the desired hour and press the Select button to confirm the hour setting.
- Rotate the Tuning control knob to select the desired minute and press the Select button to confirm the minute setting. The buzzer alarm setting is now completed. The active buzzer alarm symbol is shown on the display.
- To quick change the On / Off status of the buzzer alarm, press and release the buzzer alarm button.
 flashes on the display followed by two beeps.
When the alarm sounds
To cancel a sounding alarm, press the Power button. When the buzzer alarm activates, the buzzer alarm symbol will flash on the display. The alarm will start softly and gradually increase in level (Humane Wake System). It will sound for 1 minute and silence for 1 minute in repetition for 60 minutes unless cancelled. When the radio alarm is activated, the alarm will go off in Humane Waking System and the radio alarm symbol will flash on the display for 60 minutes.
Disabling / cancelling alarm setting
To cancel the radio / buzzer alarm setting before the alarm sounds, press the radio / buzzer alarm button. The display will show "OFF". The radio / buzzer alarm symbol will disappear from the display.
Snooze function
When the radio alarm sounds, pressing any button other than the Volume buttons and Power button will silence the alarm for 5 minutes. When the buzzer alarm sounds, the buzzer alarm can be silenced for 5 minutes by pressing any button other than the Power button. The display will show the snooze symbol  and "Z" will flash on the display. To cancel the Snooze timer while the alarm is suspended, press the Power button to cancel the alarm.
Sleep function
The sleep timer will automatically switch off the radio after a preset time has elapsed.
- Press and hold the Power button until the radio beeps. Keep long pressing the Power button and the display will cycle through the available options of 60-45-30-15-120-90-60 minutes.
- Release the Power button when the required sleep time appears on the display. The Sleep symbol
![]() will show on the display.
will show on the display. - To cancel the sleep function, press the Power button. The Sleep symbol will disappear and the radio is switched off.
 will show on the display.
Software version / Setting the time format / tuning step
Software version
The software display cannot be altered and is just for your reference.
- Press the Power button to turn off the radio.
- Press and hold the Source button until the radio beeps. Software version number (e.g. Pxx) is shown on the display.
Setting the time format / tuning step
- After the software version is shown on the display, keep long pressing the Source button until the time format (e.g. 24H) is shown the display. Rotate the Tuning control knob to select "12H" or "24H".
- Press the select button to confirm the time format setting and enter the AM tuning step setting.
- Rotate the Tuning control knob to select "10" or "9" kHz. Press the select button to confirm the AM tuning step setting and enter the FM tuning step setting.
- Rotate the Tuning control knob to select "100", "200" or "50" kHz. Press the select button to confirm the FM tuning step setting.
NOTE
In Europe and other parts of the world the AM tuning step is 9kHz, in North America the AM tuning step is 10kHz. FM tuning steps also vary from country to country.
Change in the AM tuning step setting will result in the removal of the radio alarm settings and AM presets stored in the radio.
Listening to music via Bluetooth streaming
You need to pair your Bluetooth device with your PR-D12BT before you can auto-link to play / stream Bluetooth music through your PR-D12BT. Pairing creates a 'bond' so the two devices can recognize each other.
Pairing and playing your Bluetooth device for the first time
- With your radio switched on, press the Source button to select Bluetooth function. Bluetooth icon
![]() will show on the display. The Bluetooth LED indicator on the radio will flash a fast blue to show the radio is discoverable.
will show on the display. The Bluetooth LED indicator on the radio will flash a fast blue to show the radio is discoverable. - Activate Bluetooth on your device according to the device's user manual to link to the radio. Locate the Bluetooth device list and select the device named 'PR-D12BT' (With some Smartphone's that are equipped with earlier versions than BT2.1 Bluetooth device, you may need to input the pass code "0000").
- Once connected, there will be a confirmation tone sound and the Bluetooth LED indicator will turn a solid blue. You can simply select and play any music from your source device.
- The volume control can be adjusted from your source device, or directly from the radio. Use the controls on your Bluetoothenabled device or on the radio to play / pause and navigate tracks.
 will show on the display. The Bluetooth LED indicator on the radio will flash a fast blue to show the radio is discoverable.
NOTE
- If 2 Bluetooth devices are pairing for the first time, both will search for your radio, it will show its availability on both devices. However, if one device links with this unit first, then the other Bluetooth device will not find it on the list.
- If you take your source device out of range, the connection will be temporarily disconnected to your radio. Your radio will automatically reconnect if the source device is brought back in range. Be aware that during the period of disconnection, no other Bluetooth device can pair or link with your radio.
- If 'PR-D12BT' shows in your Bluetooth device list but your device cannot connect with it, please delete the item from your list and pair the device with the radio again following the steps described previously.
- The effective operation range between the system and the paired device is approximately 10 meters (30 feet). Any obstacle between the system and the device can reduce the operational range.
- Bluetooth connectivity performance may vary depending on the connected Bluetooth devices. Please refer to the Bluetooth capabilities of your device before connecting to your radio. All features may not be supported on some paired Bluetooth devices.
- With some mobile phones, making / receiving calls, text messages, e-mails or any other activities unrelated to audio streaming may mute the Bluetooth audio streaming or even temporarily disconnect from your device. Such behavior is a function of the connected device and does not indicate a fault with your PR-D12BT.
Playing audio files in Bluetooth mode
When you have successfully connected your radio with the chosen Bluetooth source device you can start to play your music using the controls on your connected Bluetooth device.
- Once playing has started adjust the volume to the required setting using the Volume control on your radio or on your enabled Bluetooth source device.
- Use the controls on your Bluetooth source device to play / pause and navigate tracks. Alternatively, control the playback using Play / Pause
![]() , Next track
, Next track ![]() , Previous track buttons
, Previous track buttons ![]() on your radio.
on your radio. - Press and hold the Fast-forward / Rewind button to move through the current track. Release the button when the desired point is reached.
NOTE
Not all player applications or devices may respond to all of these controls.
Reconnecting a previously – paired Bluetooth source device
The PR-D12BT can memorize up to 8 sets of paired Bluetooth source devices, when the memory exceed this amount, the earliest paring device will be over written from the device.
If your Bluetooth source device already paired with the PR-D12BT previously, the unit will memorize your Bluetooth source device and it attempts to reconnect with a Bluetooth source device in memorywhich is last connected. If the last connected Bluetooth source device is not available, the PR-D12BT will try to connect to the second last Bluetooth source device.
Disconnecting your Bluetooth device
- Press and hold the Bluetooth pairing button for 2-3 seconds to disconnect with your Bluetooth device or turn off Bluetooth on your Bluetooth source device to disable the connection. There will be a confirmation tone sound and the Bluetooth LED indicator on the radio will flash a fast blue to show the radio is discoverable again for pairing.
- You can also press the Source button to select any mode other than Bluetooth mode to disable the connection.
Factory reset
If you wish to completely reset your radio to its initial state this may be performed by the following procedure. By performing a factory reset, all user entered settings will be erased.
- Turn off the radio.
- Press and hold Preset 3 button and the Source button at the same time, the "dEF" will appear and flash on the display. Continue holding down these two buttons until all the icons appear on the screen. Now the factory reset is completed.
Headphone socket
A standard 3.5mm headphone socket located on the left side of your radio is provided for use with headphones. Inserting earbuds or headphones will automatically mute the internal speaker.
Please be aware that the sensitivity of headphones can vary widely. We therefore recommend setting the volume to a low level before connecting headphones to the radio.
- Excessive sound pressure from Earbuds or Headphones can cause hearing loss.
![]()
To prevent possible hearing damage, do not listen at high volume levels for long periods of time.

Specifications
| AC Power adaptor | DC 9V 1.2A center pin positive | |||
| Batteries | 4 X LR6 (AA size) | |||
| Battery Life | Approx. 35hours of listening with the speaker at normal volume level. | |||
| Approx. 80hours of listening with headphones at normal volume level. | ||||
| Rechargeable battery charging time | approx. 4-6 hours | |||
| Battery life and battery charging time depend on selected battery capacity. | ||||
| Frequency Coverage | FM 87.50-108 MHz | |||
| AM 522-1710 kHz (9kHz / step) | ||||
| AM 520-1710 kHz (10kHz / step) | ||||
| Bluetooth | ||||
| Bluetooth specification | Bluetooth® Ver 4.1 | |||
| Profile Support | A2DP 1.2, AVRCP 1.5 | |||
| Bluetooth Audio CODEC | SBC, AAC | |||
| Transmitting Power | Power Class 2 | |||
| Line of sight range | 10meters / 30feet | |||
| The frequency and maximum transmitted power | 2402MHz ~ 2480MHz: 2.76dBm (Bluetooth EDR) | |||
| Loudspeaker | 3inches, 8Ω / 3W | |||
| Output Power | ||||
| Speaker | 1W | |||
| Headphones | 1mW + 1mW | |||
| Headphone socket | 3.5mm diameter | |||
| Antenna System | FM telescopic antenna | |||
| AM built-in ferrite antenna | ||||
| Operating temperature range | 0°C to +35°C | |||
| ※ The barcode label on the product is defined as below: | ||||
 |  | |||
The company reserves the right to amend the specifications without notice.
![]()
If at any time in the future you should need to dispose of this product please note that: Waste electrical products should not be disposed of with household waste. Please recycle where facilities exist. Check with your Local Authority or retailer for recycling advice. (Waste Electrical and Electronic Equipment Directive).

Documents / ResourcesDownload manual
Here you can download full pdf version of manual, it may contain additional safety instructions, warranty information, FCC rules, etc.
Download SANGEAN TRAVELLER 120 PR-D12BT - FM / AM Digital Receiver Manual
Advertisement


Need help?
Do you have a question about the TRAVELLER 120 and is the answer not in the manual?
Questions and answers