Table of Contents
Advertisement
Advertisement
Table of Contents

Related Manuals for Daping DP16-Pro

Summary of Contents for Daping DP16-Pro
- Page 1 Users Manual DP16-Pro *Please read carefully before using this product*...
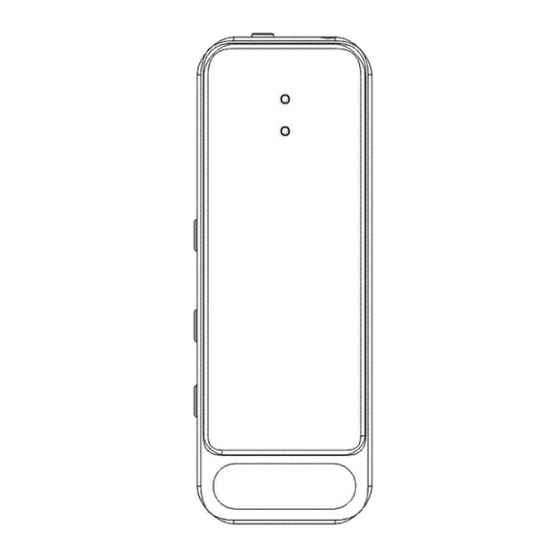
- Page 2 Buttons description 1.Power On/Off/Record 6.Volume Down/Previous 2.Earphone 7.Record Indicator light 3.Mic 8.Play Indicator light 4.Menu/Play 9. Micro USB 5.Volume Up/Next...
- Page 3 Note: If the instruction manual is small and difficult to read the content, please contact us. We will send you a PDF version instruction manual. Power Light Description Recording light lights up red: Unit is waiting for recording. Recording light flashes red: Recording is in progress. Playback light lights up blue: Unit is waiting for playback.
-
Page 4: Method Of Operation
Method of operation How to turn the power on / starting recording: First turn on the power/record button, then start recording after the recording light flashes red. (Note: This product will automatically create one recording file every 60 minutes. Please note that when the SD card is full, the record and play lights will flash 10 times at the same time and you can no longer record. - Page 5 Mode switching: When playing music or recordings, press and hold the mode/play button to switch between music mode and playback mode. (When switching modes, the record light will flash once to indicate that the mode has been successfully switched.) (Note: You cannot switch to recording mode with the mode/play button.
- Page 6 Play the recording Two ways to switch to playback mode 1.Before turning on the power of the product, insert the earphones fully, the playback light will light blue from the recording light red, and it will automatically switch t o t h e p l a y b a c k m o d e . w h e n p l a y b a c k l i g h t l i g h t s u p b l u e Yo u c a n p l a y b y p r e s s i n g t h e m o d e / p l a y b u t t o n d i r e c t .
- Page 7 If you disconnect the earphones and connect to a computer while playback is stopped, the computer will recognize it. When you disconnect from the computer, it switches to recording mode and starts recording automatically. If playback is stopped and the earphones remain connected to the device, the device will be recognized by the computer.
- Page 8 software: Windows system: Windows Media Player or Quick Time Player Mac system: iTunes or vlc media player. (Note: If you can't play on iTunes, it's probably because your version of iTunes needs to be upgraded.) The status of the record/ play indicator when connected to a PC: When the recording data of the product is copied or read, ●...
- Page 9 How to delete recording files There are two ways to delete a recording file Delete audio files using your computer: (1) Connect the product to your PC with the included USB cable. Then open the drive of the product in "My Computer" on your PC and find the "RECORD"...
-
Page 10: Otg Function
OTG function This product has an OTG function. If you have an OTG conversion adapter (sold separately), you can directly playback / delete the recorded content on an OTG-compatible smart phone. If you do not have a personal computer, use the OTG function. -
Page 11: Charging Method
Charging method Please connect to the product’s USB port with the supplied USB cable. You can charge it by connecting the included USB cable to the power supply (PC, AC adapter, mobile battery). (Note: Please charge with DC5V == 1A power supply). - Page 12 Since “SetDigitRecorderTm.exe" cannot be applied to the Mac Operating System, in the case of the Mac OS, create a n e w t e x t d i r e c t l y u n d e r t h e d r i v e o f t h e p r o d u c t a f t e r connecting to the PC.
- Page 13 Recording quality / VOR function After connecting the product to your PC, open the product drive in "My Computer". Then find the file with "RECSET". Finally, open the file with "RECSET" and change the setting value if necessary. The product itself is set to "3 0". (As shown) Please note: The first number "3"...
- Page 14 What is the VOR function: An abbreviation for Voice Operated Recording, a function that allows the microphone to detect a certain amount of sound and automatically start recording. When the sound becomes quieter, the recording will stop automatically and the VOR recording will be paused. Note: Although it is a voice-activated recording function, the recording mode must be turned on.
- Page 15 The VOR function is mainly for power saving and capacity saving, so if you increase the sensitivity, the recording will stop immediately if the volume of the sound becomes a little low when recording at a distance (1 m or more), the file will automatically be saved.
- Page 16 Product specifications Dimension 2.56*0.94*0.32 in Weight 0.066 lb Recording Format 90 hours (8GB) Recording Capacity 180 hours (16GB) 360 hours (32GB) Continuous recording 20 hours Charging time 2hours Recording bit rate 192Kbps Frequency 20-20KHZ Microphone Omnidirectional microphone Operating temperature -10°-- 40° Note: The recording file time and continuous recording time differ depending on the recording bit rate.
-
Page 17: Common Problems
Common problems 1. I want to upgrade the version. Answer: There are two ways. 1) Please download the version upgrade file corresponding to your purchased product for free on our official website. Official site: https://www.dapingvip.com/Downloads 2) If you contact us directly, our customer service staff will send you the update file. - Page 18 3.I cannot play the audio files on my PC. Answer: Use WAV playable playback software. (Recommended playback software: Windows OS: Quick Time Player or windows media player; For Mac OS: iTunes or vlc media player) Note: If you can't play on iTunes, it's probably because your version of iTunes needs to be updated.
- Page 19 7.There is noise Answer: Our product uses a high-sensitivity microphone, so if you touch the product itself during recording, a squealing voice will also be recorded. Be careful when recording in a pocket. 8.After the time synchronization was completed, the time of the recorded file could not be synchronized.
- Page 20 5. If you disconnect the USB conversion adapter from the recorder during recording or playing music, and then connect the USB conversion adapter again without turning off the power, the product will automatically play the continuation of what you stopped last time. 6.
Need help?
Do you have a question about the DP16-Pro and is the answer not in the manual?
Questions and answers