Advertisement
- 1 IMPORTANT SAFETY INSTRUCTIONS
- 2 Introduction
- 3 Included accessories
- 4 Features
- 5 Apple products that can be used with this unit
- 6 Placement precautions
- 7 Names and functions of parts
- 8 Recharging
- 9 Supported operating systems
- 10 Basic operation
- 11 Download the latest firmware
- 12 Troubleshooting
- 13 Automatic power saving (APS) function
- 14 Connections
- 15 Specifications
- 16 Request regarding the disposal of this product
- 17 Declaration of Conformity
- 18 Documents / Resources
IMPORTANT SAFETY INSTRUCTIONS
 The exclamation point within an equilateral triangle is intended to alert the user to the presence of important operating and maintenance (servicing) instructions in the literature accompanying the appliance.

TO PREVENT FIRE OR SHOCK HAZARD, DO NOT EXPOSE THIS APPLIANCE TO RAIN OR MOISTURE.

- DO NOT REMOVE THE EXTERNAL CASES OR CABINETS TO EXPOSE THE ELECTRONICS. NO USER SERVICEABLE PARTS ARE INSIDE.
- IF YOU ARE EXPERIENCING PROBLEMS WITH THIS PRODUCT, CONTACT THE STORE WHERE YOU PURCHASED THE UNIT FOR A SERVICE REFERRAL. DO NOT USE THE PRODUCT UNTIL IT HAS BEEN REPAIRED.
- USE OF CONTROLS OR ADJUSTMENTS OR PERFORMANCE OF PROCEDURES OTHER THAN THOSE SPECIFIED HEREIN MAY RESULT IN HAZARDOUS RADIATION EXPOSURE.
- Read these instructions.
- Keep these instructions.
- Heed all warnings.
- Follow all instructions.
- Do not use this apparatus near water.
- Clean only with dry cloth.
- Do not install near any heat sources such as radiators, heat registers, stoves, or other apparatus (including amplifiers) that produce heat.
- Only use attachments/accessories specified by the manufacturer.
- Refer all servicing to qualified service personnel. Servicing is required when the apparatus has been damaged in any way, such as power-supply cord or plug is damaged, liquid has been spilled or objects have fallen into the apparatus, the apparatus has been exposed to rain or moisture, does not operate normally, or has been dropped.
- Caution should be taken when using earphones or headphones with the product because excessive sound pressure (volume) from earphones or headphones can cause hearing loss.
![]()
![]()
To prevent possible hearing damage, do not listen at high volume levels for long periods.

- Do not expose this apparatus to drips or splashes.
- If the product uses batteries (including a battery pack or installed batteries), they should not be exposed to sunshine, fire or excessive heat.
Introduction
Read this manual carefully to get the best performance from this unit. After reading this manual, keep it in a safe place for future reference.
Included accessories
Check to be sure the box includes all the supplied accessories shown below. Please contact the store where you purchased this unit if any of these accessories are missing or have been damaged during transportation.
DC power supply cable (DC plug to USB A connector) × 1
USB cable for computer connection (USB micro-B connector to USB A connector) × 1
Rubber bands for attachment* × 2
Instruction manual (this document) × 1
* Use to attach a music player or other device to this unit.
Features
This D/A Converter/Headphones Amplifier supports both Apple iOS and Android products. Using asynchronous mode that supports 96 kHz/24-bit audio over USB, this unit can convert signals from digital to analog accurately using its built-in high-precision clock to enable playback of high-resolution audio contents for computer connection.
Moreover, audio playback at CD quality (44.1 kHz/16-bit) is possible for devices running Android. *
In addition to USB inputs, this unit also has an analog/optical digital input jack, enabling support for input from a variety of devices.
* This does not guarantee operation with all Android devices.
The device must support AOA 2.0 connection for Android 4.1 or later version.
Apple products that can be used with this unit
This unit can be connected to and used with the following Apple products.
iPhone 5s, iPhone 5c, iPhone 5
iPad Retina (4th generation), iPad Air, iPad mini, iPad mini Retina
iPod touch (5th generation)
- Always use the USB cable that was included with the iPod, iPhone or iPad to connect it to this unit's iPod/iPhone/iPad/Android device connection port. Operation cannot be guaranteed when using a non-genuine cable.
Placement precautions
- Do not put anything on top of the unit.
- Avoid placing the unit in direct sunlight or close to any source of heat, such as a radiator, heater, open fireplace or amplifier. Also avoid locations that are subject to vibrations or exposed to excessive dust, cold or moisture.
- Place the unit in a stable location near the audio system that you will use with it.
- The voltage supplied to the unit should match the voltage printed on the rear panel. If you are in any doubt regarding this matter, consult an electrician.
- Do not open the body of the unit as this might result in damage to the circuitry or cause electric shock. If a foreign object should get into the unit, contact your dealer.
- When removing the power plug from the wall outlet, always pull directly on the plug; never yank on the cord.
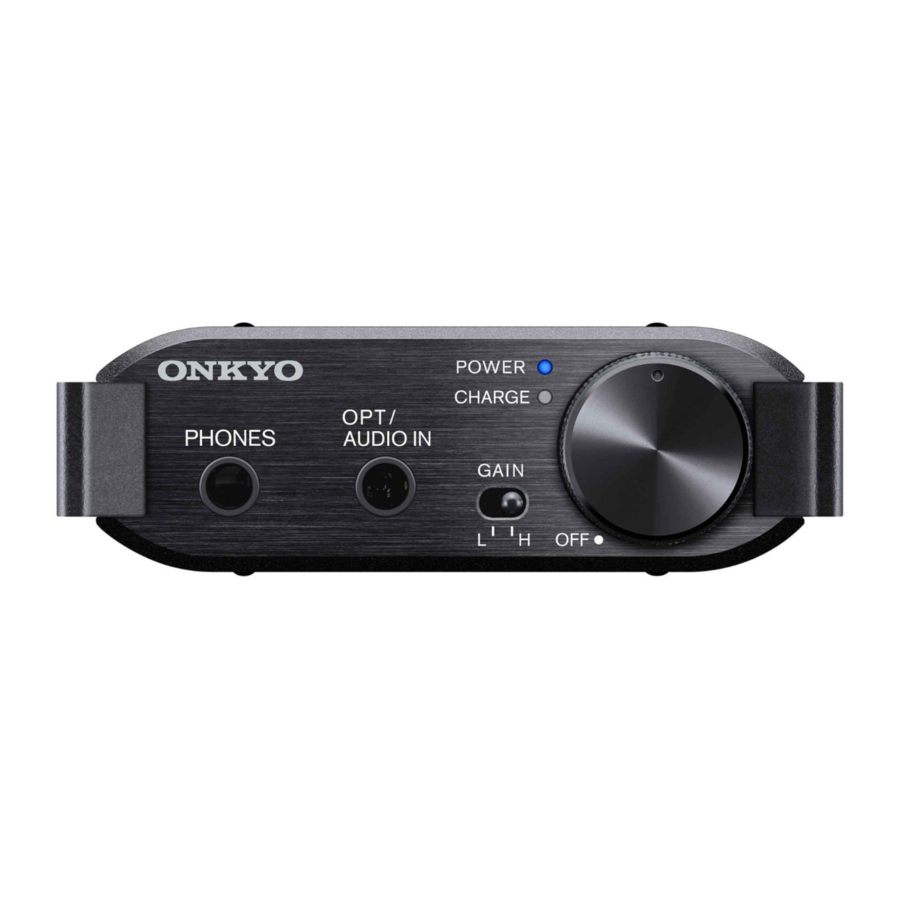
Names and functions of parts

- Indicators
CHARGE: This lights red when the unit is charging. When charging completes, it will become unlit.
POWER: This lights blue when the unit is on.- After the unit has been on for 10 seconds, this indicator will become unlit to prevent battery consumption.
- This indicator blinks when the remaining battery charge is low.
- PHONES jack
Connect a headphones plug (3.5 mm stereo mini) to this jack.
![]()
Always minimize the volume before plugging headphones in and putting them on. While wearing headphones, do not connect or disconnect them or turn the unit on or off. Doing so could result in a sudden loud noise that could harm your hearing. - Optical/analog audio input (OPT/AUDIO IN) jack
Digital connection (OPT)
Use an optical cable with a mini plug.
Analog connection (AUDIO IN)
Use a cable with a 3.5 mm stereo mini plug.
![]()
Turn the power off before changing an input source. - GAIN switch
Use this to change the output level to suit the headphones that you are using.
H: high output level
L: low output level
Lower the volume before setting this switch to H.
![]()
Particularly when using headphones for the first time with this unit, set the GAIN switch to L and be sure to raise the volume gradually during playback to check the sound pressure sensitivity. - Power/volume knob
Turn this counterclockwise until it stops to turn the unit off.
Use this to adjust the volume. Turn this clockwise to turn the unit on. Keep turning it clockwise to increase the volume. Turn it counterclockwise to decrease the volume.
Recharging
This unit has a built-in rechargeable lithium-ion battery.
- Charge it before using the unit the first time after purchase and after it has not been used for a long time.

- Make sure the temperature of the surrounding environment is between 5−35°C when charging.
Charging might not occur properly outside this temperature range. - A computer connected using the included USB cable can also charge the unit.
- Always connect this unit and the computer directly. If connected through a USB hub or other device, charging might not occur properly.
- When connected to a computer, charging might not start if the computer does not recognize this unit as a valid USB device.
- Connect a USB compatible AC adaptor (commercially available) and the included DC power supply cable to charge the unit. The maximum current when charging is 1 A. Compared to charging from a computer, the unit can be charged more rapidly by using a DC power supply.
- When the included DC power supply cable and the USB cable for computer connection are both connected, the unit will charge from the DC power supply cable. Power will not be supplied from the computer in this case.

Supported operating systems
Computers running the following operating systems can be connected by USB to this unit.
This unit can be operated with the standard OS driver, so there is no need to install a driver.
Microsoft Windows
Windows Vista, Windows 7, Windows 8, Windows 8.1
Mac OS X
Mac OS X 10.6.4 or later (Snow Leopard)
OS X Lion 10.7
OS X Mountain Lion 10.8
OS X Mavericks 10.9
Use with operating systems other than the above is not guaranteed.
Basic operation
- Set the input switch according to the input source.
- Turn this unit on.
Set the volume at a low level. - Start playback on the selected input source device.
- Turn this unit's power/volume knob to adjust the volume.
Download the latest firmware
The latest firmware is disclosed on the Onkyo website.
Troubleshooting
If you experience a problem with this unit, please check the following items before requesting service. If it still does not operate correctly, contact the retailer where you purchased the unit.
The unit does not turn on
- If the remaining battery charge is too low, the unit will not turn on. Supply power to the unit through the DC plug or the USB micro-B port.
- Has the automatic power saving function put the unit to sleep? Turn the volume knob counterclockwise to turn the unit off once.
No sound is output
- Use the volume knob to adjust the volume.
- Confirm that the input selection switch is set to the port connected to the playback device that you are using.
- Confirm that the connected device is playing back.
- Confirm the PHONES jack connection.
Automatic power saving (APS) function
This unit will enter sleep mode automatically under the following circumstances.
- When 30 minutes pass without audio input.
- When 30 minutes pass without headphones being plugged into the PHONES jack.
To end sleep mode, turn the volume knob counterclockwise until the unit is turned off.
Connections
Complete all other connections before turning the unit on.
- Read the owner's manuals of all devices that will be connected, and follow their instructions.
- Do not bundle connection cables with the power cord. Doing so could cause noise.
- Connect all plugs securely.

- iPod/iPhone/iPad/Android device connection port
Use the USB cable included with the iPod/iPhone/iPad/Android device to connect it to this unit.- Connecting anything other than an iPod/iPhone/iPad to this port could cause the operation time of the battery to be significantly reduced.
- Computer connection port
Use the included USB cable for computer connection (USB micro-B connector to USB A connector) to connect this unit to a computer. - Input switch
Use this switch to select the input source.
Specifications
Frequency response: 10 Hz–100 kHz (when using AUDIO IN)
Distortion: 0.003% or less (when using AUDIO IN) (32 Ω, 1 kHz, 85 mW + 85 mW output, JEITA)
Supported headphone impedance: 8–600 Ω
Maximum input (AUDIO IN): 1 Vrms
Effective maximum headphone output:
145 mW + 145 mW (32 Ω, 1 kHz, 10%, JEITA)
60 mW + 60 mW (300 Ω, 1 kHz, 10%, JEITA)
35 mW + 35 mW (600 Ω, 1 kHz, 10%, JEITA)
Operating temperature: 0°C to +40°C
Battery operation time (when load is 32 Ω and output is 1 mW + 1 mW):
OPT/AUDIO IN: Approx. 11 hours
Apple iOS device: Approx. 8 hours
- The operation time when using batteries will differ depending on use and other conditions.
Charging time: Approx. 8 hours (using USB)
External dimensions: 64 × 112 × 21.7 mm (2 5/8" × 4 1/2" × 7/8") (W × D × H, not including protrusions)
Weight: 210 g (1/2 lb)
Supported sampling frequency/bit depth: 96 kHz/24-bit
- Design and specifications are subject to change without notice.
- Weight and dimensions are approximate.
- Illustrations may differ slightly from production models.
Request regarding the disposal of this product

This product has a built-in lithium-ion rechargeable battery.
When disposing of this product, please check with the shop where you purchased it or a nearby government agency for instructions about how to dispose of the battery.
Please follow local laws.
Instructions for removing the battery are provided for places where laws require batteries to be removed.
- Never disassemble this unit at any time other than before disposal.
- To replace the rechargeable battery, contact the store where you purchased the product.
Lithium-ion batteries are valuable resources that can be recycled. Please cooperate in recycling them.
- If you have any questions, please contact the store where you purchased the product.
Declaration of Conformity

We declare, under our sole responsibility, that this product complies with the standards:
- Safety
- Limits and methods of measurement of radio disturbance characteristics
- Limits for harmonic current emissions
- Limitation of voltage changes, voltage fluctuations and flicker
- RoHS Directive, 2011/65/EU
- Hereby, Onkyo Corporation, declares that this DAC-HA200 is in compliance with the essential requirements and other relevant provisions of Directive 1999/5/EC.
WEEE
http://www.onkyo.com/manual/weee/weee.pdf

"Made for iPod," "Made for iPhone," and "Made for iPad" mean that an electronic accessory has been designed to connect specifically to iPod, iPhone, or iPad, respectively, and has been certified by the developer to meet Apple performance standards.
Apple is not responsible for the operation of this device or its compliance with safety and regulatory standards.
Please note that the use of this accessory with iPod, iPhone, or iPad may affect wireless performance.
Apple, Macintosh and Mac OS are trademarks of Apple Inc., registered in the U.S. and other countries.
Android is a trademark of Google Inc.
Microsoft, Windows and Windows Vista are either registered trademarks or trademarks of Microsoft Corporation in the United States and/or other countries. Other company names and product names in this document are the trademarks or registered trademarks of their respective owners.

Documents / Resources
References
Download manual
Here you can download full pdf version of manual, it may contain additional safety instructions, warranty information, FCC rules, etc.
Download ONKYO DAC-HA200 - D/A Converter/Headphones Amplifier Manual
Advertisement


Need help?
Do you have a question about the DAC-HA200 and is the answer not in the manual?
Questions and answers