Advertisement
Quick Links
Advertisement

Subscribe to Our Youtube Channel
Related Manuals for Littlebits Makey w14


Summary of Contents for Littlebits Makey w14
- Page 1 RULE YOUR ROOM KIT INVENTION GUIDE...
- Page 3 Bits to create an invention ™ a26 mounting board that solves that problem. micro USB cable alligator clips Invent a Kitchen Contraption The littleBits Invention Cycle WANT MORE INVENTIONS? Icon Index Glossary Conductivity Troubleshooting 24–25 74–75...
- Page 4 Bits that follow. ™ (“X” ICONS) Output Bits do some- OUTPUT (GREEN): OPEN HARDWARE SYMBOL & LITTLEBITS LOGO thing – light up, buzz, move… Wire Bits connect to WIRE (ORANGE): BOTTOM other systems and let you build circuits in new directions.
- Page 5 LEARN ABOUT THE MAKEY MAKEY BIT ON PG 12. TWIST MAGNET MAGIC! ORDER IS IMPORTANT Bits snap together with magnets. The always come first and POWER BITS magnets are always right – you can’t only affect the INPUT BITS OUTPUT snap them together the wrong way.
- Page 6 LET THE GAMES BEGiN! UNLOCK CHALLENG AND FUN ON THE AP INVENT A ROBOTIC PEACOCK INVENT A PINBALL GAME INVENT A KEYTAR INVENT A RACING INCHWORM *APP MAY DIFFER FROM + 1000’S MORE SCREENSHOTS SHOWN. ON THE APP!
- Page 7 GES , INVENTIONS, GET THE FREE APP. FIND MORE FUN. ENTER YOUR FIRST Create your account See tons of cool CHALLENGE. to make it official. inventions you can could win free stuff! build with your kit.
- Page 8 SAMPLE CIRCUIT HOW IT WORKS The power Bit converts the 9 volts of electricity in the o9 BARGRAPH battery to the 5 volts that littleBits circuits run on. ™ The power Bit also sends a p1 POWER signal through your circuit.
- Page 9 i6 DIMMER MEET THE BIT Twist this dimmer back and forth to control your circuit. As you twist the knob clockwise, more signal goes to the Bits that follow, brightening lights, speeding up motors, or raising the volume on buzzers. SAMPLE CIRCUIT SAMPLE CIRCUIT HOW IT WORKS...
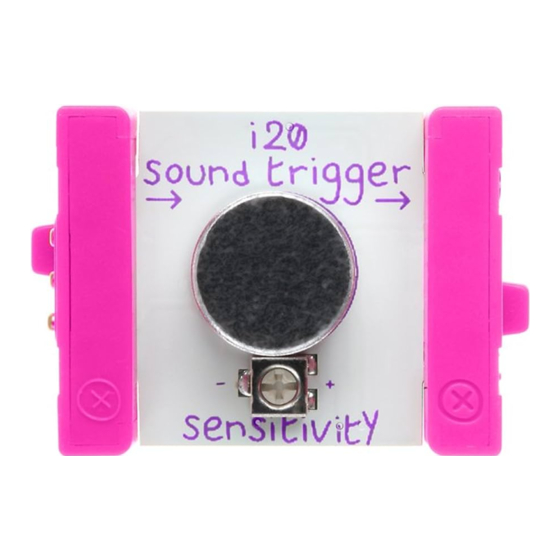
- Page 10 i20 SOUND TRIGGER MEET THE BIT Use this Bit to control your circuits with sound! The sound trigger listens to the noise level in your room, and sends an signal when it gets over a certain level. Try it with a Bit that lights up to create a circuit that responds to the snap of your fingers.
- Page 11 o6 BUZZER MEET THE BIT The buzzer makes a sound no one can ignore. It’s great at sounding the alarm or annoying those nearby. SAMPLE CIRCUIT HOW IT WORKS The buzzer converts the electrical signal it receives o6 BUZZER into a vibration, which creates a buzzing sound.
- Page 12 o9 BARGRAPH MEET THE BIT The bargraph shows you how much signal the Bit is receiving with a display of five light-emitting diodes (LEDs) in different colors. Try it with a dimmer to make your own adjustable lamp. SAMPLE CIRCUIT HOW IT WORKS The bargraph uses five LEDs to turn electricity into light.
- Page 13 o11 SERVO MEET THE BIT The servo is a motor that can swing back and forth or be turned to a specific position. There are a few accessories you can use with the servo (like the mechanical arm). You can find out how to use those on pages 17–19.
- Page 14 w14 MAKEY MAKEY BIT MEET THE BIT ® The Makey Makey Bit turns everyday conductive objects (like bananas) into triggers that control your circuit and even your computer. You can connect the Makey Makey Bit to these objects using alligator clips. Learn more about conductive materials on pages 24–25.
- Page 15 SAMPLE CIRCUIT #1 HOW IT WORKS The Makey Makey Bit TOUCH BOTH sends an signal to the ALLIGATOR When you touch the metal CLIPS AT THE Bits that follow it when SAME TIME. ends of both alligator clips, a keypad ( LEFT ARROW, you activate the buzzer SPACE/CLICK,...
- Page 16 SAMPLE CIRCUIT #2 MA KEY COMPLETE ACTIVATE YOUR COMPUTER’S THE CIRCUIT SPACE BAR HOW IT WORKS When you connect the Makey Makey Bit to your computer with the micro MODE: USB cable it can act like i12 temp. i12 temp. SPACE sensor: sensor:...
- Page 17 SAMPLE CIRCUIT #3 SAMPLE CIRCUIT #3 ACTIVATE YOUR COMPUTER’S MOUSE CLICK HOW IT WORKS You can use input Bits to o9 BARGRAPH control the keys on your computer through the micro i20 SOUND TRIGGER MODE: USB cable. Each input i12 temp. CLICK sensor: Fahrenheit...
- Page 18 HOW IT WORKS First snap together your littleBits circuit. Then press the feet of your Bits into the holes of the shoes and place your circuit on your chosen surface.
- Page 19 MEET THE ACCESSORY The servo hub lets you easily attach materials to your servo motor and add more complex movements to your littleBits inventions. HOW IT WORKS The servo hub can be removed by gently pulling it off the servo motor. This...
- Page 20 a23 MECHANICAL ARM MEET THE ACCESSORY The mechanical arm attaches to both the servo hub and the DC motor (not included) shaft, and offers lots of leverage for pushing, pulling, and throwing. HOW IT WORKS To attach the mechanical arm to the servo hub, use two of the #6 screws USE A PHILLIPS-HEAD...
- Page 21 SERVO MOUNT MEET THE ACCESSORY The servo mount lets you attach your servo to a mounting board or a pair of littleBits shoes. It’s a great way to keep the servo steady so the arm can go wild. HOW IT WORKS Push the servo in from the side until it clicks into place.
- Page 22 It also provides structure, which is helpful for building out inventions, like a vehicle. HOW IT WORKS Snap together your littleBits circuit and press the feet of your Bits into the holes of the mounting board. PRESS DOWN ON...
- Page 23 MICRO USB CABLE MEET THE ACCESSORY Use the micro USB cable to connect the Makey Makey The large plug connects Bit to your computer. to your computer HOW IT WORKS The micro USB cable sends signal information between The small plug connects the Makey Makey Bit and to the Makey Makey Bit the computer.
- Page 24 Show the world what INSPIRE OTHERS. phase of the invention cycle represents you’ve created on the littleBits Invent app. a different way of thinking and making. Get inspired by exploring what others They work well in order, but a good have shared.
-
Page 25: Icon Index
The p1 power Bit has an on/ Keep your eyes open for off switch. This icon will let you these bits of littleBits wisdom. This icon will tell you when know when it’s time to turn it These tips will help build your to use rubber bands or some on or off. - Page 26 CONDUCTORS VS. INSULATORS WITH ALLIGATOR CLIPS, YOU CAN ADD CONDUCTIVE MATERIALS TO YOUR INVENTIONS POWERED BY THE MAKEY MAKEY . SOME MATERIALS WORK BETTER THAN OTHERS. ® ™ like fruit, are materials that easily let an electric current flow through them. CONDUCTORS, like socks, are materials that don’t let an electric current flow INSULATORS,...
- Page 27 GOOD CONDUCTORS people and aluminum pets foil graphite most silverware liquids Most things that contain are conductive WATER coins make (note: the Makey Makey METALS great conductors. Bit is not waterproof). metal pots and pans plants fruits and keys veggies What’s the longest circuit you can make with your Makey Makey Bit MINI–CHALLENGE: and conductors? Can you go around the room? How about around the house?
- Page 28 INVENTION 01 CREEPY EYEBALLS (MiNiMUM) that glows green INVENT A CREEPIN’ COMPANION TIME LEVEL whenever it hears a noise. Make a unique personality for your Creepy Eyeballs, then put your new pal in the pantry to creep out your dad, or under the bed to prank your pet!
- Page 29 BITS + MATERIALS a1 battery & cable p1 power i20 sound trigger o9 bargraph a4 screwdriver a7 adhesive shoes (×2) •paper •markers •scissors •masking tape template A (not included) BUILD YOUR CIRCUIT. o9 BARGRAPH i20 SOUND TRIGGER p1 POWER...
- Page 30 PRESS ADHESIVE SHOES ONTO YOUR CIRCUIT. When you clap, the bargraph should ADJUST AND TEST THE SOUND TRIGGER. light up for three seconds. TEST YOUR CIRCUIT TROUBLESHOOTING PG 74 SENSITIVITY “+” FULLY CLOCKWISE POWER:...
- Page 31 ASSEMBLE TEMPLATE A. PLACE THE TEMPLATE OVER THE CIRCUIT.
- Page 32 Just make GET YOUR SOUND-ACTIVATED CREEPY EYEBALLS TO LIGHT UP! a sound. Draw some crazy eyeballs on a piece of paper and place it CUSTOMIZE! inside your template. USE TAPE: KEEP YOUR EYES IN PLACE USE SCISSORS: CUT OUT YOUR CUSTOM PAIR OF EYES PRO TIP:...
- Page 33 HOW IT WORKS sends signal into the circuit. ™ POWER When it detects sound, the SOUND lets the signal pass through for TRIGGER three seconds. lights up when it receives BARGRAPH the signal, revealing the creature’s face.
- Page 34 SHOW US HOW YOU’VE SURPRISED YOUR FAMILY, Take a FRIENDS, OR PETS WITH THIS INVENTION. picture or video and upload it to the littleBits Invent app! SHARE YOUR INVENTION ON THE LITTLEBITS INVENT APP ™...
- Page 35 INVENTION 02 MOVING COLLAGE (MiNiMUM) that can wiggle and INVENT INTERACTIVE ARTWORK TIME LEVEL dance on your command. Bring the walls to life with unique moving masterpieces you create with imagery from magazines, a poster on the wall, or the art you made in school.
- Page 36 BITS + MATERIALS a1 battery & cable p1 power i6 dimmer o11 servo •Phillips-head screwdriver •scissors •masking tape •magazine, poster or artwork a7 adhesive #6 screws (×3) shoes (×4) a23 mechanical arm a24 servo mount a19 servo hub (not included) BUILD YOUR CIRCUIT.
- Page 37 PRESS THE SERVO HUB ONTO THE SERVO. PRESS THE SERVO INTO THE SERVO MOUNT FROM THE SIDE AND SCREW IN. USE PHILLIPS-HEAD SCREWDRIVER JUST ONE SCREW NEEDED...
- Page 38 CONNECT THE MECHANICAL ARM TO THE SERVO HUB. USE PHILLIPS-HEAD SCREWDRIVER PRESS ADHESIVE SHOES ONTO YOUR CIRCUIT.
- Page 39 SET SERVO TO SWING MODE. MODE: i12 temp. SWING sensor: Fahrenheit mode i13 light sensor: light mode o11 servo: swing mode Turn the power on and twist the dimmer knob. The servo TEST YOUR CIRCUIT. arm should swing back and forth. TEST YOUR CIRCUIT TROUBLESHOOTING...
- Page 40 You will need two images. MAKE THE STORY OF YOUR MOVING COLLAGE. Cut out a background image and a moving image. SCISSORS ATTACH THE MOVING IMAGE TO THE MECHANICAL ARM. USE TAPE...
- Page 45 MOUNT YOUR BACKGROUND IMAGE TO THE WALL AND TAPE ALL FOUR CORNERS DOWN WELL. USE TAPE PEEL THE BACK OFF THE ADHESIVE SHOES AND STICK YOUR CIRCUIT TO THE COLLAGE.
- Page 46 Twist the dimmer to make the animated element move SET IT IN MOTION! faster or slower across the background. ADJUST THE POSITION OF THE MECHANICAL ARM SO THAT IT SWINGS WHERE YOU WANT IT TO. TROUBLESHOOTING PG 75 USE TAPE: SECURE YOUR BATTERY TO THE WALL...
-
Page 47: How It Works
HOW IT WORKS sends signal into the circuit. ™ POWER controls how much signal DIMMER moves through to the servo. The speed of the depends on SERVO the amount of signal it receives from the dimmer. The more signal it receives, the faster it swings. - Page 48 TAKE VIDEOS OF EACH MOVING COLLAGE YOU Post to the MAKE TO CREATE AN ONLINE GALLERY! littleBits Invent app and share it with friends and family. SHARE YOUR INVENTION ON THE LITTLEBITS INVENT APP ™...
- Page 49 INVENTION 03 BUZZING BOOKLET (MiNiMUM) and the Makey INVENT A BUZZER USING THIS BOOKLET TIME LEVEL Makey Bit. Now you can transform almost anything into an electronic device! Create even crazier contraptions by adding random materials like bananas to the mix and use them to make up games.
- Page 50 BITS + MATERIALS a7 adhesive a1 battery & cable p1 power w14 Makey Makey ® o6 buzzer shoes (×2) •pencil alligator clips (×2) (not included) BUILD YOUR CIRCUIT. o6 BUZZER w14 MAKEY MAKEY p1 POWER...
- Page 51 PRESS ADHESIVE SHOES ONTO YOUR CIRCUIT TO KEEP YOUR BITS SECURE. ATTACH TWO ALLIGATOR CLIPS TO THE MAKEY MAKEY BIT – ONE TO THE SPACE/ CLICK PAD, ANOTHER TO THE EARTH PAD.
- Page 52 Your body is conductive, TURN THE POWER ON AND TEST YOUR CIRCUIT. so touching both clips lets electricity flow through the Makey Makey Bit, sending an signal to the buzzer Bit. TOUCH BOTH ALLIGATOR CLIPS AT THE SAME TIME TEST YOUR CIRCUIT TROUBLESHOOTING PG 74...
- Page 53 USE A PENCIL TO FILL IN THE THREE SHAPES AS DARK AS YOU CAN. USE A GRAPHITE PENCIL ATTACH ALLIGATOR CLIPS TO THE PENCILLED EDGES OF THIS PAGE. FOLD THE CORNER OF THIS PAGE AND FIRMLY PRESS THE BUTTON The buzzer ON THE FOLDED FLAP.
- Page 54 HOW IT WORKS Bit provides electricity to POWER the circuit. Bit sends an MAKEY MAKEY signal when the pad and the SPACE/CLICK pad are connected. When you EARTH fold the page, the pencilled-in shapes touch, allowing electricity to flow through the circuit.
- Page 55 WHICH OBJECTS AND MATERIALS MADE THE BEST Create a video and share your BUZZING BOOKLET? results on the littleBits Invent app! SHARE YOUR INVENTION ON THE LITTLEBITS INVENT APP...
-
Page 56: Burglar Buzzer
INVENTION 04 BURGLAR BUZZER (MiNiMUM) that catches INVENT YOUR OWN BURGLAR ALARM TIME LEVEL would-be thieves in the act! Protect your prized possessions with this automatic alerter that sounds and stays on when someone tries to take your stuff. No heists allowed when you’re around. - Page 57 BITS + MATERIALS a1 battery & cable p1 power o4 buzzer w14 Makey Makey ® a26 mounting board •paper •scissors •masking tape •string •aluminum foil Rule Your Room alligator clips (×2) Kit box (not included) BUILD YOUR CIRCUIT. o4 BUZZER w14 MAKEY MAKEY p1 POWER...
- Page 58 PRESS YOUR CIRCUIT ONTO THE MOUNTING BOARD. CLIP ONE ALLIGATOR CLIP TO THE LEFT ARROW PAD AND THE SECOND ALLIGATOR CLIP TO THE EARTH PAD.
- Page 59 Your body is conductive, so TURN THE POWER ON AND TEST YOUR CIRCUIT. touching both clips lets electricity flow through the Makey Makey Bit, triggering signal to the buzzer Bit. TOUCH BOTH ALLIGATOR CLIPS AT THE SAME TIME TEST YOUR CIRCUIT TROUBLESHOOTING PG 74 POWER:...
- Page 60 ATTACH YOUR CIRCUIT TO THE SIDE OF USE TAPE OR RUBBER BAND THE BOX, AND THE ALLIGATOR TO ATTACH MOUNTING CLIPS TO THE TWO PIECES BOARD TO BOX OF FOIL. – this is what will set off the MAKE A TRIP WIRE .
- Page 61 TAPE A PIECE OF STRING TO YOUR TRIP WIRE AND THE OBJECT YOU WANT TO PROTECT. PLACE THE TRIP WIRE SO IT COMPLETELY COVERS THE This is to keep it from SMALL PIECE OF FOIL. touching the foil on the bottom of the box.
- Page 62 SET YOUR BOX DOWN ON TO THE TRIP WIRE, AND SET YOUR OBJECT ON TOP OF THE BOX. USE TAPE TO SECURE THE BOX TO YOUR TABLE TOP Pulling the piggy DO A TEST RUN! bank off the box should pull out the trip wire from between the two pieces of foil, setting off the...
- Page 63 HOW IT WORKS Bit provides electricity to POWER the circuit. Bit sends an MAKEY MAKEY signal when the pad and LEFT ARROW pad are connected. This happens EARTH when the paper is pulled out, and the two pieces of foil touch, allowing electricity to flow through the circuit.
- Page 64 TRY IT OUT IN ANOTHER CONTEXT. See who you can prank! TAKE A VIDEO OF YOUR CUSTOM BURGLAR BUZZER IN ACTION AND POST IT ON THE LITTLEBITS INVENT APP. SHARE YOUR INVENTION ON THE LITTLEBITS INVENT APP ™...
- Page 65 INVENTION 05 DOMAIN DEFENDER (MiNiMUM) to guard your stuff. INVENT YOUR OWN DEFENSE SYSTEM TIME LEVEL Warning: Keep out! Connect the Domain Defender to your drawers, and this loyal launcher will fling projectiles when someone tries to break in. Tweak it to amp up the accuracy, power, or camouflage ability.
- Page 66 BITS + MATERIALS a1 battery & cable p1 power w14 Makey Makey o11 servo ® a26 mounting a19 servo hub a24 servo mount a23 mechanical arm #6 screws (×4) template B board • aluminum foil •masking tape •heavy books •drawers alligator clips (×2) (not included) BUILD YOUR CIRCUIT.
- Page 67 PRESS THE SERVO HUB ONTO THE SERVO AND ADJUST THE SERVO TO TURN MODE. MODE: i12 temp. i12 temp. TURN sensor: sensor: Fahrenheit celsius mode mode i13 light i13 light sensor: sensor: light mode dark mode o11 servo: o11 servo: swing mode turn mode PRESS SERVO INTO THE SERVO MOUNT FROM THE SIDE AND SCREW IN.
- Page 68 PRESS YOUR CIRCUIT AND SERVO MOUNT ONTO THE MOUNTING BOARD. connect the WITH POWER ON, USE PHILLIPS-HEAD SCREWDRIVER mechanical arm to the servo hub, parallel to the mounting board, as shown. POWER:...
- Page 69 ON THE MAKEY MAKEY BIT, CLIP ONE OF THE ALLIGATOR CLIPS TO THE LEFT ARROW PAD AND THE OTHER TO THE EARTH PAD. Touching the ends of both alligator clips should cause the TEST YOUR CIRCUIT! servo to swing to the right. TEST YOUR CIRCUIT TROUBLESHOOTING PG 74...
- Page 70 ATTACH YOUR CIRCUIT TO A BOOK. USE TAPE OR RUBBER BANDS: SECURE YOUR CIRCUIT TO THE BOOK...
- Page 71 TAPE TWO PIECES OF FOIL TO THE EDGE OF A DRAWER, AND ATTACH THE ALLIGATOR LEAVE A SMALL GAP BETWEEN CLIPS TO THE FOIL AS INDICATED. THE TWO PIECES OF FOIL! MAKE THE BUCKET FOR THE LAUNCHER USING TEMPLATE B.
- Page 72 SLIP THE BUCKET ONTO THE FREE END OF THE MECHANICAL ARM. PRO TIP: IF NEEDED, YOU CAN USE TAPE TO SECURE THE TEMPLATE. CRUMPLE UP A HALF-SHEET OF NOTEBOOK PAPER OR A SMALL PIECE OF FOIL TO LAUNCH. PRO TIP: WRITE AN ACCUSATORY NOTE IN YOUR...
- Page 73 Opening the LAUNCH TIME! drawer will make the pieces of foil touch and activate the servo. TEST YOUR CIRCUIT TROUBLESHOOTING PG 74...
- Page 74 HOW IT WORKS Bit sends an signal MAKEY MAKEY Bit provides when the pad and POWER LEFT ARROW EARTH electricity to the circuit. pad are connected. This happens when the drawer opens and the two pieces of foil touch, allowing electricity to flow through the circuit.
- Page 75 DOMAIN DEFENDER in different places, or hiding it behind other objects. MAKE A REACTION VIDEO OF YOUR WOULD-BE BURGLAR, THEN SHOW THE COMMUNITY HOW YOU PROTECTED YOUR SECRET STASH ON THE LITTLEBITS SHARE YOUR INVENTION ON THE INVENT APP! LITTLEBITS ™...
- Page 76 CHALLENGE iNvENT A KITCHEN CONTRAPTION (MiNiMUM) TIME LEVEL IT’S TIME TO START PLAYING WITH YOUR FOOD. Automatic feeding machines, condiment catapults, an alarm that lets you know when you’ve added the perfect amount a milk to your cereal...your mission for this challenge is to invent the future of cooking and eating.
- Page 77 THE LITTLEBITS INVENT APP. Share any photos or videos of your together to transform a simple dinner early prototypes, too. The littleBits into a meal of the future. community loves to see all the things you tried on your invention journey.
- Page 78 WANT MORE INVENTIONS? Find these inventions on the littleBits Invent app. ™ INVENTION 06 TOP SECRET SAFE Keep prying eyes from your prized possessions with a safe that’s hidden in plain sight! This trigger- activated box opens when the right book is pulled.
- Page 79 GLOSSARY Brainstorming is a creative activity that helps generate a large number BRAINSTORM of ideas. There are many variations on how to brainstorm. The important thing is to let your imagination run wild. Often, the best solutions come from unexpected places. Circuits are paths that electric currents follow.
-
Page 80: Troubleshooting
TROUBLESHOOTING – You MY CIRCUIT ISN’T WORKING USING THE SOUND TRIGGER WITH THE BUZZER • Make sure your power Bit is on. You should see may find that the buzzer doesn’t turn off! That’s a red LED illuminated. because the buzzer makes sound that sets off the •... - Page 81 Makey Makey Bit. It only passes commands STILL HAVING TROUBLE? between the Makey Makey Bit and the computer. Visit littleBits.cc/faq or contact our customer service You will also need to connect the Makey Makey Bit team at support@littleBits.cc. to a power Bit to use it.
- Page 82 Inc. • Discontinue use of any modules provide reasonable protection that malfunction, become damaged against harmful interference in © 2016 littleBits Electronics Inc. or broken. a residential installation. This All rights reserved. equipment generates, uses and can Made in China...
- Page 84 POWER SOUND TRIGGER MAKEY MAKEY ® DIMMER SERVO BARGRAPH BUZZER ACCESSORIES RULE YOUR 9V battery & cable adhesive shoes (×6) ROOM KIT servo hub mechanical arm servo mount mounting boards (×2) micro USB cable alligator clips (×4) screwdriver #6 screws (×4) viii...
Need help?
Do you have a question about the Makey w14 and is the answer not in the manual?
Questions and answers