Table of Contents
Advertisement
Quick Links
Advertisement
Table of Contents

Related Manuals for Milesight DS7610


Summary of Contents for Milesight DS7610
- Page 1 IoT Display DS7610 User Guide...
- Page 2 Use another soft, dry cloth to wipe dry. Declaration of Conformity DS7610 is in conformity with the essential requirements and other relevant provisions of the CE and FCC. Copyright © 2011-2023 Milesight. All rights reserved.
-
Page 3: Table Of Contents
Contents 1. Product Introduction ......................... 4 1.1 Overview ...........................4 1.2 Features ........................... 4 2. Hardware Introduction ........................5 2.1 Packing List ..........................5 2.2 Hardware Overview ......................... 5 2.3 Dimensions(mm) ........................6 3. Power Supply ............................. 6 4. Software Guide ..........................7 4.1 Basic Screen Description ...................... -
Page 4: Product Introduction
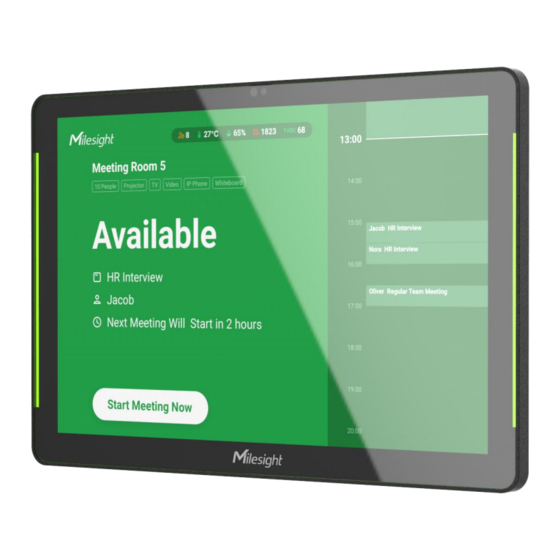
More significantly, the 10.1-inch capacitive touchscreen display allows users to see and customize the user interface with easy settings and smooth screen switching. Customizable stepless adjusted RGB LED indicators of DS7610 can show the real-time spatial availability instantly even from a long distance. -
Page 5: Hardware Introduction
Built-in ambient light sensor and proximity sensor automatically adjust the screen’s brightness according to external light conditions for saving energy 2. Hardware Introduction 2.1 Packing List 1 × DS7610 1 × Wall Mount 4 × Wall 4 × VESA 2 × Adhesive... -
Page 6: Dimensions(Mm)
2.3 Dimensions(mm) 3. Power Supply Milesight IoT Display DS7610 can be powered via a PoE injector, PoE switch, Type-C port or a DC power adapter. Choose one of the following methods to power up the IoT Display. Powered by a PoE injector ... -
Page 7: Software Guide
Connect the Ethernet cable of the IoT Display to a PoE switch. Powered by a DC power adapter Connect the DC power jack of the IoT Display and the power outlet with a DC power adapter (3.5 * 1.3mm plug). Powered by a Type-C port ... - Page 8 Application In the Application page, you can check and install applications and open them as necessary. You can also create a shortcut by long-pressing the app icon and dragging it to the home screen. Status Bar Volume-: Decrease the system volume. ...
-
Page 9: Communication
Recents: Switch between recently used applications, or take screenshot of the applications. You can also close an application by pulling up it. Volume+: Increase the system volume. Status Notifications Status notification bar displays system status such as time, Wi-Fi, USB connections, etc. You can drop down the notification bar to open the shortcut window and check the details of notifications. -
Page 10: Ethernet Connection
4.2.2 Ethernet Connection On Application page, go to Settings > Network & Internet, enable Ethernet. Select Ethernet IP mode as static or dhcp and plug the Ethernet cable to Ethernet port of device to access the network. -
Page 11: Lorawan ® Gateway
4.2.3 LoRaWAN Gateway ® DS7610 has a built-in one-channel LoRaWAN gateway to manage Milesight LoRaWAN ® ® devices. On Application page, go to Settings > Network & Internet, enable Lora Gateway. Select corresponding parameters to communicate with LoRaWAN ® end devices. -
Page 12: Bluetooth
On Application page, go to Settings > Connected devices > Connection preferences to enable Bluetooth feature and check or rename device name, then go back to Connected devices to pair your device with DS7610. You can use Bluetooth to transfer files, communicate with accessories, etc. -
Page 13: Usb
NFC feature, then attach NFC devices to the NFC area of DS7610 to exchange the data. You can use NFC to achieve Milesight LoRaWAN ® nodes configurations, ID identifications, contactless meeting check-in, etc. 4.2.6 USB Plug the USB Type-C port of DS7610 to your USB devices. On Application page, go to Settings >... -
Page 14: Ds Demo App
4.3 DS Demo App DS Demo App supports the configuration of basic parameters of device and it can’t be uninstalled. Parameter Description Show the SN of this device. Show the environment brightness level between 1 to 5 in real time. Light Level The light sensor can be used to adjust the brightness of screen on Settings >... -
Page 15: Install & Uninstall Apps
4.4 Install & Uninstall Apps Install Apps 1. Select USB mode as File Transfer, then import your app(.apk) to the device via USB port. Note that DS7610 only supports 32-bit App. 2. On Application page, go to Files to find the apk file and click it to install the App. -
Page 16: Reset To Factory Default
2) DS Demo App does not support system downgrade. If you need to downgrade, please contact Milesight technical support . 4.6 Reset to Factory Default On Application page, go to Settings > System > Advanced to select Reset options to reset as your requests. -
Page 17: App Development
4.8 App Development DS7610 is based on Android 11 system and please refer to Android official developer guide to complete the development: https://developer.android.com/guide Besides, Milesight also provides SDK and Developer API Documentations relating LoRaWAN ® gateway feature, NFC feature relating Milesight LoRaWAN Device management: ®... - Page 18 3. Press the bracket on the wall with the TOP logo side facing up and align its holes with the wall plugs, then fix the screws into the wall plugs. 4. Plug an Ethernet cable into the Ethernet port of the IoT Display. 5.
- Page 19 Glass Mounting 1. Attach the tape on the back of the Wall Mount Bracket, and attach the bracket at the desired height on the glass with the TOP logo side facing up. 2. Plug an Ethernet cable into the Ethernet port of the IoT Display. 3.
- Page 20 4. Fix the IoT Display to the bracket by tightening the 2 screws at the bottom of the bracket. VESA Desktop Stand Mounting 1. Plug an Ethernet cable into the Ethernet port of the IoT Display, then lift the IoT Display and align its VESA holes with the VESA desktop stand.
Need help?
Do you have a question about the DS7610 and is the answer not in the manual?
Questions and answers