Chapters
Table of Contents

Subscribe to Our Youtube Channel
Related Manuals for ETNA KE129 Series


Summary of Contents for ETNA KE129 Series
- Page 1 GEBRUIKSAANWIJZING MODE D’EMPLOI BEDIENUNGSANLEITUNG INSTRUCTIONS FOR USE ELEKTRISCHE KOOKPLAAT PLAQUE DE CUISSON ÉLECTRIQUE ELEKTRISCHES KOCHFELD ELECTRIC HOB KE129 --- KE158 ---...
- Page 2 Handleiding NL 3 - NL 14 Notice d’utilisation FR 3 - FR 14 Anleitung DE 3 - DE 14 Manual EN 3 - EN 14 Gebruikte pictogrammen - Pictogrammes utilisés Benutzte Piktogramme - Pictograms used Belangrijk om te weten - Important à savoir - Wissenswertes - Important information Tip - Conseil - Tipp NL 2...
- Page 3 INHOUDSOPGAVE Uw kookplaat Inleiding Beschrijving Gebruik Gebruik van de kookplaat Bediening Bediening van de kookplaat De 7-standen bedieningsknop Onderhoud Reinigen Problemen oplossen Probleemoplossingstabel Installatie Waar u op moet letten Montage Informatie over EU-verordening 66/2014 Milieuaspecten Afvoeren toestel en verpakking NL 3...
- Page 4 UW KOOKPLAAT Inleiding In deze handleiding staat beschreven op welke manier u de kookplaat zo optimaal mogelijk kunt benutten. Naast informatie over de bediening treft u ook achtergrondinformatie aan die van dienst kan zijn bij het gebruik van dit product. Lees eerst de afzonderlijke veiligheidsinstructies voordat u het apparaat in gebruik neemt! Lees deze gebruikershandleiding door voordat u het apparaat...
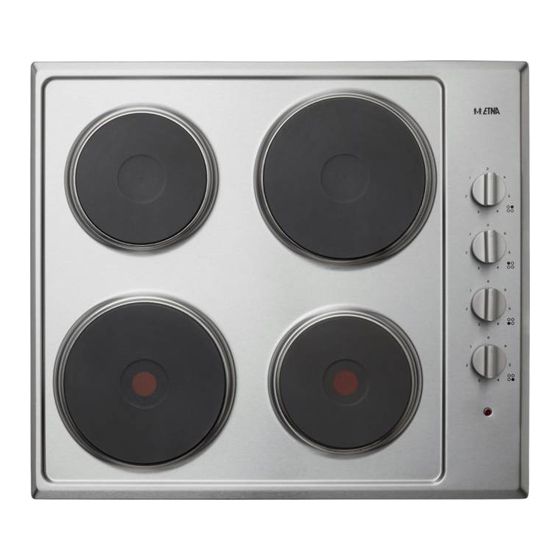
- Page 5 UW KOOKPLAAT Beschrijving KE158 --- KE129 --- 1. Kookplaat ø 145 mm / 1000 W 2. Snelkookplaat ø 180 mm / 2000 W 3. Kookplaat ø 180 mm / 1500 W 4. Snelkookplaat ø 145 mm / 1500 W 5. Bedieningsknoppen 6.
- Page 6 GEBRUIK Gebruik van de kookplaat Kookplaat inschakelen • Voordat u de kookplaat in gebruik gaat nemen dient elk element gedurende 3 à 4 minuten op de hoogste stand te worden ingeschakeld zonder dat er een pan op wordt geplaatst. • Elk kookelement is door de fabrikant voorzien van een speciale roestwerende laag.
- Page 7 BEDIENING Bediening van de kookplaat • Een symbool naast de bedieningsknop geeft aan welk element wordt bediend. • De bedieningsknoppen kunt u zowel links- als rechtsom draaien. • Zodra u een kookplaat inschakelt, gaat het controlelampje aan. • U kunt de kookplaat 5 tot 10 minuten voordat de kooktijd verstreken is, uitschakelen.
- Page 8 ONDERHOUD Reinigen Waarschuwing Schakel het toestel uit en laat het volledig afkoelen voordat u met schoonmaakwerkzaamheden gaat beginnen. • De kookplaten kunt u het beste reinigen met een vochtige doek of keukenpapier. • Verwijder overgekookt voedsel zo snel mogelijk. Vooral rode kool, rabarber en appelmoes werken in op de lak of op het roestvrijstaal.
- Page 9 PROBLEMEN OPLOSSEN Probleemoplossingstabel Als het toestel niet naar behoren werkt, betekent dit niet altijd dat het defect is. Probeer het probleem eerst zelf op te lossen door de onderstaande punten na te lopen. U kunt voor meer informatie ook terecht op de website. Probleem Mogelijke oorzaak Oplossing...
- Page 10 INSTALLATIE Waar u op moet letten Waarschuwing Dit apparaat mag uitsluitend worden geïnstalleerd door erkend onderhoudspersoneel of een gekwalificeerd elektricien en overeenkomstig de instructies van deze handleiding en conform de geldende plaatselijke voorschriften. • Op het gegevensplaatje staan de aansluitwaarde en de vereiste netspanning aangegeven. Het aansluiten moet gebeuren in overeenstemming met de nationale en lokale voorschriften.
- Page 11 INSTALLATIE Inbouwmaten 42,5 min. 50 min. 50 Benodigde vrije ruimte rondom Voor een veilig gebruik is voldoende ruimte rondom de kookplaat noodzakelijk. Controleer of deze ruimte aanwezig is. afzuigkap kast KE129: 290mm KE158: 580mm kookplaat NL 11...
- Page 12 INSTALLATIE Elektrische aansluiting • 230 V - 50 Hz • Stekker en stopcontact moeten na installatie van het toestel goed bereikbaar blijven. • De KE158RVS is voorzien van aansluitkabel zonder stekker. 220-240V / 380-415V 50/60Hz 6000W • De KE129RVS is voorzien van aansluitsnoer met stekker. 220-240V 50/60 Hz 3500W •...
- Page 13 INSTALLATIE Montage 1. Plaats de kookplaat in de uitsparing. Markeer de plaats van de kookplaat op het werkblad. 2. Verwijder de kookplaat. Plaats het afdichtband op de door u gemarkeerde lijn. Zorg ervoor dat de lijn zich in het midden van het afdichtband bevindt. Zorg dat de naden bij de hoeken overlappen en dat er geen gat langs het afdichtmateriaal achterblijft.
- Page 14 MILIEUASPECTEN Afvoeren toestel en verpakking Dit toestel is gemaakt van duurzame materialen. Het toestel moet aan het einde van zijn levensduur op verantwoorde wijze worden afgedankt. Informeer bij de plaatselijke autoriteiten hoe u dit kunt doen. De verpakking van het toestel is recyclebaar. Mogelijk zijn de volgende materialen gebruikt: •...
-
Page 15: Table Of Contents
SOMMAIRE Votre plaque de cuisson Introduction Description Utilisation Utilisation de la plaque de cuisson Fonctionnement Fonctionnement de la plaque de cuisson Les 7 réglages du bouton de commande Entretien Nettoyage Diagnostic des pannes Tableau de dépannage Installation Les points qui méritent votre attention Montage Informations conformément à... -
Page 16: Votre Plaque De Cuisson
VOTRE PLAQUE DE CUISSON Introduction Ce manuel décrit la manière d’utiliser au mieux la plaque de cuisson. En plus d’une information sur l’operation, vous trouverez également une information de base qui vous sera utile pour utiliser ce produit. Veuillez lire les instructions de sécurité fournies séparément avant d'utiliser l'appareil ! Avant d'utiliser l'appareil, lisez attentivement le manuel et rangez- le en lieu sûr afin de pouvoir le consulter ultérieurement. - Page 17 VOTRE PLAQUE DE CUISSON Description KE158 --- KE129 --- 1. Plaque de cuisson ø 145 mm / 1000 W 2. Plaque de cuisson rapide ø 180 mm / 2000 W 3. Plaque de cuisson ø 180 mm / 1500 W 4.
-
Page 18: Utilisation
UTILISATION Utilisation de la plaque de cuisson Mise en marche de la plaque de cuisson • Avant d'utiliser votre plaque de cuisson pour la première fois, allumez chaque élément à la puissance la plus élevée pendant 3 à 4 minutes sans poser de casserole. •... -
Page 19: Fonctionnement
FONCTIONNEMENT Fonctionnement de la plaque de cuisson • Le symbole près du bouton de commande indique quel élément est en cours d'utilisation. • Vous pouvez tourner le bouton vers la gauche ou vers la droite. • Lorsque vous allumez la plaque de cuisson, le témoin lumineux s'allume. -
Page 20: Entretien
ENTRETIEN Nettoyage Avertissement Éteignez l’appareil et laissez-le refroidir complètement avant de commencer tout travail de nettoyage. • Nettoyez la plaque de cuisson de préférence avec un torchon humide ou du papier absorbant. • Ôtez tous les déversements dès que possible. Le chou rouge, la rhubarbe et la compote de pommes ont un effet corrosif sur le vernis ou l'acier inoxydable. -
Page 21: Diagnostic Des Pannes
DIAGNOSTIC DES PANNES Tableau de dépannage Si l’appareil ne fonctionne pas correctement, cela ne veut pas nécessairement dire qu’il est défectueux. Essayez d’abord de résoudre le problème par vous-même en vérifiant les points indiqués ci-dessous ou consultez le site Web pour plus d’informations. Problème Cause possible Solution... -
Page 22: Les Points Qui Méritent Votre Attention
INSTALLATION Les points qui méritent votre attention Avertissement Cet appareil ne doit être installé que par du personnel de service autorisé ou un électricien qualifié et conformément aux instructions de ce manuel et conformément aux réglementations locales applicables. • Valeurs de raccordement et tension sont mentionnées sur la fiche signalétique. L’installation doit s’effectuer conformément aux normes nationales et locales. - Page 23 INSTALLATION Dimensions d’encastrement 42,5 min. 50 min. 50 Périmètre de sécurité Pour garantir une utilisation sans danger, il est nécessaire de laisser suffisamment d’espace libre autour de la plaque de cuisson. Assurez-vous que cet espace libre est respecté. hotte d’aspiration le boîtier KE129: 290mm KE158: 580mm...
- Page 24 INSTALLATION Raccordement électrique • 230 V - 50 Hz • Après l’installation, la fiche et la prise de courant doivent toujours être accessibles. • Le KE158RVS est équipé d’un câble de raccordement sans prise. 220-240V / 380-415V 50/60Hz 6000W • Le KE129RVS est équipé d’un câble de raccordement avec prise. 220-240V 50/60 Hz 3500W •...
-
Page 25: Montage
INSTALLATION Montage 1. Placez la table de cuisson dans la niche. Marquez la position de la table de cuisson sur le plan de travail. 2. Retirez la table de cuisson. Placez le ruban d’étanchéité sur la ligne que vous avez marquée. Assurez-vous que la ligne est au centre de la bande d’étanchéité. -
Page 26: Mise Au Rebut De L'appareil Et De L'emballage
ASPECTS ENVIRONNEMENTAUX Mise au rebut de l’appareil et de l’emballage Cet appareil est fabriqué à partir de matériaux durables. Il doit être mis au rebut de manière responsable à la fin de son cycle de service. Prenez contact avec les autorités locales pour en savoir plus sur la manière de procéder. - Page 27 INHALT Ihr Kochfeld Einführung Beschreibung Verwendung Verwendung des Kochfeldes Bedienung Bedienung des Kochfeldes Die 7 Einstellungen des Drehschalters Pflege Reinigung Fehlerbehebung Störungstabelle Installation Worauf Sie achten müssen Montage Informationen zur Verordnung (EU) 66/2014 Umweltschutz Entsorgung von Verpackung und Gerät DE 3...
-
Page 28: Ihr Kochfeld
IHR KOCHFELD Einführung In dieser Gebrauchsanweisung ist beschrieben, wie Sie das Kochfeld optimal nutzen können. Neben Informationen zur Bedienung finden Sie hier auch Hintergrundinformationen, die bei der Verwendung dieses Geräts nützlich sein können. Lesen Sie vor der Inbetriebnahme des Geräts die separaten Sicherheitshinweise! Lesen Sie diese Bedienungsanleitung vor der ersten Inbetriebnahme sorgfältig durch, und heben Sie sie zum späteren... - Page 29 IHR KOCHFELD Beschreibung KE158 --- KE129 --- 1. Kochplatte ø 145 mm / 1000 W 2. Schnelle Kochplatte ø 180 mm / 2000 W 3. Kochplatte ø 180 mm / 1500 W 4. Schnelle Kochplatte ø 145 mm / 1500 W 5.
-
Page 30: Verwendung
VERWENDUNG Verwendung des Kochfeldes Schalten Sie das Kochfeld ein. • Bevor Sie das Kochfeld erstmals verwenden, sollten Sie jedes Element ohne Topf 3–4 Minuten auf die höchste Stufe einstellen. • Die einzelnen Elemente sind mit einer Anti-Rost-Beschichtung versehen. Beim ersten Erhitzen des Herds ist deshalb ein Geruch nach Verbranntem wahrnehmbar. -
Page 31: Bedienung
BEDIENUNG Bedienung des Kochfeldes • Ein Symbol neben dem Drehschalter zeigt an, welches Element in Betrieb ist. • Der Drehschalter kann in beide Richtungen gedreht werden. • Beim Einschalten des Herds leuchtet die Kontrolllampe. • Die Kochzone kann 5 bis 10 Minuten vor dem Ende der Kochzeit ausgeschaltet werden. - Page 32 PFLEGE Reinigung Achtung Schalten Sie das Gerät aus und lassen Sie es vollständig abkühlen, bevor Sie mit der Reinigung beginnen. • Reinigen Sie die Kochfelder mit einem feuchten Tuch oder Küchenpapier. • Verschüttete Speisen so schnell wie möglich entfernen. Besonders Rotkraut, Rhabarber und Apfelmus greifen die Firnis und den Edelstahl an.
- Page 33 FEHLERBEHEBUNG Störungstabelle Wenn das Gerät nicht korrekt funktioniert, bedeutet dies nicht automatisch, dass es defekt ist. Überprüfen Sie in jedem Fall die Punkte der nachfolgenden Tabelle oder suchen Sie nach weiteren Informationen auf der Website. Problem Mögliche Ursache Lösung Das Kochfeld oder die Es gibt keine Überprüfen Sie die Sicherung Kochzonen lassen sich nicht...
-
Page 34: Worauf Sie Achten Müssen
INSTALLATION Worauf Sie achten müssen Achtung Dieses Gerät sollte nur von autorisiertem Servicepersonal oder einem qualifizierten Elektriker und in Übereinstimmung mit den Anweisungen in diesem Handbuch und in Übereinstimmung mit den geltenden örtlichen Vorschriften installiert werden. • Auf dem Schild mit elektrischen Angaben wird der Anschlußwert und die erforderliche Netzspannung angegeben. - Page 35 INSTALLATION Einbaumaße 42,5 min. 50 min. 50 Benötigter freier Platz Für eine sichere Verwendung ist ausreichend Raum um das Kochfeld herum erforderlich. Kontrollieren Sie, ob dieser Raum vorhanden ist. Dunstabzugshaube Küchen- schrank KE129: 290mm KE158: 580mm Kochfeld DE 11...
- Page 36 INSTALLATION Elektrischer Anschluß • 230 V - 50 Hz • Steckdose und Stecker müssen nach Einbau immer gut erreichbar sein. • Der KE158RVS ist mit einem Anschlusskabel ohne Stecker ausgestattet.. 220-240V / 380-415V 50/60Hz 6000W • Der KE129RVS ist mit einem Anschlusskabel mit Stecker ausgestattet. 220-240V 50/60 Hz 3500W •...
-
Page 37: Informationen Zur Verordnung (Eu) 66/2014
INSTALLATION Montage 1. Stellen Sie das Kochfeld in die Nische. Markieren Sie die Position des Kochfeldes auf der Arbeitsplatte. 2. Entfernen Sie das Kochfeld. Bringen Sie das Dichtungsband an der markierten Linie an. Achten Sie darauf, dass sich die Linie in der Mitte des Dichtbandes befindet. Achten Sie darauf, dass sich die Nähte an den Ecken überlappen und entlang des Dichtungsmaterials kein Spalt verbleibt. -
Page 38: Entsorgung Von Verpackung Und Gerät
UMWELTSCHUTZ Entsorgung von Gerät und Verpackung Bei der Herstellung dieses Geräts wurden nachhaltige Materialien verwendet. Nach Ablauf seiner Nutzungsdauer muss das Gerät umweltgerecht entsorgt werden. Informationen zur Entsorgung erhalten Sie von den zuständigen Behörden. Die Verpackung des Geräts ist wiederverwertbar. Folgende Materialien können verwendet worden sein: •... - Page 39 CONTENTS Your hob Introduction Description Using the hob Operation Operating the hob The 7 settings control knob Maintenance Cleaning Troubleshooting Troubleshooting table Installation What you need to consider Mounting Information according regulation (EU) 66/2014 Environmental aspects Disposing of the appliance and the packaging EN 3...
-
Page 40: Your Hob
YOUR HOB Introduction This manual describes how you can make the best possible use of the hob. In addition to information about operation, you will also find background information that can assist you in using this product. Read the separate safety instructions before using the device! Read the manual thorougly before using the appliance, and store these instructions in a safe place for future reference. - Page 41 YOUR HOB Description KE158 --- KE129 --- 1. Cooking plate ø 145 mm / 1000 W 2. Fast cooking plate ø 180 mm / 2000 W 3. Cooking plate ø 180 mm / 1500 W 4. Fast cooking plate ø 145 mm / 1500 W 5.
-
Page 42: Use
Using the hob Switch on the hob • Before using your hob for the first time, each element should be switched on to the highest setting for 3-4 minutes, without a pan. • The manufacturer has applied a layer of rust-preventer to each element. -
Page 43: Operation
OPERATION Operating the hob • A symbol next to the control knob indicates which element is being operated. • You may turn the switch either to the left or the right. • When you switch on the hob, the control light . •... - Page 44 MAINTENANCE Cleaning Attention Switch off the appliance and let it cool down completely before starting any cleaning work. • The hobs are best cleaned with a damp cloth or kitchen paper. • Remove all spillages as soon as possible. Red cabbage, rhubarb and apple sauce in particular will corrode the varnish or stainless steel.
-
Page 45: Troubleshooting Table
TROUBLESHOOTING Troubleshooting table If the appliance does not work properly, this does not always mean that it is defective. Try to deal with the problem yourself first by checking the points mentioned below or check for more information the website. Problem Possible cause Solution... -
Page 46: What You Need To Consider
INSTALLATION What you need to consider Attention This appliance should only be installed by authorized service personnel or a qualified electrician and in accordance with the instructions in this manual and in accordance with applicable local regulations. • The power rating and required mains voltage are shown on the rating plate at the back of the oven. - Page 47 INSTALLATION Built-in dimensions 42,5 min. 50 min. 50 Clearance Sufficient all-round clearance is essential to the safe use of the hob. Check that there is enough clearance. cooker hood cabinet KE129: 290mm KE158: 580mm EN 11...
- Page 48 INSTALLATION Power requirements • 230 V - 50 Hz • After installation the wall socket and plug must be accessible at all times. • The KE158RVS is provided with a connection cable without a plug. 220-240V / 380-415V 50/60Hz 6000W •...
-
Page 49: Mounting
INSTALLATION Mounting 1. Place the hob in the cut out. Mark the location of the hob on the cooktop. 2. Remove the hob. Place the sealant on the line you marked. Make sure that the line centres the sealant. Ensure that the junctions overlap at the corners and no gap is left along the sealing material. -
Page 50: Disposing Of The Appliance And The Packaging
ENVIRONMENTAL ASPECTS Disposing of the appliance and the packaging This appliance is made from sustainable materials. This appliance must be disposed of in a responsible manner at the end of its service life. Contact the local authorities for information about the method. The packaging of the appliance is recyclable. - Page 51 EN 15...
- Page 52 Vous trouverez les adresses et numéros de téléphone du service après-vente sur la carte de garantie. Adressen und Telefonnummern des Kundendienstes finden Sie auf der Garantiekarte. You will find the addresses and phone numbers of the service organisation on the guarantee card. www.etna.nl www.etna.be 886429...
Need help?
Do you have a question about the KE129 Series and is the answer not in the manual?
Questions and answers