Advertisement
Quick Links
Please read and save these instructions
PACKAGE CONTENTS
Assembly and Installation
INSTRUCTIONS PERTAINING TO A RISK OF FIRE, OR INJURY TO PERSONS
IMPORTANT SAFETY INSTRUCTIONS
Lighted lamp is HOT!
CAUTION: Safe for outdoor operation.
WARNING: To reduce the risk of FIRE OR INJURY TO PERSONS:
WARNING: Do not operate the luminaire fitting with a missing or damaged lens
or bulb protector.
WARNING: Install in accordance with all local codes and ordinances.
Only for use with low voltage power units with a maximum output rating of 15V,
300W per secondary.
FOR LANDSCAPE LIGHTING SYSTEMS ONLY. OUTDOOR USE ONLY. THE DEVICE IS
ACCEPTED AS A COMPONENT OF A LANDSCAPE LIGHTING SYSTEM WHERE THE
SUITABILITY OF THE COMBINATION SHALL BE DETERMINED BY CSA OR LOCAL
INSPECTION AUTHORITIES HAVING JURISDICTION.
PATHLIGHT ETL LISTED UNDER MODEL # U000-1923
1
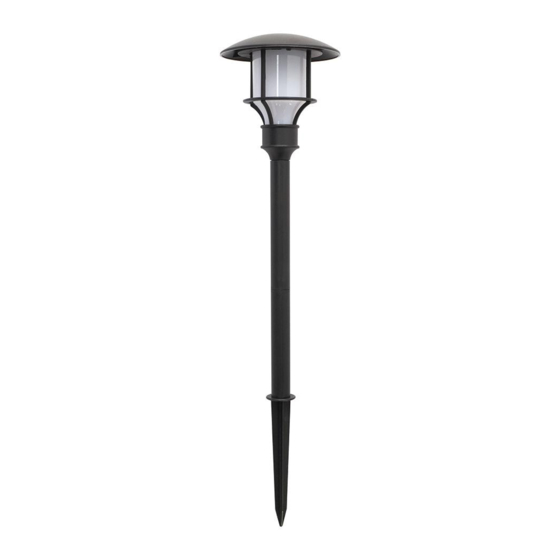
Attaching and installing the pathlight
WARNING: Never push the fixture into the ground by the fixture's head (A) or use a
hammer to insert the spike (E) into the ground.
□
Carefully remove the fixture from its protective packaging.
□
Attach the lens (B) to the post (C) and insert the spike (E) into the
post (C).
□
Attach the cap (A) by screwing it on top of the lens (B)
A
C
A
B
F
G
C
E
H
D
B
E
Part
A
B
C
D
E
F
G
H
2
Connecting the wires
WARNING: The wire connector (D) contacts have sharp edges for piercing the
main low voltage cable. To avoid injury, do not touch the metal contacts.
WARNING: Risk of Electric Shock. Install all luminaires 10 ft. (3.05 m) or more
from a pool, spa or fountain.
CAUTION: The wire from the low voltage power unit shall be 12-18 AWG type
underground low Energy Circuit Cable or SPT2W.
IMPORTANT:
• Protect the wiring by routing it in close proximity to the light fitting, or next to a
building structure such as a house or deck.
• The landscape wire and connector can also be hidden under stone or buried
under grass at a maximum depth of 6 in. (15.24 cm).
• Do not submerge the fixture in water.
□
Place the wire connector (D) on opposite sides of the low
voltage cable (G) where the fixture will be located.
□
Align and fit the main low voltage cable (G) vertically to the
slot of wire connector (D) as shown.
□
Press the wire connector (D) together until fully seated and
locked around the cable (G). Pre-set prongs will pierce the
cable insulation and establish contact. Turn on the power unit.
If the light fixture does not turn on, repeat previous steps.
□
Once the clip-on connector (D) is in place, wrap it with
electrical tape for additional protection.
CAUTION: BE CAREFUL! THE WIRE STABS ARE VERY SHARP!
D
Item
#1001 027 171
Model #HD33677
Use and Care Guide
LOW VOLTAGE PATHLIGHT KIT
Description
Pathlight head
Pathlight lens
Pathlight post
Pathlight connector
Pathlight spike
6W transformer
Cable
Control box
Quantity
6
6
6
6
6
1
1
1
Advertisement

Related Manuals for HAMPTON BAY HD33677


Summary of Contents for HAMPTON BAY HD33677
- Page 1 Item #1001 027 171 Model #HD33677 Use and Care Guide Please read and save these instructions LOW VOLTAGE PATHLIGHT KIT PACKAGE CONTENTS Part Description Quantity Pathlight head Pathlight lens Pathlight post Pathlight connector Pathlight spike 6W transformer Cable Control box...
- Page 2 Assembly and Installation (Continued) Installing the control box □ This control box (H) is weatherproof and suitable for outdoor use. □ Do not install behind shrubs. It will affect the dusk-to-dawn photocell. □ Photocell will not operate properly if installed too close to a nighttime light source.
- Page 3 Care and Cleaning □ Clean the fixture with a soft, dry cloth. □ Do not use any cleaners with chemicals, solvents or harsh abrasives. Troubleshooting Problem Possible cause Solution The fixture will not • There is no power. • Check that the power is on. light. • There is a disconnection or break in • Check if there is a loose connection at the transformer screw terminal.
Need help?
Do you have a question about the HD33677 and is the answer not in the manual?
Questions and answers
don’t know how to wire in the photo cell
To wire the photocell for HAMPTON BAY part number HD33677:
1. Mount the control box (which contains the photocell) at least 12 inches (30 cm) above the ground.
2. Do not install it behind shrubs or near nighttime light sources, as this will affect the dusk-to-dawn function.
3. Mount the control box within 1 foot (30.5 cm) of the electrical outlet where the transformer will be connected.
4. Connect the control box between the transformer and the lights using screw caps to secure the connections.
Ensure all wiring is done with 12–18 AWG underground low energy circuit cable or SPT2W.
This answer is automatically generated