Table of Contents
Advertisement
Quick Links
CGK05
Please keep this instruction sheet for future reference,
as it contains important information.
Requires three AAA (LR03) alkaline batteries (not included) for operation.
Battery installation is required.
Adult assembly is required. Tool required: Phillips screwdriver (not included).
fisher-price.com
Advertisement
Table of Contents

Subscribe to Our Youtube Channel
Related Manuals for Fisher-Price CGK05


Summary of Contents for Fisher-Price CGK05
- Page 1 CGK05 Please keep this instruction sheet for future reference, as it contains important information. Requires three AAA (LR03) alkaline batteries (not included) for operation. Battery installation is required. Adult assembly is required. Tool required: Phillips screwdriver (not included). fisher-price.com...
-
Page 2: Consumer Information
Consumer Information CONSUMER ASSISTANCE 1-800-432-5437 (US & Canada) 1300 135 312 (Australia) Fisher-Price, Inc., 636 Girard Avenue, East Aurora, NY 14052. Hearing-impaired consumers: 1-800-382-7470. Outside the United States: Canada: Mattel Canada Inc., 6155 Freemont Blvd., Mississauga, Ontario L5R 3W2; www.service.mattel.com. -
Page 3: Battery Installation
Battery Installation 1,5V x 3 AAA (LR03) • Loosen the screw in the battery compartment door with a Phillips screwdriver and remove the door. • Insert three AAA (LR03) alkaline batteries. Hint: We recommend using alkaline batteries for longer battery life. •... -
Page 4: Battery Safety Information
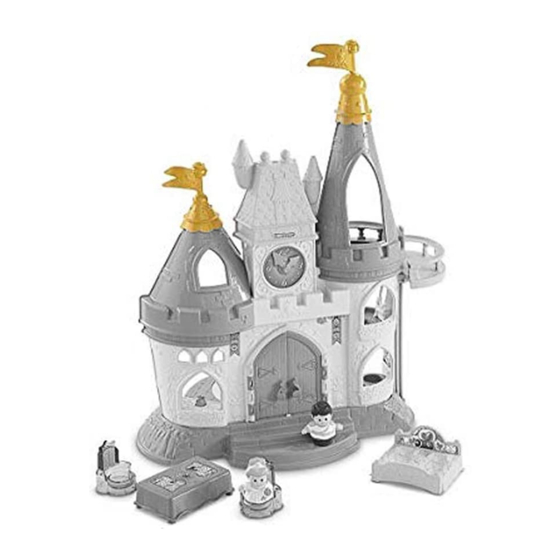
Battery Safety Information In exceptional circumstances, batteries may leak fluids that can cause a chemical burn injury or ruin your product. To avoid battery leakage: • Do not mix old and new batteries or batteries of different types: alkaline, standard (carbon-zinc) or rechargeable (nickel-cadmium). - Page 5 Assembled Parts CAUTION This package contains small parts. For adult assembly only. Balcony Clock Tower 2 Flags Floor Short Tower Tall Tower Base Wall Part not shown: Label Sheet 3 mm x 15 mm Washer Head Screw – 2 3 mm x 15 mm Screw – 7 Shown Actual Size Tighten and loosen all screws with a Phillips screwdriver.
-
Page 6: Side View
Assembly Wall Tall Tower • Fit the pegs on the tall tower into the openings in the wall. Clock Tower Assembly Tab Wall Assembly SIDE VIEW • Carefully lay the wall assembly on a flat surface with the inside facing up. •... - Page 7 Assembly Short Tower • Fit the pegs on the short tower into the openings in the wall. Screw • Align the hole in the clock tower assembly with the post on the wall assembly. Insert a 3 mm x 15 mm screw into the post. Tighten the screw.
- Page 8 Assembly Clock Tower Tabs Floor Slots • Fit the tabs on the clock tower into the slots in the floor. Push to “snap” in place. Screws • Insert two 3 mm x 15 mm screws into the holes in the clock tower and tighten.
- Page 9 Assembly 2 Washer Head Screws • Align the slots in the clock tower assembly with the holes in the posts in the wall assembly. Insert two 3 mm x 15 mm washer head screws and tighten. Screws • Insert two 3 mm x 15 mm screws into the balcony and tighten.
- Page 10 Assembly Screws • Insert two 3 mm x 15 mm screws into the wall assembly and tighten. Base • Fit the tabs on the wall assembly into the slots on the base. Push to “snap” in place.
- Page 11 Assembly Balcony • Fit the balcony onto the wall. 2 Flags • Place the flags on top of the towers.
- Page 12 Decoration • Place the labels exactly as shown in the illustrations. • For best results, avoid repositioning a label once it has been applied. Front...
- Page 13 Decoration Back Table...
- Page 14 Timeless stories…Endless play! • Slide the power/volume • Place a figure on the dance switch to ON with low floor and press down. volume or ON with The castle recognizes and high volume . When you responds to the prince and are finished playing with this princess! Additional figures toy, slide the power/volume...
- Page 15 Consumer Information FCC Statement (United States Only) This equipment has been tested and found to comply with the limits for a Class B digital device, pursuant to Part 15 of the FCC Rules. These limits are designed to provide reasonable protection against harmful interference in a residential installation. This equipment generates, uses and can radiate radio frequency energy and, if not installed and used in accordance with the instructions, may cause harmful interference to radio communications.
Need help?
Do you have a question about the CGK05 and is the answer not in the manual?
Questions and answers