Table of Contents
Advertisement
Quick Links
Advertisement
Table of Contents

Related Manuals for Laser NRGVAULT PV500

Summary of Contents for Laser NRGVAULT PV500
- Page 1 User Manual PWR-PV500-PS...
-
Page 2: Maintenance
INTRODUCTION This product is a portable energy storage power generator. It can be used as a power source for emergency relief, outdoor camping, office equipment, entertainment and much more. It is compact enough for portability but capable enough to power small to medium appliances. MAINTENANCE •... -
Page 3: General Safety
GENERAL SAFETY The NRGVault range of portable power stations has been made to the highest standards for safety and reliability. Please retain the user manual for important safety information about your device. This manual will help you learn the features and specifications of the device to assist with operability and satisfaction during use. - Page 4 TIPS FOR SAFE CHARGING 1. AVOID OVERCHARGING. Disconnect power stations and devices after the battery reaches a full charge. Leaving devices on a power station too long may cause them to overheat and can reduce battery life. 2. PICK THE RIGHT POWER OUTPUT. Take special care to match the correct voltage and amp values your device requires when using a power station.
-
Page 5: What's In The Box
WHAT’S IN THE BOX • PWR-PV500-PS Portable Power Station • AC Charging Cable • User Manual... -
Page 6: Product Specifications
PRODUCT SPECIFICATIONS Item Description Battery Cell Type: LiFePO4 Battery Cell Model: 32700 3.2V/6000mAh x 16 Rated Capacity 288Wh (16V/18Ah) Lifecycle 2000 cycles to 80% Battery Under/Over Voltage Protection, Over Current Protection, Management Short Circuit Protection, Overcharging Voltage Protection, System Over Temperature Protection, Overload Protection. MPPT Supports Solar Power MPPT charging Housing... -
Page 7: General Specifications
GENERAL SPECIFICATIONS Item Parameter Battery Cell Standard 3.2V Voltage Cells Configuration 5S3P Battery Pack Voltage Output Waveform Pure Sine Wave Operating Environment 0~40°C 20%~90% Working Humidity No condensation at 20-90% of humidity Normal indoor storage temperature. Storage Temperature Recommended storage temperature: 0 ~ 25°C (Range) Recommend: Recharge every 3 months. - Page 8 USE CASE (approximations only) Table Lamp Mini Fridge 50 hours 4 – 5 hours iPhone 12 Cordless Drill 20+ Charges 8+ Charges Tablet 6 hours 8+ Charges CPAP Device Laptop 5 – 6 hours 3 - 4 Charges Camera 3 hours 15+ Charges Bluetooth Speaker Drone...
-
Page 9: Product Diagram
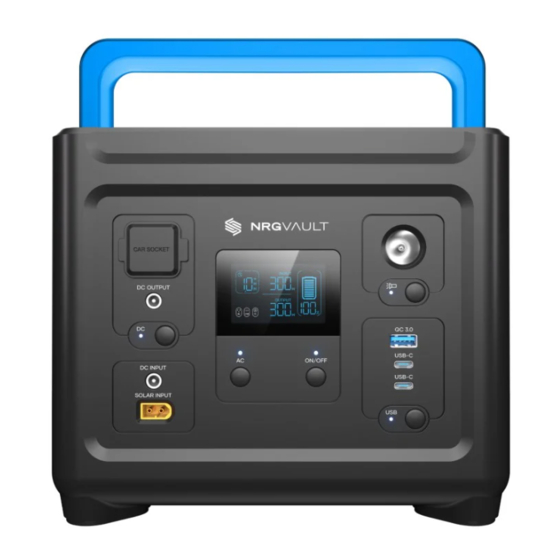
PRODUCT DIAGRAM 1 - Handle 12 - DC Input Port 2 - AC Output Port 13 - Solar Panel Input Port 3 - Dust Cover 14 - DC ON/OFF Switch 4 - 12V Car Socket 15 - AC ON/OFF Switch 5 - DC Output Port 16 - Main Power Button 6 - LCD Display... -
Page 10: Lcd Display
LCD DISPLAY Battery failure/low Battery Power Level % voltage indicator Battery high/low Battery Information Battery Power Level temperature indicator Indicator Battery Lock Protection AC Input DC Input Input Indicator Solar Input Input Power AC Output Indicators DC/Car Outlet Output Output Indicator USB Output Indicators Output power Minutes... - Page 11 CHARGING • Please charge the PWR-PV500-PS before using. • Charge the battery to 80% before extended storage. Check the PWR-PV500-PS remaining power level every 3-6 months and charge again. • There are 3 input ports on the PWR-PV500-PS: 1 x AC input port. 1 x Solar input port.
-
Page 12: Solar Charging
SOLAR CHARGING • The PWR-PV500-PS supports Solar Panel charging rated at 90W. • Solar power can be used to charge the PWR-PV500-PS with a maximum power of 90W through the XT60 port (figure 13 in Product Diagram) • A full charge from a 90W Solar Panel will take between 4-7 hours (dependant on sunlight intensity). -
Page 13: Car Charging
CAR CHARGING • PWR-PV500-PS supports car charging rated at 90W. • The 12V socket in a car can be used to charge the PWR-PV500-PS with a maximum power of 90W through the DC port (figure 12 in Product Diagram). • A full charge via a 12V car charger will take approx. 3-4 hours. Note: A 12V DC5521 cable (sold seperately) is required. - Page 14 HOW TO USE AC OUTPUT Under the condition that the total power does not exceed 500W, all AC outlets can work together at the same time. 1. Long press the main power button 3 seconds to turn on. The main power indicator and the screen lights up, then enters the standby state.
- Page 15 HOW TO USE DC OUTPUT 1. Long press the main power button to turn on. The main power indicator and the screen light up, then enters the standby state. 2. Plug in the DC device. 3. Tap the DC on/off switch to turn on the DC function. 4.
- Page 16 HOW TO USE USB OUTPUT 1. Long press the main power button to turn on. The main power indicator and the screen light up, then enters the standby state. 2.Tap the USB on/off switch to turn on the USB function. 3.Plug in the USB device.
- Page 17 HOW TO USE THE LED LIGHT 1. Press and hold the main power button for 3 seconds to power on. 2. Press and hold the LED light button for 3 seconds to turn on the half-bright mode of the LED light. 3.
-
Page 18: Troubleshooting
TROUBLESHOOTING DEVICE NOT CHARGING: • Power off/on your device and try charging again. • Try using another charging cable from your device to the PWR-PV500-PS. • If using AC or DC output, make sure their respective switches are set to ON. •... - Page 19 TROUBLESHOOTING continued... HOW DO I CHARGE THE PWR-PV500-PS? - The PWR-PV500-PS has 3 charging inputs. AC (Wall Socket), XT60 (Solar Panel) and DC (Car). An AC cable is included for charging via a wall socket. The XT60 and DC cables are not included.
- Page 20 Thank you for your purchase! To get the most out of your product please read the user manual carefully and keep for future use. For specific information relating to your product such as Spare Parts, FAQs, Warranty claims, and more, please scan the following QR code:...
- Page 21 Visit our websites www.laserco.com.au www.nrgvault.com.au Check us out at www.youtube.com/lasercoau...
Need help?
Do you have a question about the NRGVAULT PV500 and is the answer not in the manual?
Questions and answers