Advertisement
Quick Links
Solid-body ST-style Guitar Kit Assembly
Manual
This guide provides step-by-step instructions to build a solid-body ST-style DIY guitar using
a kit. Even if you have never built a DIY guitar before, you can learn how to get started by
reading this tutorial.
There's nothing more satisfying than playing a guitar you have put together yourself!
1
Advertisement

Subscribe to Our Youtube Channel
Related Manuals for GUITAR KIT WORLD Solid-body ST-style Guitar Kit


Summary of Contents for GUITAR KIT WORLD Solid-body ST-style Guitar Kit
- Page 1 Solid-body ST-style Guitar Kit Assembly Manual This guide provides step-by-step instructions to build a solid-body ST-style DIY guitar using a kit. Even if you have never built a DIY guitar before, you can learn how to get started by reading this tutorial.
- Page 2 Project Toolbox Before we get started check the list below and ensure you have the necessary tools and consumables required to complete the project. Tools ● 2 X Timber clamps (*set neck guitar only) ● Electric jigsaw or coping saw (*If shaping the headstock) ●...
-
Page 3: Safety Precautions
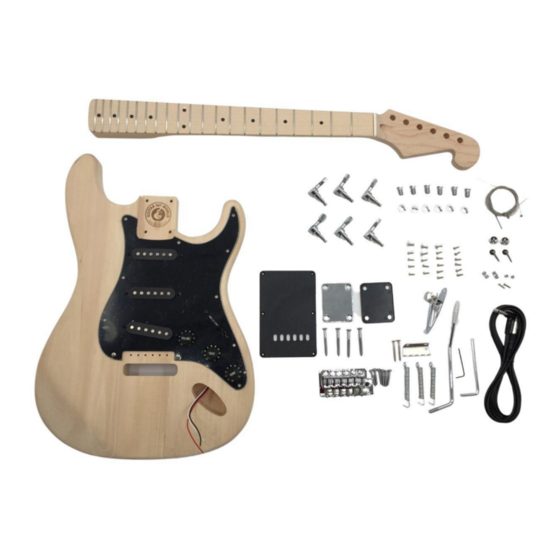
Next, check that all parts have been included. Parts List Below are the parts you will find included in your packaging to complete an ST guitar kit. ● ST body and neck ● Neck plate, neck plate cushion and screws ●... - Page 4 A well ventilated work area Ensure your work space is well ventilated, especially when finishing to prevent a build up of potentially toxic fumes. Making your Guitar Kit play and sound great There are four stages to building a great kit guitar, these are: 1.
- Page 5 1. Preparation and finishing Inspecting and prepping the body Once unboxed, remove the pickguard by removing the two screws holding it in place on either side of the bridge cutout. Next, carefully inspect the guitar body and neck under good light.
- Page 6 Once you have identified problem areas you can begin prep sanding the guitar. Start by sanding the entire body using 180 grit sandpaper.Follow that up with 240 grit paper. If you are applying a stain directly to the raw wood sand up to 400 grit, but sanding any smoother than this may begin to affect how well the stain is absorbed.
- Page 7 Insert the Neck First push the heel gently into the back of the neck pocket, then push the neck down flat. This reduces the risk of chipping the thin edges of the neck pocket before the neck has been installed. Check the scale length You can check the location of your bridge with regard to scale length by loosely installing the bridge and measuring the distance from the edge of the nut closest to the fretboard and...
- Page 8 Check the neck angle Run a steel ruler along the fretboard and over the bridge. The steel ruler should sit just above the saddles on the bridge when the bridge is sitting flat against the body. Cutting the Headstock If shaping your headstock, start out by sketching out some rough concepts before transferring the chosen design to paper at the correct size.
- Page 9 Masking Before we start grain filling and finishing we should mask the neck pocket, and body cavities of the guitar. Mask the tuning peg holes on the headstock to keep the holes clean, along with the holes for the bridge and tailpiece and pay special attention to the truss rod. You should also mask the fretboard when spraying the back of the neck.
- Page 10 Grain Filling Grain filling is optional, and mostly depends on the wood your guitar is made from and whether you are aiming for a flat finish. If your guitar is made from an open grain timber such as Oak or Mahogany, the open pores of the timber will prevent a flat finish unless filled.
- Page 11 Finishing It’s beyond the scope of this guide to cover every available way to finish an electric guitar but below are a few rules that apply to almost all finishing options: ● Carefully consider your finishing options with regard to how protective they are and how they might affect tone along with aesthetics.
- Page 12 ● Spray the sides of the body first. That way when spraying the front and back you will be spraying over any overspray from the sides of the guitar. ● Don’t spray heavy coats. In many cases, several lighter coats are a better option than 1-2 heavy coats due to the potential for runs.
-
Page 13: Hardware Installation
Place the neck into the neck pocket and ensure it is pushed right up into the back of the cavity. Place the black neck plate cushion followed by the chrome neck plate and then loosely place the 4 screws, but don’t begin tightening these yet. Next, double check your alignment and begin installing the screws. - Page 14 Whenever installing hardware: 1. Use masking tape on the guitar to mark the location of the hole using a pen (pencils usually don’t result in sharp lines on masking tape). 2. Mark the location of the hole making an indentation in the wood through the masking tape using a hole punch or similar tool.
- Page 15 Once you have threaded the wires, including the ground wire for the bridge, install the pickguard. Check the alignment and then mark indentations in the timber for each screw hole using a hole punch or similar object and the pickguard as a template. Once you have marked the location of your pilot holes select a drill bit approx.
- Page 16 Installing the Tuners ST guitar kits utilize inline tuners, so you won’t need to separate your tuners into left and right. 1. Start by inserting the tuner in the back of the headstock with the mounting hole facing back toward the body. 2.
- Page 17 You can also install the first and last tuner, and using a steel ruler mark a straight line between them on masking tape to ensure a straight line to mark out the location of the pilot holes. Installing strap buttons Strap buttons not only support your guitar when playing standing up, the placement of the strap buttons also affects the balance of the guitar.
- Page 18 On an ST guitar, the rear strap button is located in the center of the lower bout. The front strap button is inserted into the top horn on a downward facing angle. Follow the method described above for all hardware installation including using painters marking tape for marking the location of pilot holes, and drilling to the correct size and chamfering the edges of the holes.
-
Page 19: Connecting The Electronics
3. Connecting the electronics Soldering If you haven’t soldered before you’re going to need a soldering iron, solder, and a damp sponge to clean the tip of your iron. I’d also recommend practicing before committing solder to your electrical components. Most entry level soldering irons will do the job, and your kit will come with more than enough solder. - Page 21 Tin both lugs on the input jack by applying a small amount of solder to each and let cool. Take the hot wire, in the example this is the red wire, and thread it through the eyelet of the lug attached to the outer sleeve of the input jack. Next, take the ground wire (black) and thread it through the eyelet of the lug attached to the the inner sleeve of the input jack.
- Page 22 Screw the claw into place but only loosely fit the screws in place for now, as we’ll need to install the springs next. Taking the 3 strings in your packaging, thread the round ends of the springs over the tremolo claw end and the square end of the tremolo block. I attach to the middle three positions on the tremolo claw but this is really up to you.
- Page 23 We’ll connect the white wire we threaded through the side of the control cavity earlier to the tremolo claw to ground the guitar. Locate the wire and tin the end. Next melt a small puddle of solder around the hole to the side of the trem claw.
- Page 24 Installing the String Trees String trees serve to increase the break angle from the nut to the tuners, for the high Em, B, G, and D strings, providing greater stability for the nut and preventing strings moving around in their slots. This is fairly typical of Fender®...
-
Page 25: Final Setup
To install your string trees, you will first need to install your strings to allow for perfect alignment. Once the strings are in place lay the top face of the string trees across the E,B and D and G strings. Align the D and G string tree between the first and second tuning post and the D and E string tree in line with the second tuning post. - Page 26 Floating the Trem Now that the strings are on, we'll adjust, or aka float the trem. What we’re aiming for is enough action on the tremolo unit to allow for a semitone (half step) shift in pitch when laying the bridge plate flat against the guitar body. The amount of action provided by the tremolo depends on the interplay between the springs and the strings.
- Page 27 3. Flip the guitar over and tighten the tremolo springs. While retuning the guitar as needed and checking how much tilt the tremolo has. Check the amount of pitch shift when laying the trem flat against the body and continue to adjust until satisfied.
- Page 28 Adjusting the action Action refers to the height of the strings from the fretboard of the guitar. This is usually measured from the top of the 12th fret to the underside of the low E string. A good starting point if unsure is 2.4mm on the low E side and 1.6mm on the high E side, taking into account the different string gauges.
- Page 29 Intonating the guitar Intonation, in essence means, is the guitar in tune with itself. You can check this by tuning to standard tuning and then checking the strings at the 12th fret (an octave up from the open string). If the pitch is sharp you will need to lengthen the string length. If flat you will need to shorten it.
- Page 30 Adjusting pickup height Lastly, we’ll check and adjust the pickup height. Much like string action, the height of your pickups is mostly subjective and will depend on what you are hearing. But, if unsure a good starting point is 2.4mm from the top of the magnetic pole piece to the underside of the string.
- Page 31 To adjust the height of the pickups, adjust the mounting screws on the outside of the pickup surround. Summary And that marks the end of our project. Once you have completed the steps outlined above. You should have a complete guitar ready to play.
Need help?
Do you have a question about the Solid-body ST-style Guitar Kit and is the answer not in the manual?
Questions and answers