Table of Contents
Advertisement
Quick Links
SG-style Guitar Kit Assembly
Manual
This guide provides step-by-step instructions to build a solid-body SG-style DIY guitar using
a kit. Even if you have never built a DIY guitar before, you can learn how to get started by
reading this tutorial.
There's nothing more satisfying than playing a guitar you have put together yourself!
1
Advertisement
Table of Contents

Related Manuals for GUITAR KIT WORLD SG-style Guitar Kit


Summary of Contents for GUITAR KIT WORLD SG-style Guitar Kit
- Page 1 SG-style Guitar Kit Assembly Manual This guide provides step-by-step instructions to build a solid-body SG-style DIY guitar using a kit. Even if you have never built a DIY guitar before, you can learn how to get started by reading this tutorial.
- Page 2 Project Tools and Consumables Before we get started check the list below and ensure you have the necessary tools and consumables required to complete the project. Tools ● 2 X Timber clamps (*set neck guitar only) ● Electric jigsaw or coping saw (*If shaping the headstock) ●...
-
Page 3: Safety Precautions
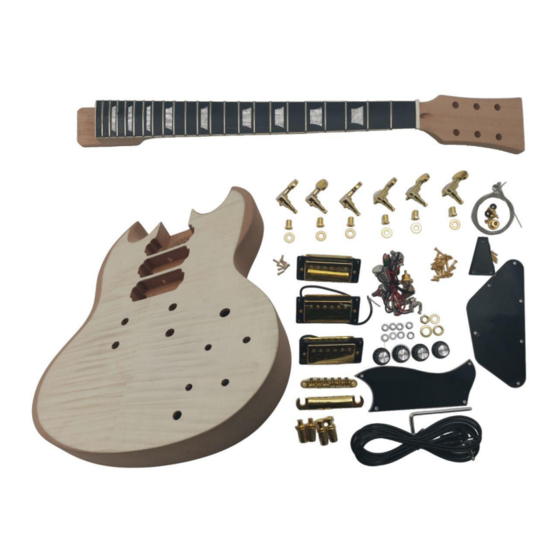
Next, check that all parts have been included. Parts List Below are the parts you will find included in your packaging to complete an SG guitar kit. ● SG-style body & neck ● Neck plate, neck plate cushion and screws (if bolt-on neck) ●... - Page 4 A well ventilated work area Ensure your work space is well ventilated, especially when finishing to prevent a build up of potentially toxic fumes. Making your Guitar Kit play and sound great There are four stages to building a great kit guitar, these are: 1.
- Page 5 This includes large dents that require filling, deep scratches that require sanding and glue residue on the surface of the guitar that will prevent your finish from being absorbed evenly. Glue stains will only be a potential issue for guitars with binding, and/or a veneer top. Dry fitting the neck Insert the Neck First push the heel gently into the back of the neck pocket, then push the neck down flat.
- Page 6 Check the scale length You can check the location of your bridge post holes with regard to scale length by measuring the distance from the edge of the nut closest to the fretboard and the middle of the 12th fret and then doubling that number. An SG guitar kit should have a scale length of 24.75”...
- Page 7 1. Once you have a completed design at the correct size cut the shape out and glue it to a thin scrap piece of timber to be used as a template. (You can also use cardboard which in many cases will be easier to work with). 2.
- Page 8 Prepping the body Check the body carefully again for glue stains. In most cases glue stains can be sanded out but if you notice stains on a veneer top, keep in mind the veneer is quite thin and you should first try to remove with a small amount of warm water and a clean rag. Next we’ll move onto prep sanding the body and neck.
- Page 9 If you are staining, depending on the product you are using, you can grain fill either before or after. In most cases I’ve found grain filling first results in a more even application, and a better result. There are a number of different grain fillers available, including solvent, water and oil based options, along with pre-tinted options.
- Page 10 If your guitar has binding you can either attempt to mask off the binding, which in most cases will mean some finish still permeates the masking tape and will need to be removed, or not masking, and scraping the binding clean with a razor blade before spraying your clear coats.
-
Page 11: Hardware Installation
● Check your binding for cracks. If cracks are present, mask the binding prior to applying a colored finish or the finish will penetrate the binding and become impossible to restore to its original state. ● Don’t apply too many coats within recommended drying times. If you spray more than 3 coats in a day for example, your first coat may have trouble curing. - Page 12 You may want to drill less than ⅓ depth on less dense timbers such as Mahogany and Basswood. Installing strap buttons Strap buttons not only support your guitar when playing standing up, the placement of the strap buttons also affects the balance of the guitar. On an SG guitar, the rear strap button is located in the center of the lower bout.
- Page 13 Installing the truss rod cover While not strictly hardware, it’s important to center the truss rod cover on the headstock. The simplest way to do this is by using masking tape on the headstock, measuring half way across the headstock (the guitar has a nut width of 42mm, so the number should be 21mm) and drawing a line extending out from the nut to the end of the headstock.
-
Page 14: Installing The Electronics
5. Remove the protective covering by firmly pressing masking tape onto the back of each tuner and removing both the covering and masking tape in one action. Align tuners using a steel ruler. You can also install the first and last tuner, and using a steel rule mark a straight line between them on masking tape to mark out the location of the pilot holes. -
Page 15: Install The Pickguard
5. Insert the bushing into the predrilled hole, ensuring the ground wire ends up sitting flush against the bushing. In many cases you may require a rubber mallet to force the bushing into place. 6. Screw the bridge posts to the bridge bushings and the tailpiece posts to the tailpiece bushings. - Page 16 Most entry level soldering irons will do the job, and your kit will come with more than enough solder. Be careful when soldering. Solder won’t melt until it reaches 185°C (365°F) and soldering irons get very hot, up to 392°-896° F in some cases. When soldering there are two key areas to keep in mind.
- Page 18 Connecting the pickup wires Next, we’ll warm up our soldering iron and connect the pickups. Taking the wire from the neck position on the pickup selector (the top position) insert the end of the shielded wire through the input lug eyelet (the leftmost lug if facing away from you) and secure in place.
-
Page 19: Final Setup
diagram above. If you notice the guitar is particularly noisy, it is likely to be a problem with your ground circuit (the black wires). 4. Final Setup The last stage of our project is setting up the guitar. This is an important step that makes all the difference with regard to playability and tone. - Page 20 You can measure the straightness of the neck using a steel ruler. I prefer to hold down the first and last fret and then tap the 12th fret lightly of the low E string. If the string is already sitting hard against the fret more relief is required. If sitting well above the fret, the amount of relief can be reduced.
-
Page 21: Adjusting The Action
Adjusting the action Action refers to the height of the strings from the fretboard of the guitar. This is usually measured from the top of the 12th fret to the underside of the low E string. A good starting point if unsure is 2.4mm on the low E side and 1.6mm on the high E side, taking into account the different string gauges. - Page 22 But, if unsure a good starting point is 2.4mm from the top of the magnetic pole piece to the underside of the string. However, this should be measured when pressing down the last fret of the guitar. To adjust the height of the pickups, adjust the mounting screws on the outside of the pickup surround.
Need help?
Do you have a question about the SG-style Guitar Kit and is the answer not in the manual?
Questions and answers