Table of Contents
Advertisement
Quick Links
Quick Setup Guide
EdgeIPS
EdgeIPS Pro 216 Rugged is a Transparent Security
Appliance, supporting up to 8 pairs of IPS segments.
Users can efficiently adapt the rack mounted
EdgeIPS Pro 216 Rugged into a flexible solution
for the challenges of Ethernet communications.
1
1
Opening and Inspecting the Package
EdgeIPS Pro 216 Rugged Appliance
Power Cord x 4
2
1
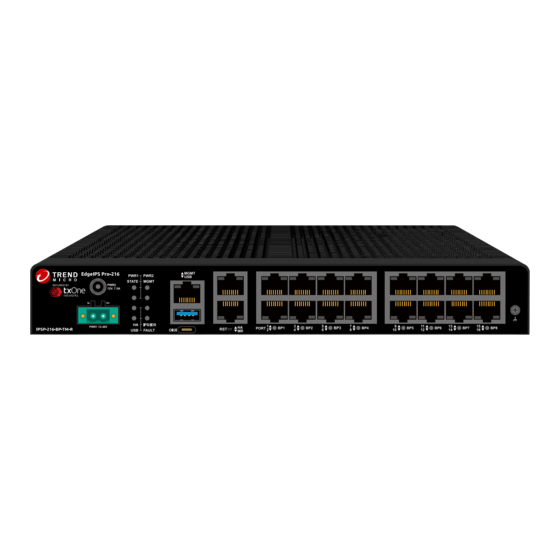
Examining the EdgeIPS Pro 216 Rugged
Pro 216 Rugged
TM
Console Cable
(USB Type-C)
Terminal Block
Rubber Feet x 4
Adapter
1
-
-
Support
configurable
hardware
bypass
DIN-Rail Kit
(installed on EdgeIPS
Pro 216 Rugged)
Documents
Advertisement
Table of Contents

Subscribe to Our Youtube Channel
Related Manuals for Trend Micro txOne networks EdgeIPS Pro 216 Rugged

Summary of Contents for Trend Micro txOne networks EdgeIPS Pro 216 Rugged
- Page 1 Quick Setup Guide EdgeIPS Pro 216 Rugged Support configurable hardware bypass EdgeIPS Pro 216 Rugged is a Transparent Security Appliance, supporting up to 8 pairs of IPS segments. Users can efficiently adapt the rack mounted EdgeIPS Pro 216 Rugged into a flexible solution for the challenges of Ethernet communications.
-
Page 2: Deployment Checklist
Deployment Checklist Requirement Details Ethernet Cables Connect to the Management Port to access web management console. Default IP Address of Default web console access information: Web Console https://192.168.127.254 User Name: admin Password: txone Laptop with Ethernet The computer must have one of the following browsers installed: Port (RJ-45 Type) - Microsoft Edge (version 15 or above) - Firefox (version 53 or above) -
Page 3: Led Indicators
LED Indicators The function of each LED is described in the table below. Green Power 1 is on, and the device is functioning normally. PWR1 Power 1 is off. Green Power 2 is on, and the device is functioning normally. PWR2 Power 2 is off. - Page 4 Mounting the EdgeIPS Pro 216 Rugged to a DIN Rail The aluminum DIN rail attachment plate should already be fixed to the back panel of EdgeIPS Pro 216 Rugged when you take it out of the box. If you need to reattach the DIN rail attachment plate to EdgeIPS Pro 216 Rugged, make sure the stiff metal spring is oriented towards the back, as shown in the following pictures.
-
Page 5: Connecting The Power
Connecting the Power with DC Wires Step Open the terminal block’s wire locks by pushing the buttons down. Step Insert positive/negative DC wires into the V+/V- Top View terminals respectively. Step When the wire is properly seated, the wire lock will be forced V- V+ shut around it. - Page 6 Wiring the Redundant Power Inputs Software Configuration Before you connect the PC/laptop to EdgeIPS Pro 216 Rugged, the PC's IP address should be set to 192.168.127.100. After that, connect the PC and EdgeIPS Pro 216 Rugged using an Ethernet cable. Open a web browser on your PC and type “https://192.168.127.254” into the address bar.
- Page 7 Configuring the Management Port 1. Go to [Network] > [Device Settings]. 2. In the [Device Settings] pane, configure the management port for EdgeIPS Pro 216 Rugged Task Action Device IP Address Configure Management IP Address of the EdgeIPS Pro 216 Rugged Netmask Configure Netmask of the EdgeIPS Pro 216 Rugged...
- Page 8 Checking LED Indicators to Confirm Status The LED on each Ethernet port shows the deployment status. No Light The EdgeIPS Pro 216 Rugged appliance cannot communicate with a network. Left LED GE LINK/ACT (off = no link, on = activity) Right LED 1 Gbps LINK/ACT (on = 1 Gbps link) MGMT/MR...
-
Page 9: Contact Information
Appendix: Connecting to the Console Port The EdgeIPS Pro 216 Rugged console port is a USB Type-C port located on the front panel of the case. It is designed for connecting to serial console terminals to view messages during a boot sequence or for debugging system boot issues. To connect to a serial console terminal using a console cable, remove the protective cover from the port.
Need help?
Do you have a question about the txOne networks EdgeIPS Pro 216 Rugged and is the answer not in the manual?
Questions and answers