Table of Contents
Advertisement
Quick Links
Advertisement
Table of Contents

Related Manuals for Sioux Tools DAAY POWER SWEEP


Summary of Contents for Sioux Tools DAAY POWER SWEEP
- Page 1 MANUAL NO. 712702 3/23/2022 OWNERS MANUAL...
- Page 2 Introduction • The purpose of this manual is to explain the operation and maintenance of the paddle sweep. It also contains a parts list for reference if replacement parts are needed. • It is recommended that you read this manual in its entirety for the information available in order to provide the proper care and maintenance of the paddle sweep.
-
Page 3: Table Of Contents
Contents Sweep Terminology ..........................1 Safety Information ..........................3 Safety Alert Symbol ........................4 Safety & Logo Decals ........................5 Specifications ............................6 Features ............................6 Burial Depth Chart ........................7 Overall Dimensions & Weights ....................8 Setup ..............................9 Prior to Installation ........................ -
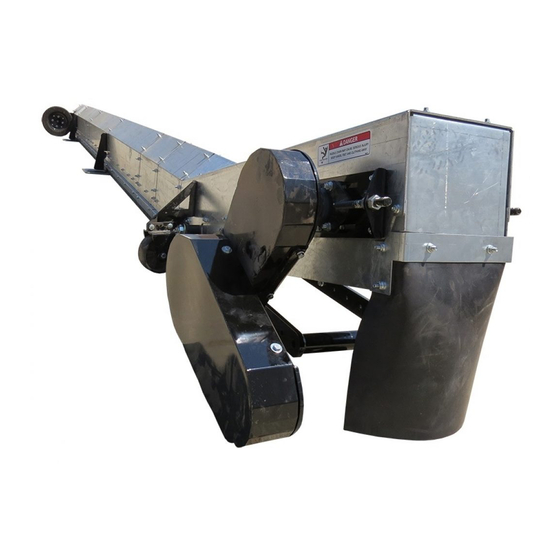
Page 4: Sweep Terminology
1 Sweep Terminology Head Section Intermediate Section Pivot Kit Drive End Paddle Chain Jack Stand... - Page 5 Caster Wheel Zero Entry...
-
Page 6: Safety Information
2 Safety Information • A careful operator is the best operator. Most accidents can be avoided by observing necessary precautions. To help prevent accidents, read the following precautions before operating this equipment. Equipment should be operated only by those who are responsible and instructed to do so. -
Page 7: Safety Alert Symbol
2.1 Safety Alert Symbol • The symbol shown below is used to call your attention to instructions concerning your personal safety. Watch for this symbol it points out important safety precautions. It means ATTENTION! Be Alert! Your Personal Safety Is Involved! DANGER: Indicates an imminently hazardous situation that, if not avoided, will result in death or serious injury. -
Page 8: Safety & Logo Decals
2.2 Safety & Logo Decals ▪ 686033 DANGER – Paddle chain may cause serious injury keep hands, feet and clothing away. ▪ 690344 – Operation Information ▪ 688462 DANGER - Electrical Hazard. Turn off power and lock out before servicing. 689771 WARNING –... -
Page 9: Specifications
3 Specifications (Specifications are subject to change without notice and without liability) 3.1 Features • Farm Series • Theoretical Capacity: Up to 5,000 BPH. Note: These values can fluctuate greatly depending on the varying conditions present, including but not limited to; moisture content, grain commodity type and flowability, amount of foreign matter present, and compaction rate. -
Page 10: Burial Depth Chart
3.2 Burial Depth Chart... -
Page 11: Overall Dimensions & Weights
3.3 Overall Dimensions & Weights Sweep Unit for Bin Length Length Height Width Unit Weight (lbs) Size (Dim A) (Dim B) (Dim C) (Dim D) 15’ 8’ 18’ 9’ 21’ 11’ 24’ 12’ 27’ 13’ 30’ 15’ 18” 37” 33” 33’... -
Page 12: Setup
4 Setup 4.1 Prior to Installation • Extra floor supports or structure will be required to support the sweep during burial if a full aeration floor is used. These supports or structure will need to be placed directly underneath the zero entry pads/jacks/caster wheels to support the sweep in the burial condition. - Page 13 • Wheel Diagram BIN WALL OUTER DRIVE WHEEL PATH MIDDLE DRIVE WHEEL PATH INNER DRIVE WHEEL PATH SECOND ROLLER WHEEL PATH FIRST ROLLER WHEEL PATH "B" "C" "D" "E" "F" "G" "H" "I" "J" "K" "A" • Note: Wheel Diagram has additional information NOT relevant to setup of the interceptor sweep (“D”...
-
Page 14: Installation
A tripod kit is available to assist in lifting components and moving them across the bin floor. The tripod can be collapsed to fit through any size door. • Since the power for the Daay Power Sweep is thru the gearbox, lock out tag out procedures should be followed. •... -
Page 15: Head Section Assembly
4.3 Head Section Assembly • Overview – The installation of the head section will determine the final location of the sweep. So, planning the pin location is critical to avoid having to move the entire sweep. Head Section – 1.Reference the following parts of this manual. - Page 16 · The proper holes to use is not important currently. The length will be adjusted when the Daay Power Sweep is completely assembled. · Hand tighten nuts only. 6. Ensure all fasteners are tightened properly and parts that need to move freely can.
-
Page 17: Intermediate Sections And Paddle Chain Installation
4.4 Intermediate Sections and Paddle Chain Installation • Overview – Locate the parts diagram for your sweep model in the back of this manual to determine the order of intermediate section and their locations. Setting the sections on the ground in the order of installation can aid in the assembly process. Note: do not install the zero entry pads until noted to do so in this manual. - Page 18 3. Feed the chain through the bottom of the head section. Then over the sprocket and out the top. NOTE: It is recommended that after starting chain over the top to attach a wire/rope to the chain to pull through the intermediate sections. 4.
- Page 19 6. Continue pulling the chain through the top portion of each section as you assemble them. Installing the jacks or zero entry stands as each section is installed will assist with supporting the sweep. Tip: Be sure that the paddles do not get pinched between the flanges when bolting them together.
-
Page 20: End Drive Section Assembly And Installation
4.5 End Drive Section Assembly and Installation • Overview - The end drive will be delivered disassembled. Assembly should occur in the bin to ensure it fits into the bin’s entry door / manway. Drive End Reference the following parts of this manual. See table of contents for specific page numbers. - Page 21 3. Attach the drive gearbox bracket weldment to the drive section making sure the bolts and nuts are orientated so that the threads and nuts are oriented out of the sweep. · Tighten the nuts only hand tight. The bracket will need to slide back and forth to ensure the drive chain is at the proper tensions.
- Page 22 Set the distance between the outside of the wheel hub weldment plate and the drive gearbox bracket weldment between 2.75” and 2.875”. 11. Install the wheel (K689095) onto the wheel hub weldment. 12. Make sure the chain and sprockets are aligned &...
-
Page 23: Paddle Chain Tensioning
4.6 Paddle Chain Tensioning • Overview – The paddle chain will need to be tensioned twice before installation is complete. The initial tensioning will be prior to operation and tension must be checked again after operation. This will ensure proper tension upon startup under load. 1. -
Page 24: Final Check
4.7 Final Check • Overview – The final check is to complete installation and ensure the sweep is ready for operation. Checking these items is critical before an initial operation. 1. Install the drag rubber on the back side of the sweep such that it lightly contacts the ground. -
Page 25: Initial Operation
4.8 Initial Operation • Overview – During initial operation in an empty bin, personal will have to be inside of the bin. It is critical that persons stay on the back side of the sweep and do not sit on, walk, stand, or touch the sweep as it is operating. -
Page 26: Track Pathway Installation
4.9 Track Pathway Installation • Overview –If your floor is a full aeration floor or has aeration tunnels, track pathways are available to protect them from damage from the caster wheels and drive wheel. The track pathways are critical to preventing floor damage when the sweep is operated under load. To determine the location of the track pathways it is recommended that the sweep is operated to find the path. - Page 27 3. Using the shims that are provided, elevate the pad so that each one has a 1/8” gap to the stand. If there is not enough room for the pad without a shim, then the zero-entry stand will need to be cut or ground to provide the 1/8” gap.
-
Page 28: Setting The Sweep For Burial
4.11 Setting the sweep for Burial • Overview – Once the second pass is nearly complete the sweep can be set for burial. Improperly setting the sweep for burial can cause extensive damage to the sweep which can be very difficult and hazardous to repair when the bin is full of grain. 1. - Page 29 4. Rotate the jacks down. 5. Adjust the jacks downward so that the pad is making light contact with the floor. The jack pad should be touching the floor but should not be bearing so much weight that the pad does not have free play when pushed on.
-
Page 30: Operation
5 Operation • Before Startup • The paddle sweeps are not intended to be run if the grain bin has not been filled and drained down. The grain pile must be across the entire front of the sweep. • Failure to have a constant grain pile across the front of the sweep will result in the sweep bending or breaking at the sections as it tries to wrap around the pile of grain. -
Page 31: Preventative Maintenance
6 Preventative Maintenance • Service Schedule Service Description After Initial Use After 4 Operations or After 12 Operations Every Year or Every 3 Years Check oil level in gearboxes Check Hardware Check Paddle Chain Tension Grease Fittings Adjust Drag Rubber Clean off excess debris Change oil in Gearboxes... - Page 32 Grade 5 Grade 8 Lubricated Lubricated Size Lb-ft Lb-ft Lb-ft Lb-ft 1/4” 13.5 12.5 5/16” 3/8” 7/16” 1/2” 9/16” 5/8” 3/4” • Paddle conveyor chain • Tractor drive chain • Pivot kit chain • Check drag rubber for damage or adjustment. •...
-
Page 33: Trouble Shooting
7 Trouble Shooting Problem Solution Overloading take away system – Need to slow down the paddle Overheating gearbox sweep or check that vent plug is installed and open A different sprocket combination in needed to slow the sweep Farm sweep is over running the sump down. -
Page 34: Parts Diagrams
8 Parts Diagrams PARTS DIAGRAM & LIST 7’ DAAY POWER SWEEP FOR A 15’ BIN (K704867) ITEM PART # DESCRIPTION K704800 PIVOT END KIT K711453 DRIVE END ASSEMBLY K695153 ZERO ENTRY KIT – FARM SWEEP K693103 108 LINK PADDLE CHAIN ASSEMBLY... - Page 35 PARTS DIAGRAM & LIST 8’ 6” DAAY POWER SWEEP FOR A 18’ BIN (K704868) ITEM PART # DESCRIPTION K704800 PIVOT END KIT K704801 1’ 6” SECTION ASSEMBLY K711453 DRIVE END ASSEMBLY K695153 ZERO ENTRY KIT – FARM SWEEP K693105 131 LINK PADDLE CHAIN ASSEMBLY...
- Page 36 PARTS DIAGRAM & LIST 10’ DAAY POWER SWEEP FOR A 21’ BIN (K704869) ITEM PART # DESCRIPTION K704800 PIVOT END KIT K704801 1’ 6” SECTION ASSEMBLY K711453 DRIVE END ASSEMBLY K695153 ZERO ENTRY KIT – FARM SWEEP K693107 153 LINK PADDLE CHAIN ASSEMBLY...
- Page 37 PARTS DIAGRAM & LIST 11’ 6” DAAY POWER SWEEP FOR A 24’ BIN (K704870) ITEM PART # DESCRIPTION K704800 PIVOT END KIT K704803 4’ 6” SECTION ASSEMBLY K711453 DRIVE END ASSEMBLY K695153 ZERO ENTRY KIT – FARM SWEEP K693109 176 LINK PADDLE CHAIN ASSEMBLY...
- Page 38 PARTS DIAGRAM & LIST 13’ DAAY POWER SWEEP FOR A 27’ BIN (K704871) ITEM PART # DESCRIPTION K704800 PIVOT END KIT K704801 1’ 6” SECTION ASSEMBLY K704803 4’ 6” SECTION ASSEMBLY K711453 DRIVE END ASSEMBLY K695153 ZERO ENTRY KIT – FARM SWEEP...
- Page 39 PARTS DIAGRAM & LIST 14’ 6” DAAY POWER SWEEP FOR A 30’ BIN (K704872) ITEM PART # DESCRIPTION K704800 PIVOT END KIT K704801 1’ 6” SECTION ASSEMBLY K704803 4’ 6” SECTION ASSEMBLY K711453 DRIVE END ASSEMBLY K695153 ZERO ENTRY KIT – FARM SWEEP...
- Page 40 PARTS DIAGRAM & LIST 16’ DAAY POWER SWEEP FOR A 33’ BIN (K704873) ITEM PART # DESCRIPTION K704800 PIVOT END KIT K704803 4’ 6” SECTION ASSEMBLY K711453 DRIVE END ASSEMBLY K695153 ZERO ENTRY KIT – FARM SWEEP K693115 238 LINK PADDLE CHAIN ASSEMBLY...
- Page 41 PARTS DIAGRAM & LIST 17’ 6” DAAY POWER SWEEP FOR A 36’ BIN (K704874) ITEM PART # DESCRIPTION K704800 PIVOT END KIT K704801 1’ 6” SECTION ASSEMBLY K704803 4’ 6” SECTION ASSEMBLY K711453 DRIVE END ASSEMBLY K695153 ZERO ENTRY KIT – FARM SWEEP...
- Page 42 PARTS DIAGRAM & LIST 20’ 6” DAAY POWER SWEEP FOR A 42’ BIN (K704875) ITEM PART # DESCRIPTION K704800 PIVOT END KIT K704803 4’ 6” SECTION ASSEMBLY K711453 DRIVE END ASSEMBLY K695153 ZERO ENTRY KIT – FARM SWEEP K693119 308 LINK PADDLE CHAIN ASSEMBLY...
- Page 43 PARTS DIAGRAM & LIST 23’ 6” DAAY POWER SWEEP FOR A 48’ BIN (K704876) ITEM PART # DESCRIPTION K704800 PIVOT END KIT K704801 1’ 6” SECTION ASSEMBLY K704803 4’ 6” SECTION ASSEMBLY K711453 DRIVE END ASSEMBLY K695153 ZERO ENTRY KIT – FARM SWEEP...
- Page 44 PARTS DIAGRAM & LIST 26’ 6” DAAY POWER SWEEP FOR A 54’ BIN (K704877) ITEM PART # DESCRIPTION K704800 PIVOT END KIT K704801 1’ 6” SECTION ASSEMBLY K704803 4’ 6” SECTION ASSEMBLY K711453 DRIVE END ASSEMBLY K695153 ZERO ENTRY KIT – FARM SWEEP...
- Page 45 PARTS DIAGRAM & LIST 29’ 6” DAAY POWER SWEEP FOR A 60’ BIN (K704878) ITEM PART # DESCRIPTION K704800 PIVOT END KIT K704801 4’ 6” SECTION ASSEMBLY K711453 DRIVE END ASSEMBLY K695153 ZERO ENTRY KIT – FARM SWEEP K693125 446 LINK PADDLE CHAIN ASSEMBLY...
- Page 46 PARTS DIAGRAM & LIST 32’ 6” DAAY POWER SWEEP FOR A 66’ BIN (K704879) ITEM PART # DESCRIPTION K704800 PIVOT END KIT K704803 4’ 6” SECTION ASSEMBLY K704801 1’ 6” SECTION ASSEMBLY K711453 DRIVE END ASSEMBLY K695153 ZERO ENTRY KIT – FARM SWEEP...
- Page 47 PARTS DIAGRAM & LIST PIVOT END ASSEMBLY (K704800) ITEM PART # DESCRIPTION K688914 STABALIZER LOCK ARM K688936 PIVOT STABALIZER BUSHING K688970 STABALIZER WELDMENT K689838 PIVOT END RUBBER K704805 PIVOT END K704838 PIVOT END RUBBER PLATE...
- Page 48 PARTS DIAGRAM & LIST DRIVE END ASSEMBLY DIAGRAM (K704800) ITEM PART # DESCRIPTION K688422 15 LINK CA500 CHAIN K688924 DRIVE GEARBOX BRACKET WELDMENT K688929 550 8 TOOTH WELDED SPROCKET K688930 DRIVE CHAIN GUARD WELDMENT K688933 550 8 TOOTH WELDED SPROCKET K689095 15”...
- Page 49 PARTS DIAGRAM & LIST SECTION JOINT WITH JACKS ASSEMBLY PARTS LIST & DIAGRAM ITEM PART # DESCRIPTION K640030 SCREW - .375 X 1.00 GR 5 CAR K682413 NUT - .375 X 16 FLANGE K683942 SCREW- .375 – 16 X 0.75 GR 5 CAR...
- Page 50 PARTS DIAGRAM & LIST SECTION JOINT WITHOUT JACKS ASSEMBLY PARTS LIST & DIAGRAM ITEM PART # DESCRIPTION K682413 NUT - .375 X 16 FLANGE K683942 SCREW - .375 X 0.75 GR 5 CAR...
- Page 51 PART # DESCRIPTION K704991 DECAL – VIRTUAL PATENT K686033 DECAL – DANGER “GATHERING CHAIN UNLOADER” K666941 DECAL – SERIAL NUMBER K690344 DECAL – OPERATION K689871 DECAL – WARNING – CHAIN K689872 DECAL – LOGO – DAAY POWER SWEEP – FPS...
- Page 52 PARTS DIAGRAM & LIST PADDLE CHAIN PARTS LIST & DIAGRAM ITEM PART # DESCRIPTION K686010 MALE CONNECTOR LINK K686081 RUBBER PADDLE K686111 PADDLE BACKING PLATE K688591 BULK CA550 CHAIN W/ F17 ATTACHMENT EVERY 6 LINK K654121 3/8” NYLON LOCKNUT K680140 3/8”...
- Page 53 PARTS DIAGRAM & LIST PIVOT END SUB ASSEMBLY DIAGRAM (K704805) ITEM PART # DESCRIPTION K704833 PLATE – FS PIVOT END COVER K688922 WELDMENT – FPS PADDLE CHAIN TIGHTNER K788942 PLATE – FPS BEARING SLIDE K704836 PLATE – PIVOT END DRAG K688954 RUBBER –...
- Page 54 K701182 NUT - .375 – 16 FLANGE CENTERLOCK GR 2 K701467 NUT - .3125 – 18 FLANGE CENTERLOCK GR 2 K683943 SCREW - .3125 – 18 X .75 GR 5 CAR K686527 SCREW - .375 – 16 X 1.75 GR 5 CAR K688944 KEY - .3125 X .3125 X 1.25 K700705...
- Page 55 PARTS DIAGRAM & LIST 1’ 6” SECTION PARTS LIST & DIAGRAM (K704801) ITEM PART # DESCRIPTION K704820 1’ 6” SINGLE COVER K704823 1’ 6” DIVIDER PLATE K688947 RUBBER DRAG – 1’ 6” SECTION K704826 DRAG COVER PLATE – 1’ 6” K640018 SCREW - .3125 X 1.00 GR 5 CAR K682524...
- Page 56 PARTS DIAGRAM & LIST 4’ 6” SECTION PARTS LIST & DIAGRAM (K704803) ITEM PART # DESCRIPTION K704822 4’ 6” SINGLE COVER K704825 4’ 6” SINGLE DIVIDER PLATE K688948 RUBBER DRAG – 4’ 6” SECTION K704828 DRAG COVER PLATE – 4’ 6” SECTION K640018 SCREW - .3125 X 1.00 GR 5 CAR K682524...
- Page 57 PARTS DIAGRAM & LIST DRIVE END SUB ASSEMBLY (K711453) ITEM PART # DESCRIPTION K704829 DRIVE END COVER K704830 DRIVE END DIVIDER PLATE K704831 DRAG COVER PLATE – DRIVE SECTION K704832 DRIVE END COVER PLATE K686008 550 8 TOOTH SPROCKET K686603 1 ¼”...
- Page 58 PARTS DIAGRAM & LIST FRONT CASTER WHEEL ASSEMBLY PARTS LIST & DIAGRAM (K689823) ITEM PART # DESCRIPTION K688969 CASTER PLATE K688971 FRONT CASTER PLATE – PIVOT SECTION K688997 GLASS FILLED NYLON WHEEL K640067 SCREW - .50 -13 X 3.50 GR 5 HHC K660638 NUT - .500 –...
- Page 59 PARTS DIAGRAM & LIST REAR CASTER WHEEL ASSEMBLY PARTS LIST & DIAGRAM (K689824) ITEM PART # DESCRIPTION K688968 BACK CASTER PLATE – PIVOT SECTION K688969 CASTER PLATE K688997 GLASS FILLED NYLON WHEEL K640067 SCREW - .50 -13 X 3.50 GR 5 HHC K660638 NUT - .500 –...
- Page 60 PARTS DIAGRAM & LIST PIVOT JOINT (K689851, K689852 & K689833) DIAGRAM ITEM PART # DESCRIPTION K688889 UPPER PIVOT ARM WELDMENT K689800 LOWER PIVOT ARM WELDMENT K689802 PIVOT CHAIN TIGHTNER K689805 PIVOT JOINT ROUND COVER PLATE K689806 PIVOT JOINT OBLONG COVER PLATE K689808 SHAFT –...
Need help?
Do you have a question about the DAAY POWER SWEEP and is the answer not in the manual?
Questions and answers