
Subscribe to Our Youtube Channel
Related Manuals for Merck Milliflex Oasis


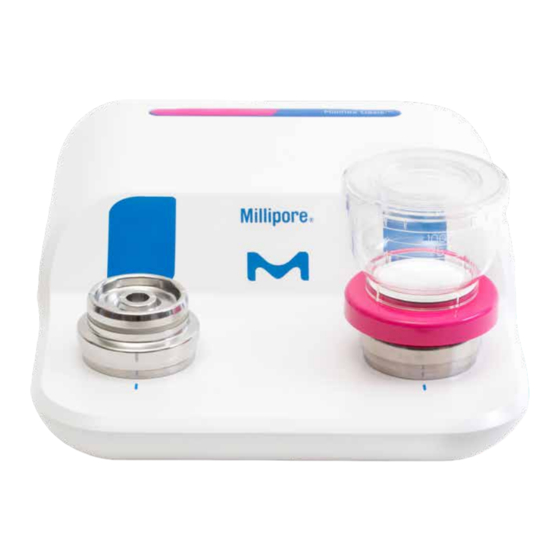
Summary of Contents for Merck Milliflex Oasis
- Page 1 User Guide Milliflex Oasis pump ® for the EZ-Fit filtration unit ® The life science business of Merck operates as MilliporeSigma in the US and Canada. SigmaAldrich.com...
-
Page 2: Table Of Contents
This manual is believed to be complete and accurate at the time of publication. In no event shall Merck KGaA, Darmstadt, Germany or any of its Affiliates be liable for all damages (including but not limited to incidental or consequential damages) in connection with, or arising from, the use of this document or associated literature. -
Page 3: Introduction
EZ-Fit filtration unit is a solution for the microbial testing ® ® of aqueous fluids. The system is composed of the Milliflex Oasis pump, the EZ-Fit filtration unit and culture media. ® ® Please refer to the ordering information section for details on the different items. -
Page 4: Components
Consumables: please refer to the ordering information section for details on the different items. 1. Filtration units 2. Culture media 3. Consumables for the Milliflex Oasis ® internal flow sanitization kit Page 4 of 24... -
Page 5: Description Of Items
2. Two filtration heads with their covers 2. Vacuum gauge 3. Tubing for discarding the liquids 4. Accessory kit 5. Spare parts kit Figure 3: Milliflex Oasis internal flow sanitization ® kit package components Figure 1: Milliflex Oasis ®... -
Page 6: Touch Switch
The switch is touch-sensitive. Use your fingertip to activate it. Touch the center of the switch without touching the outer ring. When the Milliflex Oasis pump is in standby ® mode, it can be reactivated by touching the space between the two switches. -
Page 7: Hardware Installation
2. Hardware installation The pump must be installed on a horizontal • On the back of the pump, press the metal surface. Please make sure that your working latch and remove the white plug, then area is level to ensure good sample volume connect the tubing readings. - Page 8 • Install the pump heads on the pump body • Lock the pump heads by turning clockwise until the sign on the head is aligned with the one on the pump body Figure 10: Use of Milliflex Oasis guides for ® electrical cable and tubing (item MMTUGUIDE) •...
-
Page 9: Testing
3. Testing 3.3 Testing The following components are needed before starting your sample processing: When the pump is on standby mode, • Milliflex Oasis pump for EZ-Fit filtration ® ® the switch is not lit up. To power up the... -
Page 10: Waste
• Place the EZ-Fit filtration unit on the • Place the membrane onto the culture ® pump head media plate, close the plate, it is ready for incubation Figure 14: Filtration unit placement on the pump head Figure 17: Membrane transfer onto culture media •... -
Page 11: Cleaning & Maintenance
4. Cleaning & Maintenance 4.1 Cleaning & Maintenance table First Before each After each Component Action installation testing shift testing shift Monthly Yearly Filtration head Cleaning Pump Surface cleaning Pump Internal flow sanitization Pump Rinsing If testing non- water samples Filtration head External gasket If testing non-... -
Page 12: Filtration Head Cleaning
Internal flow sanitizers: active ingredients Internal flow sanitizers: active ingredients Suppliers Suppliers Dilution Dilution Quaternary ammonium: Benzalkonium chloride (between 0.25–0.5%) Consult our local Ready to use Poly (hexamethylene biguanide) hydrochloride (between 0.1–0.25%) technical service Sodium Hypochlorite (2.6% active chloride) 250 ppm hydrogen peroxide (6%) Consult our local Ready to use... -
Page 13: Pump Internal Flow Sanitization
4.7 Pump internal flow sanitization Material needed: 1. Sanitization kit (item MMSANKIT1) 2. Consumables for sanitization kit (item MMSANSYFU) 3. Sanitizer (see table) 4. Purified water • Remove the pump heads Figure 21: Visible air pocket over the liquid in the •... -
Page 14: Filtration Head Complete Cleaning
4. The plunger is pulled down completely • Remove the black check valve with the metal tool provided in the gasket kit 5. The water in the funnel is pulled to rinse the pump 6. The switch stops blinking 7. The pump switches off if not in use for thirty minutes •... -
Page 15: Filtration Head Gaskets And Check Valve (Spare Parts) Replacement
4.9 Filtration head gaskets • Clean the gaskets and the check valve carefully using a wipe moistened with and check valve (spare the sanitizer parts) replacement • Put the gaskets and check valve back in place using the gasket removal tool Materials: 1. -
Page 16: (Spare Parts) Replacement
4.10 Sanitization kit gaskets (spare parts) replacement Materials: 1. Sanitization kit (item MMSANKIT1) 2. Sanitization kit gasket kit (item MMGASKTSK) containing: • Five O-rings for securing funnel to kit tightness • Five O-rings for securing kit to pump tightness • Remove the gaskets (using the metal tool provided with the gasket kit) from the sanitization kit and discard them •... -
Page 17: Performance Verification
10. Repeat steps 4 to 9 twice more (sanitization kit consumables) on the sanitization kit Check that the average values are within • Connect the Milliflex Oasis ® vacuum the following specifications. gauge to the syringe port of the kit... -
Page 18: Use Of Multiple Pumps
Optional: the accessory bag contains four stickers, select your preferred sticker and 6.1.1 Two pumps connected: stick it carefully to the specific groove on each pump. • Two Milliflex Oasis pumps for EZ-Fit ® ® filtration unit (item MMSYSTEZ1) • Milliflex Oasis electrical cable ®... - Page 19 • Push the connectors into the power ports until a click is heard • Plug the DC power cord in the free power port, at the back of the Milliflex Oasis ® pump A • Plug the region-specific power cord to the appropriate electrical power source;...
-
Page 20: System Specifications
7. System specifications Milliflex Oasis ® pump Frame Acrylonitrile Styrene Acrylate and Polycarbonate, compatible with standard UV sterilization Filtration heads Two per pump, stainless steel, silicone, rubber gaskets Can be autoclaved at 121 °C for 15 minutes or at 134 °C for 5 minutes... -
Page 21: Ordering Information
8. Ordering information Description Qty/pack Packaging/Format Catalogue No. PINK base—no pad EZ-Fit Filtration Unit, white plain PVDF membrane, 0.45 μm, 100 mL Single EFHVW10IS ® EZ-Fit Filtration Unit, white gridded MCE membrane, 0.45 μm, 100 mL Multipack of 3 units EFHAW10MS ®... - Page 22 MMCABLEMM Milliflex Oasis T connectors for tubings for connecting two pumps MMTCNNECT ® Milliflex Oasis guides for electrical cable and tubing MMTUGUIDE ® Stickers and filtration head rings for customizing the Milliflex Oasis ® pump MMCUSTKIT Page 22 of 24...
-
Page 23: Troubleshooting
9. Troubleshooting Problem Resolution Installation Pump power supply is missing The power supply is not comprised with the pump and has to be ordered separately. A list of 11 power supply items for specified regions is available. Impossible to connect the tubing for discarding Press the connector metal latch down prior to inserting the liquids the tubing. - Page 24 © 2019 Merck KGaA, Darmstadt, Germany and/or its affiliates. All Rights Reserved. Merck, Millipore, Sigma-Aldrich, Milliflex Oasis, Lit. No. MK_PG4070EN EZ-Fit, ReadyPlate, and the vibrant M are trademarks of Merck KGaA, Darmstadt, Germany or its affiliates. All other trademarks 2019 - 23690 are the property of their respective owners.
Need help?
Do you have a question about the Milliflex Oasis and is the answer not in the manual?
Questions and answers