Advertisement
Quick Links
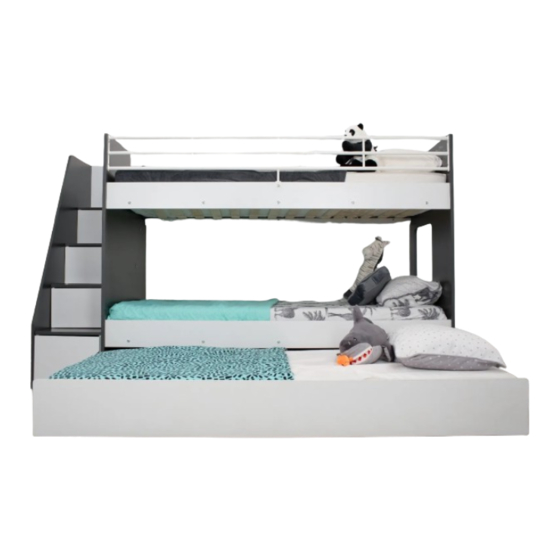
MODEL
PRODUCT SIZE :
Thank you for purchasing this product. Before starting assembly we suggest you spend a short time reading
through this leaflet, then follow the simple step by step guide.
Two persons are needed to assemble this product.
* Approximately 2 Hours
* 2 People Required
IMPORTANT - READ CAREFULLY - RETAIN FOR FUTURE REFERENCE
a) WARNING "High beds and the upper bed of bunk beds are not suitable for children under six years due to the risk of injuryfrom falls";
b) WARNING "Bunk beds and high beds can present a serious risk of injury from strangulation if not used correctly. Never attach or
hang items to any part of the bunk bed that are not designed to be used with the bed,for example, but not limited to ropes, strings,
cords, hooks, belts and bags"
c) WARNING "Children can become trapped between the bed and the wall, a roof pitch, the ceiling, adjoining pieces of furniture
(e.g. cupboards) and the like. To avoid risk of serious injury the distance between the top safety barrier and the adjoining structure
shall not exceed 75 mm or shall be more than 230 mm";
d) WARNING "Do not use the bunk bed/high bed if any structural part is broken or missing;
e) always follow the manufacturer's instructions;
f)
This bunk bed is suitable for a single mattress or foam bed 920mm x 1870mm.Thickness of mattress should not exceed 200mm.
g) Ventilation of the room is necessary in order to keep the humidity low and to prevent mauld in and around the bed;
h) all bunk beds and high beds intended to be assembled by other than the manufacturer or his/her representative shall include
assembly instructions including a list of the parts supplied and details of any tools required to assemble the bed;
i)
Use ladder for entering and leaving upper bunk.
j)
The bunk bed should be checked periodically by the owner to ensure that the guardrail, ladder and other components are
maintained in the correct position and state of repair and that all connectors are tight.
k) This bunk bed conforms to BS EN 747-1 : 2012 + A1 : 2015
Tools Required For Assembly
Philips Screw Driver
ASSEMBLY INSTRUCTIONS
: JASPER (#:FJASPBW)
920mm x 1930mm (Int Base Size)
Tools Not Use
DO NOT USE POWER TOOLS
TO ASSEMBLE THIS PRODUCT.
USE OF POWER TOOLS WILL
INVALIDATE ANY CLAIM AND
MAY DAMAGE THIS PRODUCT
MAKING IT UNSAFE.
DO NOT USE HAMMER
1
20
CK 6285
Advertisement

Related Manuals for Bedkingdom JASPER


Summary of Contents for Bedkingdom JASPER
- Page 1 ASSEMBLY INSTRUCTIONS MODEL : JASPER (#:FJASPBW) PRODUCT SIZE : 920mm x 1930mm (Int Base Size) Thank you for purchasing this product. Before starting assembly we suggest you spend a short time reading through this leaflet, then follow the simple step by step guide.
- Page 2 PARTS LIST JASPER (#:FJASPBW) Carton 1 of 4 Carton 3 of 4 Part Name RIGHT END PANEL SIDE PANEL (LOWER) END PANEL SIDE PANEL (UPPER) LADDER LEFT PANEL TOP PANEL (4TH LADDER STEP) Carton 4 of 4 DOOR DOOR FRONT PANEL (TRUNDLE)
- Page 3 PARTS LIST JASPER (#:FJASPBW) (2 set) CK 6285...
- Page 4 FITTING LIST JASPER (#:FJASPBW) Fitting List Part Name Cam Stud (5137) CAUTION There are many small components used M8 x 25mm Wood Dowel in the construction of this unit. These loose items should be kept away from 14mm Chipboard Screw young children whilst assembling your unit.
- Page 5 GUIDE TO ASSEMBLY JASPER (#:FJASPBW) STEP 1 Dx 32 L x 8 STEP 2 A x 2 B x 12 C x 12 CK 6285...
- Page 6 GUIDE TO ASSEMBLY JASPER (#:FJASPBW) WHEN FITTING CAMS STEP 3 ENSURE STARTING POSITION IS CORRECT BEFORE YOU INSERT CONNECTING BOLT TURN CLOCKWISE UNTIL SECURE A x 3 B x 20 C x 24 WRONG CORRECT Turn Over CK 6285...
- Page 7 GUIDE TO ASSEMBLY JASPER (#:FJASPBW) STEP 4 A x 16 C x 8 STEP 5 STEP 6 CK 6285...
- Page 8 GUIDE TO ASSEMBLY JASPER (#:FJASPBW) STEP 7 STEP 8 STEP 9 STEP 10 A x 5 STEP 11 STEP 12 CK 6285...
- Page 9 GUIDE TO ASSEMBLY JASPER (#:FJASPBW) STEP 13 STEP 14 A x 4 STEP 15 STEP 16 A x 2 CK 6285...
- Page 10 GUIDE TO ASSEMBLY JASPER (#:FJASPBW) STEP 17 STEP 18 STEP 19 A x 6 B x 6 C x 4 CK 6285...
- Page 11 GUIDE TO ASSEMBLY JASPER (#:FJASPBW) STEP 20 E x 12 STEP 21 G x 4 P x 4 CK 6285...
- Page 12 GUIDE TO ASSEMBLY JASPER (#:FJASPBW) STEP 22 N x 16 STEP 23 K x 16 CK 6285...
- Page 13 GUIDE TO ASSEMBLY JASPER (#:FJASPBW) STEP 24 P x 20 J x 20 STEP 25 G x 4 P x 4 CK 6285...
- Page 14 GUIDE TO ASSEMBLY JASPER (#:FJASPBW) STEP 26 H x 32 STEP 27 H x 32 CK 6285...
- Page 15 GUIDE TO ASSEMBLY JASPER (#:FJASPBW) STEP 28 STEP 29 P x 1 G x 1 P x 4 F x 4 STEP 30 P x 1 G x 1 CK 6285...
- Page 16 GUIDE TO ASSEMBLY JASPER (#:FJASPBW) STEP 31 P x 4 F x 4 STEP 32 STEP 33 D x 16 L x 8 CK 6285...
- Page 17 GUIDE TO ASSEMBLY JASPER (#:FJASPBW) STEP 34 STEP 35 C x 24 A x 22 B x 22 Turn Over 30 x2 Turn Over Turn Over CK 6285...
- Page 18 GUIDE TO ASSEMBLY JASPER (#:FJASPBW) STEP 36 STEP 37 STEP 38 STEP 39 CK 6285...
- Page 19 GUIDE TO ASSEMBLY JASPER (#:FJASPBW) STEP 40 STEP 41 STEP 42 STEP 43 G x 12 M x 6 D x 12 32 x2 CK 6285...
- Page 20 GUIDE TO ASSEMBLY JASPER (#:FJASPBW) STEP 44 CK 6285...
Need help?
Do you have a question about the JASPER and is the answer not in the manual?
Questions and answers