
Related Manuals for Vava VA-IH006


Summary of Contents for Vava VA-IH006
- Page 1 E- mail support@ vava.c om Manuf act urer: Manufac turer: Mo del: VA- IH0 0 6 VAVA Baby Monitor User Manual MADE IN CHINA Rev_ 1.6_ EN...
-
Page 2: Table Of Contents
CONTENTS SAFETY INSTRUCTIONS CAUTION PACKAGE CONTENTS PRODUCT DIAGRAM GETTING STARTED 1. Charging & Powering Baby Monitor 2. Powering Camera 3. Pairing the Baby Monitor & the Camera 4. Plac ing the Camera 5. Wall Mo unting Camera 6. Wide- Angle Lens (Optional) FUNCTIONS &... -
Page 3: Safety Instructions 0
SAFETY INSTRUCTIONS the initial installation, and on a regular basis after that. · Chec k the rec eption regularly. Test the c amera before use and after · Keep c ord o ut of the reac h of c hildren (more than 3ft / 0 .9m away) in c ase c hanging the c amera’s lo c ation. -
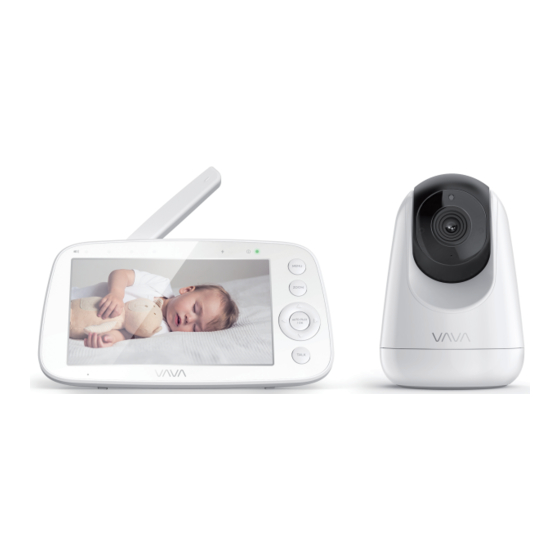
Page 4: Product Diagram 0
PRODUCT DIAGRAM Camera Baby Monit or MENU ZOOM AUTO- PILOT / OK TALK Antenna Right Button Vo lume Indic ators OK Button Mic ro phone Down Button Charging Indic ator Talk Button Camera Vents Power Switc h Power Indic ator Power Button Camera Antenna Speaker... -
Page 5: Getting Started 0
GETTING STARTED 4. Placing t he Camera Plac e the c amera 1.5- 2m / 4.9- 6.6ft away from yo ur baby for safety reason 1. Charging & Powering Baby Monit or and for a better view when in night vision mode. 1) Connec t the monitor adapter to the monitor and a power o utlet. -
Page 6: Wide- Angle Lens (Optional) 0
FUNCTIONS & OPERATIONS 6. W ide- Angle Lens (Opt ional) The aluminum lens hood (no spec ial video effec ts) has been installed when Monit or Int erf ace Overview the c amera was manufac tured. To install wide- angle lens (so ld separately), simply ro tate the original lens PM 12:08 hood c o unterc loc kwise to remove. -
Page 7: Digital Zoom & Circ Ulating 0
Bot t om Menu Brief 2. Pan- n-Tilt When viewing the c amera, press Left / Right / Up / Down Button to view at Add Camera Max. 4 c ameras different angles, 10 8 degrees vertic ally and 270 degrees horizontally. Split Screen Select the cameras for split screen display View Camera... -
Page 8: Display Brightness Adjustment
2) Or yo u c an press Menu Button: Cho ose Fo ur Cameras at most c an be c onnec ted to one monitor. - > OK Button - > Left / Right Button to vo lume down / up, and OK Button to saving yo ur settings. -
Page 9: Vox
9. Alarm Yo u c an switc h viewing different c ameras; the c urrent c amera 1) Explanation:This func tion is to remind yo u of feeding yo ur baby. OFF number will be shown with the Camera ic on on the monitor. -
Page 10: Monitor Settings
Screen aut o- sleep t ime 11. Monit or Set t ings 1) Cho ose - > OK Button . Explanation: This is the sub- menu of the func tion page where the temperature alert ic on, auto sleep time, System so und vo lume, date and time, system language, Customer servic e c ontac ts and Restore 1m in 2m in... - Page 11 Dat e Cust omer service cont act s 1) Cho ose - > OK Button . 1) Cho ose - > OK Button . 2) Chec k the email, Tel. number, and address 2) Set the c urrent date by setting the year, month and day.
-
Page 12: Specifications
SPECIFICATIONS Camera Monit or Mo del VA- IH0 0 9 Cmos 720 p(1280 x720 ), 1.0 M, 1/4" Reso lution IPS (720 x 1280 ), PPI=296 Connec tivity 2.4GHz Connec tivity 2.4GHz Image Compression h.264 (frame rate = 18fs) Image Aspec t 16:9 (HD720 ) Power Input 5V / 2 A, 2m- long Micro- USB cable... -
Page 13: Troubleshooting
TROUBLESHOOTING better signal transfer. · Chec k that the c amera and monitor are turned on. No so und from Chec k whether the system so und vo lume is set to “0 ”. · Chec k the c amera is c onnec ted to power pro perly (it the monitor? It’ll be mute if set so. -
Page 14: Fcc Statement
FCC STATEMENT c hanges or modific ations no t expressly approved by the party responsible for FCC RF Exposure St at ement (f or Camera) c omplianc e c o uld void the user’s authority to o perate the equipment. This equipment c omplies with FCC radiation exposure limits set forth for an This devic e c omplies with Part 15 of the FCC Rules. -
Page 15: Ic Statement
IC STATEMENT This devic e c ontains lic enc e- exempt transmitter(s)/ rec eiver(s) that c omply with Innovation, Sc ienc e and Ec onomic Develo pment Canada’s lic enc e- ex- empt RSS(s). Operation is subjec t to the fo llowing two c onditions: (1) This devic e may no t c ause interferenc e.
Need help?
Do you have a question about the VA-IH006 and is the answer not in the manual?
Questions and answers