Table of Contents
Advertisement
E-mail
support@vava.com
Manufacturer:
Manufacturer: Shenzhen Danya Technology Co.,Ltd.
Address: Room 2801,Building C,Galaxy World Phase Ⅱ,Minle
Community,Minzhin Street,Longhua District,Shenzhen
Learn more about the EU Declaration of Conformity:
https://www. v ava.com/pages/user-manual
MADE IN CHINA
Rev_1.6_EN
Model: VA-IH006
VAVA Baby Monitor
User Manual
Advertisement
Table of Contents

Related Manuals for Vava VA-IH006


Summary of Contents for Vava VA-IH006
- Page 1 E-mail support@vava.com Manufacturer: Manufacturer: Shenzhen Danya Technology Co.,Ltd. Address: Room 2801,Building C,Galaxy World Phase Ⅱ,Minle Community,Minzhin Street,Longhua District,Shenzhen Learn more about the EU Declaration of Conformity: Model: VA-IH006 https://www. v ava.com/pages/user-manual VAVA Baby Monitor User Manual MADE IN CHINA Rev_1.6_EN...
-
Page 2: Table Of Contents
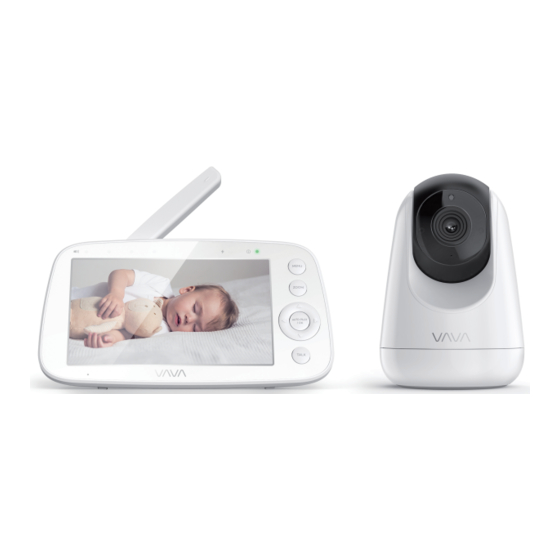
CONTENTS SAFETY INSTRUCTIONS CAUTION PACKAGE CONTENTS PRODUCT DIAGRAM GETTING STARTED 1. Charging & Powering Baby Monitor 2. Powering Camera 3. Pairing the Baby Monitor & the Camera 4. Placing the Camera 5. Wall Mounting Camera 6. Wide-Angle Lens (Optional) FUNCTIONS & OPERATIONS Monitor Interface Overview 1. -
Page 3: Safety Instructions
· The lens and lens hood are small parts, keep them out of your baby’s reach at all times. · Baby Monitor & Camera (Model: VA-IH006) · This product is NOT intended to replace the proper supervision of children. · Monitor Adapter with USB-C Charging Cable You MUST check your child’s activity regularly. -
Page 4: Product Diagram
PRODUCT DIAGRAM Camera Baby Monitor MENU ZOOM AUTO-PILOT / OK TALK Antenna Right Button Volume Indicators OK Button Microphone Down Button Charging Indicator Talk Button Camera Vents Power Switch Power Indicator Power Button Camera Antenna Speaker Menu Button Upgrade Pinholes Micro-USB Port Lens Zoom Button... -
Page 5: Getting Started
GETTING STARTED 4. Placing the Camera Place the camera 1.5-2m / 4.9-6.6ft away from your baby for safety reason 1. Charging & Powering Baby Monitor and for a better view when in night vision mode. 1) Connect the monitor adapter to the monitor and a power outlet. 2) Unplug the unit when its power indicator turns off, indicating a full charge. -
Page 6: Wide-Angle Lens (Optional)
FUNCTIONS & OPERATIONS 6. Wide-Angle Lens (Optional) The aluminum lens hood (no special video effects) has been installed when Monitor Interface Overview the camera was manufactured. To install wide-angle lens (sold separately), simply rotate the original lens PM 12:08 hood counterclockwise to remove. Then install the new lens and rotate clockwise to fix in place. -
Page 7: Digital Zoom & Circulating
Bottom Menu Brief 2. Pan-n-Tilt When viewing the camera, press Left / Right / Up / Down Button to view at Add Camera Max. 4 cameras different angles, 108 degrees vertically and 270 degrees horizontally. Split Screen Select the cameras for split screen display View Camera Select to view each at a time 3 . -
Page 8: Display Brightness Adjustment
2) Or you can press Menu Button: Choose Four Cameras at most can be connected to one monitor. -> OK Button -> Left / Right Button to volume down / up, and OK Button to saving your settings. Split Screen 1) Press Menu button, select through ->... -
Page 9: Vox
9. Alarm You can switch viewing different cameras; the current camera 1) Explanation:This function is to remind you of feeding your baby. OFF number will be shown with the Camera icon on the monitor. means you shut down the function; 2 hour means it reminds you every 2 hours and so on for the other options. -
Page 10: Monitor Settings
Screen auto-sleep time 11. Monitor Settings 1) Choose -> OK Button . Explanation: This is the sub-menu of the function page where the temperature alert icon, auto sleep time, System sound volume, date and time, system language, Customer service contacts and Restore 1min 2min 5min... - Page 11 Customer service contacts Date 1) Choose -> OK Button . 1) Choose -> OK Button . 2) Set the current date by setting 2) Check the email, Tel. number, and address for customer service. the year, month and day. 2022 Press OK Button.
-
Page 12: Specifications
SPECIFICATIONS Monitor Camera Model VA-IH009 Cmos 720p(1280x720), 1.0M, 1/4" Resolution IPS (720 x 1280), PPI=296 Connectivity 2.4GHz Connectivity 2.4GHz Image Compression h.264 (frame rate = 18fs) Image Aspect 16:9 (HD720) Power Input 5V / 2A, 2m-long Micro-USB cable Image Compression h.264 (frame rate = 18fs) Pan-n-Tilt 108 degrees vertical (Up=90, Down=18) -
Page 13: Troubleshooting
TROUBLESHOOTING better signal transfer. · Check that the camera and monitor are turned on. No sound from Check whether the system sound volume is set to “0”. · Check the camera is connected to power properly (it the monitor? It’ll be mute if set so. cannot be charged;... -
Page 14: Fcc Statement
FCC STATEMENT changes or modifications not expressly approved by the party responsible for FCC RF Exposure Statement (for Camera) compliance could void the user’s authority to operate the equipment. This equipment complies with FCC radiation exposure limits set forth for an This device complies with Part 15 of the FCC Rules. -
Page 15: Ic Statement
IC STATEMENT This device contains licence-exempt transmitter(s)/receiver(s) that comply with Innovation, Science and Economic Development Canada’s licence-ex- empt RSS(s). Operation is subject to the following two conditions: (1) This device may not cause interference. (2) This device must accept any interference, including interference that may cause undesired operation of the device.
Need help?
Do you have a question about the VA-IH006 and is the answer not in the manual?
Questions and answers