Table of Contents
Advertisement
Available languages
Available languages
Quick Links
Advertisement
Table of Contents

Related Manuals for AnkerWork SR500

Summary of Contents for AnkerWork SR500
- Page 1 AnkerWork SR500 Speakerphone USER MANUAL...
- Page 2 English Français 日本語 日本語 简体中文...
-
Page 3: What's Included
What's Included AnkerWork SR500 Speakerphone Power adapter Power plug* PoE cable (10 / 3 m) USB-C to USB-A cable (10 / 3 m) USB-A to USB-C converter *Power plug may vary in different regions. 01 EN... -
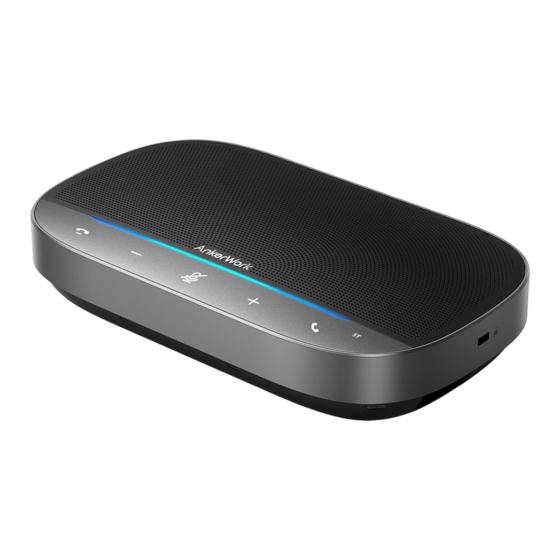
Page 4: Top View
At a Glance Top View Reject / end call Volume down Mute / unmute Volume up Answer call Standby indicator • Turns white when speakerphone switches to Standby mode. LED bar 02 EN... -
Page 5: Bottom View
Bottom View Input port Power port • Connect to the previous speakerphone. • Connect to a power supply. USB-C port Output port • Connect to a computer. • Connect to the next speakerphone. 03 EN... - Page 6 Power Adapter Assembly 1. Align the groove of the plug with the pins on the power adapter. 2. Press and turn the plug clockwise to lock. To remove the plug, turn it counterclockwise while pressing the tab button. 04 EN...
-
Page 7: Connecting To A Computer
• Once the speakerphone is connected and powered on, all buttons will turn white for 10 seconds, and the LED bar will turn blue for 2 seconds. You might need to manually select AnkerWork SR500 Speakerphone for your PC system or conference so ware. • macOS System Preferences >... - Page 8 Settings > Audio > Speaker / Microphone Linking Mode You can link up to five AnkerWork SR500 Speakerphones for meeting rooms in di erent sizes. 1. Plug the provided power adapter (with the power plug) into a speakerphone. 2. Connect one end of the PoE cable to the Output port on the previous speakerphone. Connect the other end of the PoE cable to the Input port on the next speakerphone.
-
Page 9: Button Controls
• Make sure to power the first speakerphone instead of the others in the chain. • The speakerphone connected to your computer is the primary device. Its settings apply to the other speakerphones in Linking mode. Button Controls Press once Reject / end a call Press once Answer a call... - Page 10 Press Volume up / down Press once Mute / unmute the microphone LED Bar Blue light display length varies with volume. Volume up / down Steady red Microphone muted Flashing blue Sound direction detected Flashing blue for 2 seconds Linked with another speakerphone Green light sequence Firmware updating 08 EN...
- Page 11 Download the AnkerWork Software from software.ankerwork.com Download and install the AnkerWork software on your computer to update the firmware. Firmware update: Ensure the speakerphone is powered and connected to your computer until the firmware update is completed. In linking mode, all other speakerphones will be updated automatically when you update the speakerphone connected to your computer.
-
Page 12: Specifications
Specifications Specifications are subject to change without notice. Power port input 52 V 0.8 A Input port 52 V 0.7 A Output port 52 V 0.5 A Rated output power (Speaker) Speaker driver size 1 × 1.75" full-range driver Voice pickup frequency 48 kHz Voice pickup range Microphone... - Page 13 Contenu Haut-parleur AnkerWork SR500 Adaptateur secteur Prise d’alimentation* Câble PoE (10 / 3 m) Câble USB-C vers USB-A (10 / 3 m) Convertisseur USB-A vers USB-C *La prise d’alimentation peut varier selon les régions. 11 FR...
-
Page 14: Vue De Dessus
Récapitulatif Vue de dessus Rejeter/terminer l’appel Volume Bas Activer/désactiver le son Volume Haut Répondre à l’appel Indicateur de veille • Devient blanc lorsque le haut-parleur passe en mode veille. Barre lumineuse à LED 12 FR... -
Page 15: Vue De Dessous
Vue de dessous Port d’entrée Port d'alimentation • Connexion au haut-parleur précédent. • Connexion à un bloc d’alimentation. Port USB-C Port de sortie • Connexion à un ordinateur. • Connexion au haut-parleur suivant. 13 FR... - Page 16 Assemblage de l’adaptateur secteur. 1. Alignez la rainure de la prise avec les broches de l’adaptateur secteur. 2. Appuyez et tournez la prise dans le sens des aiguilles d’une montre pour verrouiller. Pour retirer la prise, la tourner dans le sens inverse des aiguilles d’une montre tout en appuyant sur le bouton de la languette. 14 FR...
-
Page 17: Connexion À Un Ordinateur
• Une fois que le haut-parleur est connecté et mis sous tension, tous les boutons deviennent blancs pendant 10 secondes, et la barre de témoins à DEL devient bleue pendant 2 secondes. Il se peut que vous deviez sélectionner manuellement AnkerWork SR500 Speakerphone pour le système ou le logiciel de votre • macOS Préférences système >... - Page 18 Paramètres > Audio > Haut-parleur/Microphone Mode de liaison Vous pouvez relier jusqu’à cinq haut-parleurs AnkerWork SR500 pour des salles de réunion de di érentes tailles. 1. Branchez l’adaptateur secteur fourni (avec la prise d’alimentation) à un haut-parleur. 2. Connectez une extrémité du câble PoE au port de sortie du haut-parleur précédent. Connectez l’autre extrémité du câble PoE au port d’entrée du haut-parleur suivant.
-
Page 19: Boutons De Commande
• Assurez-vous de connecter à l’alimentation le premier haut-parleur plutôt que les autres de la chaîne. • Le haut-parleur connecté à votre ordinateur est l’appareil principal. Ses paramètres s’appliquent aux autres haut-parleurs en mode liaison. Boutons de commande Appuyer une fois Raccrocher/refuser un appel Appuyer une fois Répondre à... - Page 20 Appuyez une fois Volume haut / bas Activer ou désactiver le Appuyer une fois microphone Barre lumineuse à LED La durée d’affichage de la lumière bleue varie Volume haut / bas en fonction du volume. Rouge fixe Microphone coupé bleu clignotant Direction du son détectée Bleu clignotant pendant 2 secondes Lié...
- Page 21 Download the AnkerWork Software from software.ankerwork.com Téléchargez et installez le logiciel AnkerWork sur votre ordinateur pour mettre à jour le micrologiciel. Mise à jour du micrologiciel : Assurez-vous que le haut-parleur est alimenté et connecté à votre appareil jusqu’à ce que la mise à...
-
Page 22: Spécifications
Spécifications Les spécifications sont susceptibles d'être modifiées sans préavis. Entrée du port d’alimentation 52 V 0,8 A Port d’entrée 52 V 0,7 A Port de sortie 52 V 0,5 A Puissance de sortie (haut-parleur) Taille du pilote de haut-parleur 1 × 1,75" pilote à plage complète Fréquence de prise de voix 48 kHz Portée de prise de voix... - Page 23 同梱品 AnkerWork SR500 Speakerphone 電源アダプタ 電源プラグ * PoE 対応 LAN ケーブル (3m) USB-C & USB-A ケーブル (3m) USB-A & USB-C 変換プラグ * 電源プラグの形状は地域によって異なる場合があります。 21 JP...
- Page 24 各部分の名称 上面 着信を拒否 / 通話を終了 音量ダウン ミュート / ミュート解除 音量アップ 着信に応答する スタンバイランプ • 本製品がスタンバイモードに入ると、白く点灯します LED インジケーター 22 JP...
- Page 25 底面 入力ポート 電源ポート • 前のスピーカーに接続します。 • 電源に接続します。 USB-C ポート 出力ポート • PC に接続します。 • 次のスピーカーに接続します。 23 JP...
- Page 26 電源アダプタの組み立て 1. プラグの溝を電源アダプタのピンに合わせます。 2. プラグを押し、ロックされるまで時計回りに回します。 プラグを取り外すには、イラストのボタンを押しながらプラグを反時計回りに回します。 24 JP...
- Page 27 2. 付属の USB ケーブル ( 必要に応じて USB 変換プラグを使用 ) で、本製品を PC に接続します。 • 本製品は電源に接続されると、自動的に起動します。 • 接続後、本製品の電源がオンになると、すべてのボタンが 10 秒間白色に点灯し、LED インジケーターが 2 秒間青色 に点灯します。 お使いの PC またはビデオ会議アプリの設定で、「 AnkerWork SR500 Speakerphone 」を手動で選択する必要がある場 合があります。 • macOS [ システム環境設定 ] > [ サウンド ] > [ サウンドエフェクト / 出力 / 入力 ] でデバイスを選択...
- Page 28 • ビデオ会議アプリ (Zoom、Skype など ) [ 設定 ] > [ オーディオ ] > [ スピーカー / マイク ] リンクモード AnkerWork SR500 Speakerphone は、最大 5 台までリンクすることができるため、1 台ではカバーしきれない人数や会議 室でご利用の場合でも、集音範囲を拡げることができます。 1. 付属の電源アダプタ ( 電源プラグ付き ) を本製品に差し込みます。 2.PoE 対応 LAN ケーブルの一方を、1 台目のスピーカーの出力ポートに接続します。PoE 対応 LAN ケーブルのもう一方の...
- Page 29 • 必ず 1 台目のスピーカーに電源アダプタを接続し、電源をつけてください ( 他のスピーカーには電源を接続しないで ください )。 • PC に接続されているスピーカーが親機となります。リンクモード中は、親機の設定が他のスピーカーにも適用され ます。 ボタンの操作方法 1 回押す 着信を拒否 / 通話を終了 1 回押す 着信に応答する 27 JP...
- Page 30 押す 音量アップ / ダウン 1 回押す マイクのミュート / ミュート解除 LED インジケーター 青色で点灯 音量アップ / ダウン ※点灯の長さは音量によって変わります 赤色で点灯 マイクがミュート 青色に点滅 点灯した方向から音を検知 青色に 2 秒間点滅 別のスピーカーと接続中 緑色に連続で点灯 ファームウェアの更新中 28 JP...
- Page 31 AnkerWork ソフトウェア AnkerWork software.ankerwork.com AnkerWork ソフトウェアを PC にダウンロードして、ファームウェアを更新してください。 ファームウェアの更新:ファームウェアの更新が完了するまで本製品の電源は落とさず、ご使用の PC と接続したま まにしてください。リンクモードでは、PC に接続されているスピーカーのファームウェアを更新すると、他のすべ てのスピーカーも自動的に更新されます。 29 JP...
- Page 32 製品の仕様 仕様は予告なく変更されることがあります。 電源ポート入力 52 V 0.8 A 入力 52 V 0.7 A 出力 52 V 0.5 A オーディオ出力 スピーカードライバーのサイズ 1 × 1.75" フルレンジドライバー 集音周波数 48 kHz 集音可能範囲 搭載マイク数 30 JP...
- Page 33 包装内容 AnkerWork SR500 会议音箱 电源适配器 电源插头 * PoE 电缆(3 米) USB-C 转 USB-A 电缆(3 米) USB-A 转 USB-C 转换器 * 电源插头可能因地区而异。 31 SC...
- Page 34 概览 顶部 拒绝 / 结束通话 调低音量 静音 / 取消静音 调高音量 接听电话 待机指示灯 • 当会议音箱切换到待机模式时亮起白灯。 LED 灯条 32 SC...
- Page 35 底部 输入端口 电源端口 • 连接到上一个会议音箱。 • 连接到电源。 USB-C 端口 输出端口 • 连接到计算机。 • 连接到下一个会议音箱。 33 SC...
- Page 36 组装电源适配器 1. 将插头的凹槽与电源适配器上的引脚对齐。 2. 按下并顺时针转动插头以锁定。 要取下插头,请按下按钮同时逆时针旋转。 34 SC...
- Page 37 连接到计算机 1. 将提供的电源适配器(带电源插头)插入会议音箱。 2. 使用提供的 USB 电缆(如有必要,使用 USB 转换器)将会议音箱连接到计算机。 • 会议音箱将在连接到电源后自动开启。 • 会议音箱连接并通电后,所有按钮将变为白色 10 秒钟,然后 LED 灯条将变为蓝色 2 秒钟。 您可能需要为您的 PC 系统或会议软件手动选择 AnkerWork SR500 会议音箱。 • macOS 系统设置 > 声音 > 声音效果 / 输出 / 输入 35 SC...
- Page 38 右键点击声音图标 > 打开声音设置 > 选择输出设备 / 选择输入设备 • 软件(Zoom、Skype 等) 设置 > 音频 > 扬声器 / 麦克风 链接模式 您可以为不同规模的会议室连接最多 5 个 AnkerWork SR500 会议音箱。 1. 将提供的电源适配器(带电源插头)插入会议音箱。 2. 将 PoE 电缆的一端连接到上一个会议音箱的输出端口。 将 PoE 电缆的另一端连接到下一个会议音箱的输入端口。 3. 使用提供的 USB 电缆(如有必要,使用 USB 转换器)将链上的任一会议音箱连接到计算机。 Speakerphone x N Speakerphone 1 •...
- Page 39 按钮控制 按一次 拒绝 / 结束通话 按一次 接听电话 按下 调高 / 调低音量 按一次 将麦克风静音或取消静音。 37 SC...
- Page 40 LED 灯条 蓝灯显示长度随音量变化。 调高 / 调低音量 红灯常亮 麦克风静音 蓝灯闪烁 检测到声音方向 蓝灯闪烁 2 秒 已与另一个会议音箱链接 绿灯依次亮起 固件更新中 38 SC...
- Page 41 AnkerWork 软件 Download the AnkerWork Software from software.ankerwork.com 在您的计算机上下载并安装 AnkerWork 软件来更新固件。 固件更新:确保会议音箱已通电并连接到您的计算机,直到固件升级完成。 在链接模式下,如果您更新了连接到计算 机的会议音箱,则所有其他会议音箱将自动更新。 39 SC...
- Page 42 规格 规格如有变更,恕不另行通知。 电源端口输入 52 V 0.8 A 直流输入(网口协议) 52 V 0.7 A 直流输出(网口协议) 52 V 0.5 A 额定输出功率(扬声器) 扬声器驱动单元大小 1 个 1.75" 全域驱动单元 拾音频率 48 kHz 拾音范围 麦克风 40 SC...
Need help?
Do you have a question about the SR500 and is the answer not in the manual?
Questions and answers