Table of Contents
Advertisement
Available languages
Available languages
Quick Links
MODEL VC9209
9.25-GALLON
WET/DRY VACUUM
Instruction Manual
NEED HELP? CONTACT US!
Have product questions? Need technical support? Please feel free to contact us:
1-847-429-9263 (M-F 8AM-5PM CST)
TECHSUPPORT@WENPRODUCTS.COM
IMPORTANT: Your new tool has been engineered and manufactured to WEN's highest standards for dependability,
ease of operation, and operator safety. When properly cared for, this product will supply you years of rugged,
trouble-free performance. Pay close attention to the rules for safe operation, warnings, and cautions. If you use
your tool properly and for its intended purpose, you will enjoy years of safe, reliable service.
WENPRODUCTS.COM
For replacement parts and the most up-to-date instruction manuals, visit
Advertisement
Chapters
Table of Contents

Subscribe to Our Youtube Channel
Related Manuals for Wen VC9209


Summary of Contents for Wen VC9209
- Page 1 1-847-429-9263 (M-F 8AM-5PM CST) TECHSUPPORT@WENPRODUCTS.COM IMPORTANT: Your new tool has been engineered and manufactured to WEN’s highest standards for dependability, ease of operation, and operator safety. When properly cared for, this product will supply you years of rugged, trouble-free performance. Pay close attention to the rules for safe operation, warnings, and cautions. If you use your tool properly and for its intended purpose, you will enjoy years of safe, reliable service.
-
Page 2: Table Of Contents
CONTENTS WELCOME Introduction ..................... 3 Specifications ....................3 SAFETY General Safety Rules ..................4 Wet / Dry Vacuum Safety Warnings ..............6 Electrical Safety Warnings................7 BEFORE OPERATING Unpacking & Packing List .................8 Know Your Wet / Dry Vacuum ................9 Assembly &... -
Page 3: Welcome
INTRODUCTION Thanks for purchasing the WEN Wet / Dry Vacuum. We know you are excited to put your tool to work, but first, please take a moment to read through the manual. Safe operation of this tool requires that you read and understand this operator’s manual and all the labels affixed to the tool. -
Page 4: Safety
GENERAL SAFETY RULES WARNING! Read all safety warnings and all instructions. Failure to follow the warnings and instructions may result in electric shock, fire and/or serious injury. Safety is a combination of common sense, staying alert and knowing how your item works. The term “power tool” in the warnings refers to your mains-operated (corded) power tool or battery-operated (cordless) power tool. - Page 5 GENERAL SAFETY RULES WARNING! Read all safety warnings and all instructions. Failure to follow the warnings and instructions may result in electric shock, fire and/or serious injury. Safety is a combination of common sense, staying alert and knowing how your item works. The term “power tool” in the warnings refers to your mains-operated (corded) power tool or battery-operated (cordless) power tool.
-
Page 6: Wet / Dry Vacuum Safety Warnings
WET / DRY VACUUM SAFETY WARNINGS WARNING! Do not operate the power tool until you have read and understood the following instructions and the warning labels. WET/DRY UTILITY VACUUM SAFETY 4. Do not collect anything that is burning or smoking 1. -
Page 7: Electrical Safety Warnings
ELECTRICAL INFORMATION GROUNDING INSTRUCTIONS In the event of a malfunction or breakdown, grounding provides the path of least resistance for an electric current and reduces the risk of electric shock. This tool is equipped with an electric cord that has an equipment grounding conductor and a grounding plug. -
Page 8: Before Operating
UNPACKING & PACKING LIST UNPACKING With the help of a friend or trustworthy foe, such as one of your in-laws, carefully remove the vacuum from the packaging and place it on a sturdy, flat surface. Make sure to take out all contents and accessories. Do not discard the packaging until everything is removed. -
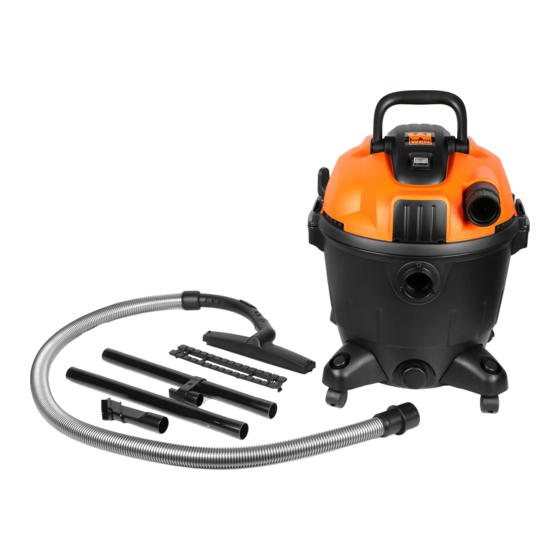
Page 9: Know Your Wet / Dry Vacuum
KNOW YOUR WET / DRY VACUUM TOOL PURPOSE From general garage spring cleaning to major basement cleanup from flooding or seepage, your wet / dry vacuum can handle it all. Refer to the following diagrams to become familiarized with all the parts and controls of your vacuum. -
Page 10: Assembly & Adjustments
ASSEMBLY & ADJUSTMENTS ASSEMBLING THE VACUUM Fig. 1 1. Ensure the unit is unplugged from its power source and the power switch is in the OFF position. 2. Pull out on the two side tabs (Fig. 1 - 1) and remove the top cover of the vacuum (Fig. -
Page 11: Operation & Maintenance
ASSEMBLY & ADJUSTMENTS Fig. 4A Fig. 4B Fig. 4C OPERATION OPERATING THE VACUUM Fig. 5 1. The vacuum can be operated by turning on the switch (Fig. 5 - 1). 2. Airflow can be adjusted using the tab on the hose (Fig. 6 - 1) to allow for maximum airflow when necessary and lesser airflow in more delicate situations. -
Page 12: Maintenance
HEPA filter will need to be purchased. Replacement HEPA filters can be found at wenproducts. com under part number VC9209-044. REMOVING AND CLEANING WET WASTE 1. Unplug the unit from the power source. -
Page 13: Troubleshooting Guide
TROUBLESHOOTING GUIDE WARNING! Stop using the generator immediately if any of the following problems occur or risk serious personal injury. If you have any questions, please contact customer service at 1-847-429-9263 (M-F 8-5 CST), or email techsupport@wenproducts.com. Problem Cause Solution Check the power cord and plug. -
Page 14: Exploded View & Parts List
EXPLODED VIEW & PARTS LIST 9 10 11 12 13... - Page 15 EXPLODED VIEW & PARTS LIST Part No. Description Qty. Part No. Description Qty. VC9209-001 Handle VC9209-036 Drain Cap Seal VC9209-002 Handle Cover VC9209-037 Screw VC9209-003 Top Inset Panel VC9209-038 Drain Bracket VC9209-004 Screw VC9209-039 Caster Foot VC4710-002 Switch VC4710-037 Caster...
-
Page 16: Warranty Statement
WARRANTY STATEMENT WEN Products is committed to building tools that are dependable for years. Our warranties are consistent with this commitment and our dedication to quality. LIMITED WARRANTY OF WEN PRODUCTS FOR HOME USE GREAT LAKES TECHNOLOGIES, LLC (“Seller”) warrants to the original purchaser only, that all WEN consumer power tools will be free from defects in material or workmanship during personal use for a period of two (2) years used for professional or commercial use. - Page 17 Notre équipe de service client est anglophone. IMPORTANT : Votre nouvel outil a été conçu et fabriqué selon les normes les plus élevées de WEN en matière de fiabilité, de facilité d’utilisation et de sécurité de l’opérateur. Lorsqu’il est correctement entretenu, ce produit vous fournira des années de performances robustes et sans problème.
- Page 18 CONTENU BIENVENU Introduction ....................19 Caractéristiques ..................... 19 SÉCURITÉ Règles Générales de Sécurité ................. 20 Avertissements de Sécurité Aspirateur eau et Poussière........ 22 Avertissements de Sécurité Électrique ............23 AVANT D’OPÉRER Déballage et Liste de Colisage .................24 Connaître ton Aspirateur eau et Poussière ............. 25 Montage &...
-
Page 19: Bienvenu
REMARQUE: Les informations de sécurité suivantes ne visent pas à couvrir toutes les conditions et situations pos- sibles qui peuvent se produire. WEN se réserve le droit de modifier ce produit et ses spécifications à tout moment sans préavis. -
Page 20: Sécurité
RÈGLES GÉNÉRALES DE SÉCURITÉ AVERTISSEMENT! Lisez tous les avertissements de sécurité et toutes les instructions. Le non-respect des avertissements et des instructions peut entraîner un choc électrique, un incendie et/ou des blessures graves. La sécurité est une combinaison de bon sens, de vigilance et de connaissance du fonctionnement de votre article. Le terme “outil électrique”... - Page 21 RÈGLES GÉNÉRALES DE SÉCURITÉ 5. N’exagérez pas. Gardez une bonne assise et un bon 6. Gardez les outils de coupe affûtés et propres. Des équilibre à tout moment. Cela permet un meilleur con- outils de coupe bien entretenus avec des arêtes de coupe trôle de l’outil électrique dans des situations inattendues.
-
Page 22: Avertissements De Sécurité Aspirateur Eau Et Poussière
AVERTISSEMENTS DE SÉCURITÉ ASPIRATEUR EAU ET POUSSIÈRE ATTENTION! N’utilisez pas l’outil électrique avant d’avoir lu et compris les instructions suivantes et les étiquettes d’avertissement. SÉCURITÉ ASPIRATEUR EAU ET POUSSIÈRE 3. N’utilisez pas cet aspirateur pour collecter des 1. Ne faites jamais fonctionner cet appareil avec des matières cancérigènes, combustibles, toxiques ou au- matériaux ou des vapeurs inflammables. -
Page 23: Avertissements De Sécurité Électrique
AVERTISSEMENTS DE SÉCURITÉ ÉLECTRIQUE INSTRUCTIONS DE MISE À LA TERRE En cas de dysfonctionnement ou de panne, la mise à la terre fournit le chemin de moindre résistance pour un courant électrique et réduit le risque de choc électrique. Cet outil est équipé d’un cordon électrique doté d’un conducteur de mise à... -
Page 24: Avant D'opérer
DÉBALLAGE ET LISTE DE COLISAGE DÉBALLAGE Avec l’aide d’un ami ou d’un ennemi digne de confiance, comme l’un de vos beaux-parents, retirez délicatement l’aspirateur de l’emballage et placez-le sur une surface plane et solide. Assurez-vous de retirer tout le contenu et les accessoires. -
Page 25: Connaître Ton Aspirateur Eau Et Poussière
CONNAÎTRE TON ASPIRATEUR EAU ET POUSSIÈRE OBJECTIF DE L’OUTIL Du nettoyage de printemps général du garage au nettoyage majeur du sous-sol en cas d’inondation ou d’infiltration, votre aspirateur sec/humide peut tout gérer. Référez-vous aux schémas suivants pour vous familiariser avec toutes les pièces et commandes de votre aspirateur. -
Page 26: Montage & Réglages
MONTAGE & RÉGLAGES ASSEMBLAGE DE L’ASPIRATEUR Fig. 1 1. Assurez-vous que l’appareil est débranché de sa source d’alimentation et que l’interrupteur d’alimentation est en position OFF. 2. Tirez sur les deux languettes latérales (Fig. 1 - 1) et re- tirez le couvercle supérieur de l’aspirateur (Fig. 1 - 2) pour trouver les accessoires supplémentaires à... -
Page 27: Opération & Entretien
MONTAGE & RÉGLAGES Fig. 4A Fig. 4B Fig. 4C OPÉRATION FONCTIONNEMENT DE L’ASPIRATEUR Fig. 5 1. L’aspirateur peut être actionné en allumant l’interrupteur (Fig. 5 - 1). 2. Le débit d’air peut être ajusté à l’aide de la languette sur le tuyau (Fig. -
Page 28: Entretien
HEPA devra être acheté. Des filtres HEPA de remplace- ment sont disponibles sur wenproducts.com sous le nu- méro de pièce VC9209-044. ENLEVER ET NETTOYER LES DÉCHETS HUMIDES REMARQUE: Pour les travaux humides et secs, il est suggéré... -
Page 29: Guide De Dépannage
GUIDE DE DÉPANNAGE AVERTISSEMENT! Arrêtez immédiatement d’utiliser le groupe électrogène si l’un des problèmes suivants survient ou risque de vous blesser gravement. Si vous avez des questions, veuillez contacter le service client au 1-847-429-9263 (M-F 8-5 CST), ou envoyez un e-mail à techsupport@wenproducts.com. Problème Cause La Solution... -
Page 30: Vue Éclatée Et Liste De Pièces
VUE ÉCLATÉE ET LISTE DE PIÈCES 9 10 11 12 13... - Page 31 VUE ÉCLATÉE ET LISTE DE PIÈCES Partie No. La Description Qty. Partie No. La Description Qty. VC9209-001 Gérer Joint de Bouchon de VC9209-036 Vidange VC9209-002 Couvercle de la Poignée VC9209-037 Panneau D'encart VC9209-003 Supérieur VC9209-038 Support de Vidange VC9209-004 VC9209-039...
-
Page 32: Déclaration De Garantie
Les pièces et produits endommagés ou défectueux peuvent devoir être envoyés à WEN avant que les pièces de rechange puissent être expédiées.
Need help?
Do you have a question about the VC9209 and is the answer not in the manual?
Questions and answers