Table of Contents
Advertisement
Quick Links
Advertisement
Table of Contents

Related Manuals for Dahua DS04-AI400


Summary of Contents for Dahua DS04-AI400
- Page 1 Distributed Play Box User's Manual V1.0.1...
-
Page 2: Foreword
Foreword General This manual introduces the installation, functions and operations of the distributed play box (hereinafter referred to as "the box"). Read carefully before using the box, and keep the manual safe for future reference. Safety Instructions The following signal words might appear in the manual. Signal Words Meaning Indicates a high potential hazard which, if not avoided, will result in... - Page 3 ● All designs and software are subject to change without prior written notice. Product updates might result in some differences appearing between the actual product and the manual. Please contact customer service for the latest program and supplementary documentation. ● There might be errors in the print or deviations in the description of the functions, operations and technical data.
-
Page 4: Important Safeguards And Warnings
Important Safeguards and Warnings This section introduces content covering the proper handling of the box, hazard prevention, and prevention of property damage. Read carefully before using the box, and comply with the guidelines when using it. Installation Requirements ● Improper use of the battery might result in a fire or explosion. ●... -
Page 5: Table Of Contents
Table of Contents Foreword ........................................I Important Safeguards and Warnings ............................III 1 Introduction ......................................1 2 Packing List ......................................2 3 Structure ........................................3 3.1 Dimensions ....................................3 3.2 Ports ......................................... 3 4 Basic Operations ....................................5 4.1 Starting and Shutting Down ..............................5 4.2 Initialization .................................... - Page 6 4.8.1 Installing the App ................................. 23 4.8.2 File Manager ..................................23 5 System Settings ....................................24 5.1 Setting the Date and Time ..............................24 5.2 Selecting the Input Source ..............................24 5.3 Configuring Visual and Audio Parameters ......................... 25 5.4 System Language ..................................26 6 Maintenance and Update ................................
-
Page 7: Introduction
1 Introduction The play box is a new generation of smart cloud information terminal integrated with multimedia information release, advertisement release, and network access. Based on an industrial design scheme, it is paired with the information release management platform that features B/S architecture. -
Page 8: Packing List
2 Packing List Check whether there is any obvious damage to the package box. Unpack the box and check whether the components are complete according to the packing list. Table 2-1 Packing list Name Quantity Name Quantity Distributed play box Power adapter Remote control Fixed base bracket... -
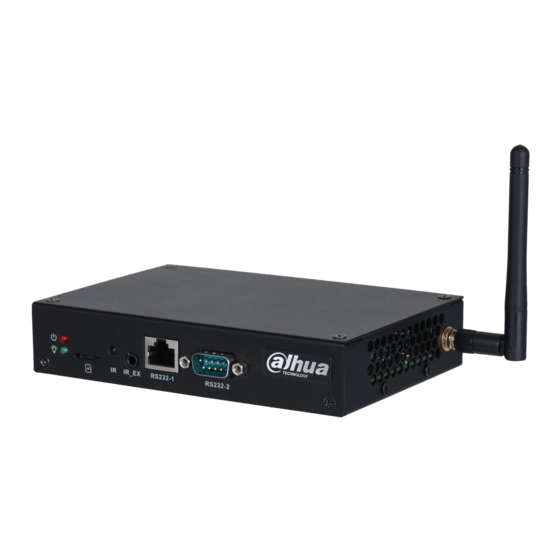
Page 9: Structure
3 Structure 3.1 Dimensions Figure 3-1 Dimensions (mm [inch]) 3.2 Ports Figure 3-2 Ports (1) - Page 10 Figure 3-3 Ports (2) Table 3-1 Port description Name Description Power indicator light The light turns on when the box is powered on. Insert a TF card. The TF card is used to force update the Android OS or provide media for projects. A force update is needed when the Android OS restarts repeatedly or the box cannot be started.
-
Page 11: Basic Operations
4 Basic Operations The remote control supports limited operations: You can use the remote control to turn on or off the screen, turn on, turn off, or restart the box, adjust the volume and go back to the home page. We recommend you connect a mouse to operate the box. - Page 12 Figure 4-1 Password protection Step 6 Set the device name. 1. Click to set the device name. 2. Click Save and Next. Step 7 Configure network settings. Click Skip if you do not want to configure the network settings. 1. Select a network type and then configure network settings. Table 4-1 Network settings Network type Description...
-
Page 13: Login
Figure 4-2 Platform registration 2. Click Complete. 4.3 Login You need to log in to the system to perform operations when any of the following situations occurs. ● It is your first-time use after initialization. ● You locked the screen manually. ●... -
Page 14: Changing The Password And Security Questions
Figure 4-3 Verify security questions 4.5 Changing the Password and Security Questions We recommend changing the login password and security questions regularly to keep the box safe. 4.5.1 Setting the Password Validity Period Step 1 On the home page, select Settings > Password Setting > Password Validity Period Setting. -
Page 15: Changing The Password
4.5.2 Changing the Password On the home page, select Settings > Password Setting > Password Setting. Step 1 Step 2 Enter old password and new password, and then confirm your new password. Step 3 Click Save. Figure 4-5 Password settings 4.5.3 Changing Security Questions Step 1 On the home page, select Settings >... -
Page 16: Releasing Projects
Point to the bottom of the page, and then the quick toolbar is displayed. Figure 4-7 Quick toolbar Table 4-2 Description of quick toolbar Icon Description Indicates whether the box is registered to the platform. Go to the home page. Adjust volume. -
Page 17: Configuring The Network
Operation Description After registering the box to the platform, you can release projects and Register the box to operate the box through the platform. For details, see "4.7.1.3 Registering the platform the Box to the Platform". Release project After you add media and configure project plans on the platform, you can through the play projects on the box. -
Page 18: Configuring The Allowlist
4.7.1.2.2 Configuring the Allowlist Configure IP addresses that are allowed to access the box. Only IP addresses on the allowlist can be used to log in to the web interface. This is to enhance data security. Step 1 On the home page, select Settings > Network Setting > Allowlist. Step 2 Click to enable the allowlist. -
Page 19: Local Release
Figure 4-11 Network release Step 2 Click on the lower-left corner. Figure 4-12 Platform address Step 3 Enter the IP address or domain name of the platform (MPS or ICC), the platform port and the ID of the department that the box is in. After registration, you can only link the box with devices in the same department. -
Page 20: Configuration Flow Of Local Release
4.7.2.1 Configuration Flow of Local Release For General template, you can select Quick Play and Customized Play. For Special templates, you can select from Catering & Life, Special Offer & Promotion, Brand Publicity, Supermarket & Hotel, Info & News, Face Attendance, Stream Media, and Video Surveillance. -
Page 21: Custom Play
Figure 4-15 Quick play Step 4 Select a template. The system will display the media in the USBPLAY folder. A picture is displayed for 10 seconds by default and a video to its end. PDF files can be imported only to Template 1. 4.7.2.2.2 Custom Play Define your own templates to release information. -
Page 22: Releasing Projects By Special Templates
Figure 4-17 Add media 2) Click , select media content, and then configure the picture play duration. ● Pictures are displayed for 10 seconds by default and videos to their end. ● You can upload multiple media contents and then drag the media to sort them. ●... - Page 23 Figure 4-18 Configure face attendance template Step 3 Click Edit on the upper-right corner. Figure 4-19 Setting 1) Click Add Channel.
- Page 24 Figure 4-20 Add channel 2) Configure the parameters. Table 4-5 Description of adding channel Parameter Description Select a protocol depending on the device or platform that is connected. ● When the box is connected to IVSS (intelligent video surveillance server) or IP camera, select Acquisition. Protocol ●...
- Page 25 3) Click Confirm. Step 4 Configure other parameters. Table 4-6 Description of other parameters Parameter Description ● Screen split: You can view the video image of the added channels by 1, 2, 3, or 4 splits. ● Switching time(seconds): Switch to play the video of another Display Video Image added channel after the defined time.
-
Page 26: Configuring Other Special Templates
4.7.2.3.2 Configuring Other Special Templates The other special templates are similar in configurations. This sections uses the supermarket & hotel template as an example. Step 1 On the home page, select Local Release > Special. Step 2 Click a template that you want to define. Step 3 Configure the template. -
Page 27: Scheduled Project
Figure 4-22 My project 4.7.2.5 Scheduled Project Configure which and when projects will be played. Procedure Step 1 On the home page, select Local Release > Scheduled Project. Step 2 Click , and then on the page displayed, click Add order play period. Figure 4-23 Add order play period Step 3 Set the time period, and then click... -
Page 28: App Manager
Figure 4-25 Add project Step 5 Click Save. The system goes back to the Add order play period page. ● Repeat Step 2–Step 4 to add multiple order play periods. ● Up to 30 periods can be added. Step 6 Click Save. -
Page 29: Installing The App
Figure 4-26 App center 4.8.1 Installing the App Install an app on the box, and then you can manage and operate the app. Prerequisites Insert the USB drive with the installation package (.apk) into the box. Procedure On the home page, select App Manager > App Center. Step 1 Step 2 Click Install App. -
Page 30: System Settings
5 System Settings 5.1 Setting the Date and Time You can set time and date for the box. Remember to select a correct time zone based on where the box lies. Step 1 On the home page, select Settings > Date & Time. Figure 5-1 Date &... -
Page 31: Configuring Visual And Audio Parameters
Figure 5-2 Input source When the box itself acts as the signal input source that outputs signals through the HDMI port, Input Source Setting is not available. 5.3 Configuring Visual and Audio Parameters Adjust display effect of screen and device volume. If it prompts This operation may cause power increase. -
Page 32: System Language
Table 5-1 Visual & audio adjustment Item Description Adjust the screen background brightness manually or automatically. Backlight Brightness ● Automatic background brightness adjustment is available on select models. ● Click to restore the default backlight brightness. The resolution is self-adaptive by default. You can change the Output Resolution output resolution. -
Page 33: Maintenance And Update
6 Maintenance and Update 6.1 Maintenance Requirements To keep the box running normally, you need to: ● Change the user password every three months. ● Restart the box regularly. ● Update firmware regularly. 6.2 Restoring Factory Defaults Restore the box to factory settings to handle problems such as storage insufficiency and system error. -
Page 34: Turning The Screen On/Off At A Fixed Time
restart time for the box. Step 1 On the home page, select Settings > Maintenance and Upgrade > Auto Maintenance Time Setting. Figure 6-1 Configure auto maintenance time Step 2 Drag your mouse up and down to select a time. Step 3 (Optional) Select the days of the week to which you want to apply the automatic maintenance time. -
Page 35: Restarting The Box
Custom settings come first when Custom and Week are enabled at the same time. Step 3 Click to configure the specific date and time. Step 4 Click Save. 6.7 Restarting the Box Manually restart your device to solve problems such as system crash. Step 1 On the home page, select Settings >... -
Page 36: Appendix 1 Remote Control
Appendix 1 Remote Control For select models of play boxes, you can use remote controls to operate them. ● The remote control supports limited operations. ● The remote control for different models of boxes might be different. Appendix Figure 1-1 Remote control appearance Appendix Table 1-1 Buttons description Operation Item Buttons Needed... - Page 37 Operation Item Buttons Needed 1. When you find the screen is locked, you can use your remote control to type the password. Press on your remote control. The Login page is displayed. 2. Operate arrow keys and move pointer to password box, and type Type password to log in password.
-
Page 38: Appendix 2 Cybersecurity Recommendations
Appendix 2 Cybersecurity Recommendations Mandatory actions to be taken for basic device network security: 1. Use Strong Passwords Please refer to the following suggestions to set passwords: ● The length should not be less than 8 characters. ● Include at least two types of characters; character types include upper and lower case letters, numbers and symbols. - Page 39 the risk of ARP spoofing. 8. Assign Accounts and Privileges Reasonably According to business and management requirements, reasonably add users and assign a minimum set of permissions to them. 9. Disable Unnecessary Services and Choose Secure Modes If not needed, it is recommended to turn off some services such as SNMP, SMTP, UPnP, etc., to reduce risks.
Need help?
Do you have a question about the DS04-AI400 and is the answer not in the manual?
Questions and answers