Table of Contents
Advertisement
DIBK226-E/DIBK235-E/DIBK261-E/DIBK218-E
DIBK226S-E/DIBK235S-E/DIBK261S-E/DIBK218S-E
DIHG35G-E/DIHG35GIR-E/DIHG70G-E/DIHG70GIR-E
User's Manual
TCK60-E/TCK070-E/TCK113-E
DIH602-E/DIH070-E/DIH113-E
BK60-E/BK70-E/BK602-E
BK60S-E/BK70S-E/BK602S-E
DIHG900-E/DIHG450-E
DIHN35-E/DIHN070-E/DIHN113-E
Theory
Cautions
Specification
How to Use
Cleaning & Troubleshooting 20~21P
Installation
Cookware for Induction
Warranty Card
Caution
Read this manual,
before using the Range.
4P
5~9P
10~16P
17~19P
22~28P
29P
30~31P
Advertisement
Table of Contents

Related Manuals for dipo INDUCTION TCK60-E

Summary of Contents for dipo INDUCTION TCK60-E
- Page 1 User’s Manual TCK60-E/TCK070-E/TCK113-E DIH602-E/DIH070-E/DIH113-E BK60-E/BK70-E/BK602-E BK60S-E/BK70S-E/BK602S-E DIBK226-E/DIBK235-E/DIBK261-E/DIBK218-E DIBK226S-E/DIBK235S-E/DIBK261S-E/DIBK218S-E DIHG35G-E/DIHG35GIR-E/DIHG70G-E/DIHG70GIR-E DIHG900-E/DIHG450-E DIHN35-E/DIHN070-E/DIHN113-E Caution Read this manual, before using the Range. Theory Cautions 5~9P Specification 10~16P How to Use 17~19P Cleaning & Troubleshooting 20~21P Installation 22~28P Cookware for Induction Warranty Card 30~31P...
- Page 2 INSTRUCTIONS and SAFEGUARDS 1. Use an individual ELB having rated ampacity according to electric wiring regulation before connecting to a distribution panel. See page 22~23 for electrical wiring installation. 2. DO NOT block the air-intake or air-outflow panels as blocking may overheat the unit.
- Page 3 10. DO NOT operate the induction range if it has been damaged in any manner or if the unit malfunctions. Return the unit to the nearest authorized service facility for examination or repair. 11. The use of any accessories not recommended by the manufacturer may cause injuries.
- Page 4 Theory of DIPO Induction Induction Range When the magnetic flux created at the coil passes through the bottom of the pot placed on the top plate, eddy current is generated around the flux. This eddy current then is transformed into heat by the resistant element of the pan and heats up the pan for cooking.
-
Page 5: Warning / Cautions
Warning / Cautions Contents Indicates the possibility of severe injury or death . Warning Indicates the possibility of injury or damage to Caution the equipment. S Y M B O L General Don’t touch! Important! prohibition Be careful of Use of fire strictly Electric shock! prohibited! -
Page 6: Warnings & Cautions
Warnings / Cautions Warning 1. Use a proper circuit breaker to standard. <1 Phase> <3PH+N> <3PH> Don't use a damaged power Don't bent or put strain on the cable. power cable. ** If the supply cable is damaged, it must be replaced by the manufacturer, its service agent or similarly qualified... - Page 7 Warnings / Cautions Warning This appliance is not intended for use by persons (including children) with reduced physical, sensory or mental capabilities, or lack of experience and knowledge, unless they have been given supervision or instruction concerning use of the appliance by a person responsible for their safety.
- Page 8 Warnings / Cautions Warning Don’t spray water on the range. Don’t touch the hob surface, after using range. It will be hot. *It can cause a fire or a electric shock. Metallic objects such as knives, Don’t use the sharp tools, when forks, spoons and lids should not you clean this appliance.
- Page 9 Warnings / Cautions Warning Unplug or turn of the circuit Do not block the exhaust vents. breaker when not in use. Use vessels of the proper size. Do not heat an empty pan or cook *Use vessels with flat bottoms and a diameter of is dry ingredients.
-
Page 10: Specifications
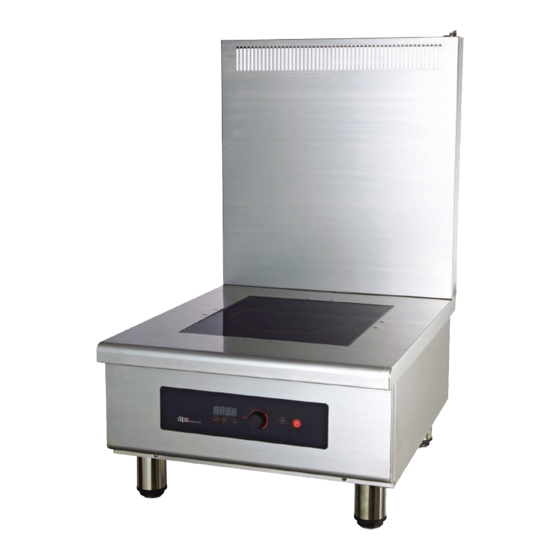
Specifications MODEL: TCK60-E/TCK070-E/TCK113-E External Temperature Exhaust Vent Sensor Connector Ceramic Top Plate Display Power Button Timer Button Start/Stop Button Min/Sec Button Air Filter Mode Button Control Knob Model TCK60-E TCK070-E TCK113-E AC 220~240V AC 340~420V 3PH+N Voltage 3PH 50/60Hz 50/60Hz... - Page 11 Specifications MODEL: DIH602-E/DIH070-E/DIH113-E Exhaust Vent External Ceramic Temperature Sensor Top Plate Connector Control Knob Display Start Button Timer Button Power Button Air Filter Min/Sec Button Mode Button Model DIH070-E DIH602-E DIH113-E AC 220~240V AC 340~420V 3PH+N Voltage 3PH 50/60Hz 50/60Hz Watt 5500W 11000W...
- Page 12 Specifications MODEL: BK602-E/BK60-E/BK70-E Exhaust Vent Ceramic Top Plate Air Intake Display Control Knob Timer Button External Temperature Power Sensor Button Min/Sec Connector Button Start Button Mode Button Model BK60-E BK602-E BK70-E AC 340~420V 3PH+N AC 220~240V Voltage 50/60Hz 3PH 50/60Hz Watt 5500W 7000W...
- Page 13 Specifications MODEL: BK602S-E/BK60S-E/BK70S-E Ceramic Top Plate Air Intake Display Control Knob Timer Button External Temperature Power Sensor Button Min/Sec Connector Button Start Button Mode Button Model BK60S-E BK602S-E BK70S-E AC 340~420V 3PH+N AC 220~240V Voltage 50/60Hz 3PH 50/60Hz Watt 5500W 7000W 6000W 26 Kg...
- Page 14 Specifications MODEL: DIBK-E Series Control Knob External Temperature Sensor Connector Timer Button Exhaust Hole Ceramic Top Min/Sec Button Plate Back Burner Start Display Mode Front Air Intake Button Button Start Burner Button Display Model DIBK226-E DIBK218-E DIBK261-E DIBK235-E Voltage AC 220~240V 50/60Hz 5200W 4000W 5900W...
- Page 15 Specifications MODEL: DIBKS-E Series Control Knob Ceramic Top Plate Timer Button Min/Sec Button Back Burner Display Front Burner Power Mode Display Air Intake Button Button Start Button Model DIBK226S-E DIBK235S-E DIBK218S-E DIBK261S-E Voltage AC 220~240V 50/60Hz 5200W 4000W 5900W 6600W Watt (3300W+3300W) (2600W+2600W)
- Page 16 Specifications MODEL: DIHG35G-E/DIHG35GIR-E/DIHG70G-E/DIHG70GIR-E Exhaust <DIHG35G-E/ DIHG35GIR-E> Vent Steel/Clad Plate Grease <DIHG70G-E/ DIHG70GIR-E> Display Power Button Control Air Filter Knob Start Button DIHG70G-E DIHG35G-E Model /DIHG70GIR-E /DIHG35GIR-E Voltage AC 220~240V 50/60Hz Watt 7000W 3500W Clad/Steel Clad/Steel Top Plate Dimension 900X600X345(mm) 450X600X345(mm) Heat Level 40~260℃...
- Page 17 Specifications MODEL: DIHN35-E Noodle Boiling Zone Noodle Basket Tray Exhaust Vent Water Control Faucet Water Tank Drain Inside Valve Do not hit ‘mode’ button without a temperature probe. It will show up ‘E5’ error. Once ‘E5’ error shows up, turn off and on the unit. Model DIHN35-E Voltage...
- Page 18 Specifications MODEL: DIHN070-E / DIHN113-E Noodle Exhaust Vent Boiling Zone Noodle Water Basket Tray Faucet Exhaust Vent Water Tank Inside Control Do not hit ‘mode’ button without a temperature probe. It will show up ‘E5’ error. Once ‘E5’ error shows up, turn off and on the unit. DIHN070-E Model DIHN113-E...
-
Page 19: How To Use
How To Use BK(S)-E/TCK-E/DIH-E Series Start Timer Control Knob Min/Sec Power Button Button Button Button 1. Connect the power cable. ◆ Four lighted dots on the display indicates that the unit is plugged in. 2. Place a pot on the Ceramic Top Plate. ◆... - Page 20 How To Use DIBK(S)-E Series Control Knob Time Button Min/Sec Button Mode Button Start Button Power Button 1. Connect the power cable. ◆ Four lighted dots on the display indicates that the unit is plugged in. 2. Place a pot on the Ceramic Top Plate. ◆...
- Page 21 How To Use DIHG900-E/DIHG450-E Start Button Power Button Display Control Knob 1. Insert the power plug. ◆ Four lighted dots on the display indicates that the unit is plugged in. 2. Operation ◆ If you press the power button, “000C” is displayed. ◆...
- Page 22 Cleanings Cleanings 1. Cleaning ceramic top plate and control panel ◆ Light stains : Clean the top plate with the soft and wet cloth. ◆ Severe stains : Use a soft cloth with a mild cleaning agent or detergent. ◆ Do not use hard or sharp tools to clean the glass. 2.
-
Page 23: Troubleshooting
Troubleshooting 세척 및 유지 방법 Troubleshooting Symptoms Measure Methods ◆Check that the unit is plugged in and/or the breaker is Display is Blank ◆Check that voltage is present at the unit. ◆Contact the Factory. ◆Check that a pot is proper for Induction Range or that a Power on, but pan pot is placed in center of the top plate. -
Page 24: Installation
• Electrical specification - 220~240V 3PH (Plus GND) - Use circuit breaker with proper ratings - cable : Above 400V , 4 Wires • Electrical specs according to Models Model Output Ampere Voltage TCK60-E 220~240V 3PH DIH602-E 220~240V 3PH BK602(S)-E 220~240V 3PH... - Page 25 Installation Installing Electricity 3. 220V 1 Phase Circuit Breaker • Electrical specification - 220~240V 1PH (Plus GND) - Use circuit breaker with proper ratings - cable : Above 400V, 3 Wires : Below 7kw (Wire Diameter : Above 4¢) Model Output Ampere Voltage...
- Page 26 Installation BK-E Series 1. Match cut-out size to the product. 2. Space of 10cm (4”) and open louvers in front of the unit is required for ventilation. 3. For Drop-in units, be sure the counter top is adequately reinforced to bear the weight of the unit in operation. Additional support under the unit may be required.
- Page 27 Installation BKS-E Series 1. Match cut-out size to the product. 2. Space of 10cm and open louvers in front of the unit is required for ventilation. 3. For Drop-in units, be sure the counter top is adequately reinforced to bear the weight of the unit in operation. Additional support under the unit may be required.
- Page 28 Installation DIBK-E Series 1. Match size of hole with size of product as possible. 2. Space of 10cm and holes to front of product is needed for ventilation. 3. When products have been built-in, reinforcement stand is required in order to bear weight of products. 4.
- Page 29 Installation DIBKS-E Series 1. Match size of hole with size of product as possible. 2. Space of 10cm and holes to front of product is needed for ventilation. 3. When products have been built-in, reinforcement stand is required in order to bear weight of products. 4.
- Page 30 Installation DIBKS-E Series 6. In case of DIBKS-E Model, the ventilation and the air flow guide of product’s back is needed. 7. Ventilation Holes and Air Flow Guide Back of Case Ventilation Holes Hole of Power Cable Picture of Case Air Flow Guide...
-
Page 31: Induction Cookware
Induction Cookware Selecting proper pots BKP/BK 설치 가이드 1. Bottom of pots must be flat. 2. Bottom Materials of Pots : Iron, Cast Iron, Enameled Iron, Stainless Steel(Magnetic), Triple Bond Steel and Magnetic Pots ★Please use pots that have IH exclusive marks. 3. -
Page 32: Warranty
Warranty Limited Warranty Statement All commercial cooking equipment manufactured by DIPO is warranted against defects in materials and workmanship for a period of one year from the date of invoice. Accessories, cookware and other incidental non-range items sold by DIPO are warranted against defects in materials and workmanship for a period of 90 days. - Page 33 Warranty This warranty is void if it is determined upon inspection by DIPO or one it’s Authorized agents that the equipment has been modified, misused, misapplied, improperly installed, or damaged in transit or by fire, flood or act of God. Broken Glass-Ceramic tops are considered abuse and are NOT covered.
- Page 34 TEL : 82-31-793-5895 TEL : 82-2-444-5895 FAX : 82-31-793-5862 FAX : 82-70-4694-5412 E-MAIL : dipoelec@naver.com E-MAIL : dipo24@dipoelec.com www.dipoelec.com www.dipoelec.com Rm402, Hanamventure Center, 523 Chang-u-dong, 6-30, Wolmun-ri, Wabu-eup, Namyangju-si, Hanam-si, Gyeonggi-do 465-120, Korea Gyeonggi-do, Republic of Korea...
Need help?
Do you have a question about the TCK60-E and is the answer not in the manual?
Questions and answers