Advertisement
Quick Links
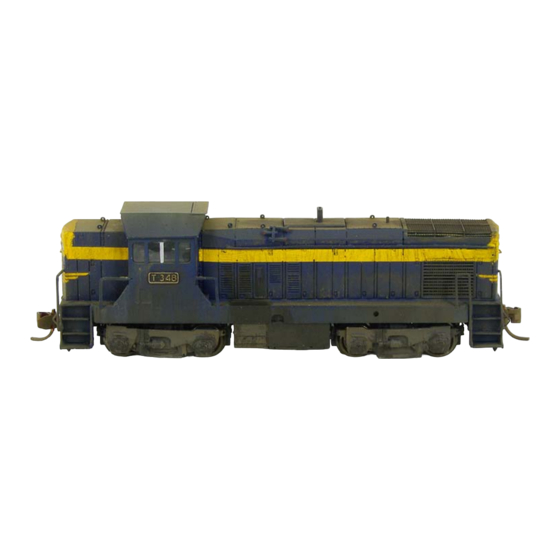
SDLoco3 - Victorian Railways T class diesel-electric Series 2
Requires Bachmann S4 loco, LifeLike or Concor split chassis SW9 to complete, available separately.
Thank you for purchasing this kit and I hope you get many hours of enjoyment from it. Chris Pearce (Spirit Design)
T347 staff exchanger cutouts and no cab valances, circa 1980. Photo courtesy of Mau Bau's website
Basic history: The T class became the largest diesel class on the Victorian Railways and were built by Clyde's Granville workshops
over 13 years from 1955-to 1968. As a consequence, there are 5 versions but the group is commonly called by the 3 versions of
"Flat Top", "High Nose" and "Low Nose". They were purchased to serve the state's branch lines and to replace the ageing K's and
the newly arrived J class steam locos. The 2
they were assigned all manner of jobs with other classes.
With the arrival of larger locos in the form of G's and the aging B class being rejuvenated into the A-class most of the fleet was
scrapped or withdrawn by 1989. For the majority of their life, they were painted Blue & Gold of the Victorian Railways and then,
later on, were painted in the V/Line orange and grey. Towards the end of their working lives, they received the 'chopped' valance
treatment which altered their appearance but maintenance was easier. Sadly only a solidary unit no. T356 has made it into
preservation and currently wears the classic VR Blue and Gold paint scheme.
Road Numbers: T347-T356. Model: G8B
CAB
END
ABN 92 510 718 068
Blue and Gold era and V/line era.
nd
series was constructed from June to December 1959 and when they entered traffic
1
Web site:
http://www.spiritdesign.com.au
Note (P24)
are 2 wooden
1.5mm thick
timber blocks
that are glued
in front of
each cab door
to the
walkway
(P25) are
the clear
windows for
the cab
Advertisement

Related Manuals for SPIRIT DESIGN SDLoco3 2 Series

Summary of Contents for SPIRIT DESIGN SDLoco3 2 Series
- Page 1 Requires Bachmann S4 loco, LifeLike or Concor split chassis SW9 to complete, available separately. Thank you for purchasing this kit and I hope you get many hours of enjoyment from it. Chris Pearce (Spirit Design) T347 staff exchanger cutouts and no cab valances, circa 1980. Photo courtesy of Mau Bau’s website Basic history: The T class became the largest diesel class on the Victorian Railways and were built by Clyde’s Granville workshops...
- Page 2 These notes cover the Bachmann S4 mechanism only. If you plan to use a LifeLike chassis, a Spirit Design plywood chassis is available separately. It’s easier than the Y class chassis to put together if you have done this kit in the past Assembly Instructions: These instructions may seem long-winded but it’s harder to describe and better for your understanding...
- Page 3 This edge up against the headstock end of walkway At each of the valance ends of the walkway (P1), a small flap should be bent towards the centre of the walkway at about a 45-degree angle. This angle is easy to follow as the flap bend should match the shape in the top of the walkway when viewed from above Note the side part of the staircase is positioned away from the front/rear skirts of the headstocks on the walkway.
- Page 4 Cab: Fold lines are on the inside of the cab (P6). The main front of the cab has 2 high windows side by side and this goes towards the short nose. Fold each of the sides 90 degrees and workaround until the 2 high windows of the cab rear meet squarely in the centre.
- Page 5 Using the 20thou wire provided solder or glue it into position on the long hood, on the centre line and just forward of the radiator exhaust vents, with it protruding 1.0 – 1.25 above the mansard long hood roof Glue or solder 8 lift rings (P10) into the holes provided in the long hood and the nose roof sections Glue the headlights (P11) into the depressions on each of the noses Glue or solder the step treads (P12) onto the holes provided in each staircase and trim the tabs protruding through the rear...
- Page 6 The Blue and Gold era chevrons and stripes are the highest quality decals on the market and have been especially screen printed for Spirit Design to match Steam Era Diesel Yellow. They also feature a unique border fractionally wider than the artwork work. This...
- Page 7 more having to trim as close as possible as the special mask does this for you. V/Line era: using photos as a guide place the decals as per the prototype on the sides and noses of the loco Final assembly: Glazing: Where there is a score line on each window section, bend this down 90 degrees from the scoreline.
- Page 8 Simple solder board made from 6mm and 3mm MDF 100mm wide x 150mm long. Use whatever measurements or scraps you have available T351 chopped valance Geelong loco 29/04/1989. Photo Chris Pearce T 353 between duties at Geelong 04/03/1989. Note the different chopped valance compared to T351. Photo Chris Pearce...
Need help?
Do you have a question about the SDLoco3 2 Series and is the answer not in the manual?
Questions and answers