Advertisement
Quick Links
Thank you for purchasing this kit and I hope you get many hours of enjoyment from it. Chris Pearce (Spirit Design)
Basic history: The Y class was the second-largest diesel class of the Victorian Railways with 75 members being built by Clyde's
Granville workshops in 3 batches between 1963-1968. Utilising bogies off scrapped swing door electric trains and featuring a 6-
cylinder EMD 567 and later a 645 engine they were highly regarded by crews and were a versatile go-anywhere engine. The long
hood is designated the no1 end and controls were arranged accordingly. The fleet was seen over the entire VR system with 4 always
on the standard gauge. Later on, in life, they received the V/line orange and grey livery and this was later replaced on the
remaining active units with the new V/line red and blue. Some were fitted with DOO window openings altering their appearance. A
few have made their way into private tourist railways and are still giving reliable service.
Soldering: Always clean up soldered joints as you progress, as it's easier in the long run. For an understanding of soldering it
would pay to visit the following sites for information on soldering before attempting your first kit.
Tools needed: small files, sanding sticks, fine grade sandpaper, fast-drying wood glue, Selley's Kwik Grip hydrocarbon-based,
'Duck Bill' (flat – no teeth) and long nose pliers, Plyobond or superglue, soldering iron, solder, flux, Exacto knife, scissor clamps,
weights, soldering aids, Blu-Tak, 0.3mm drill bit, pin vice, tweezers.
Other items: decoder wire, 2B pencil, paint, couplers, LifeLike SW9/1200 loco for motor, bogies, weights and phosphorous bronze
pickups etc
Assembly Instructions: Some steps require close attention and they are highlighted
text are marked (P1), (P2) etc.
Reference photos:
Walkway:
1.
Cut the centre section holding the small parts away from the walkway etch (P1)
2.
Remove the walkway (P1) from the etch and fold sides up to 90degrees using a 'Hold 'n' Fold' or between 2 bars of
hardened ground steel
3.
Bend ends of the walkway (headstock skirts) to 90 degrees.
4.
Fold a staircase side (P2), then the bottom of the step up to meet the side and solder. Do this for all 4 (P2) staircases
5.
Tests fit a staircase (P2) and once satisfied with the fit, solder it into the floor making sure that the tab in the top slots into
the hole provided in the walkway. Also, make sure the staircase is square and straight with the front/rear walkway and the
headstock skirts. Then solder the edge of the stair casing to the walkway skirt. Repeat for the other 3 staircases (P2).
Note the side part of the case is positioned away from the front/rear skirt of the walkway
6.
Where the stair casing (P2) comes through the walkway (P1), cover this area over with solder and file the tab to make the
walkway decking flush
7.
Clean up any excess solder on the completed walkway and make sure the centre area is free from etching holding tabs and
set aside once the entire walkway is flat and straight when sitting on a flat surface
8.
Make sure that the walkway is straight and flat and if twisted use pliers/steel bars to achieve a perfectly flat
surface. See the walkway picture below
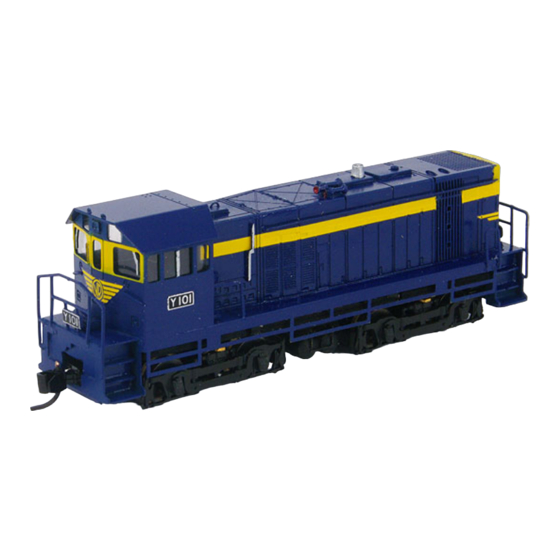
SDLocoY1 - Victorian Railways Y class diesel-electric.
Requires LifeLike SW9/1200 loco to complete, available separately.
Brand new Y101 arrives from Clyde and is seen outside Dynon. Victorian Railways photo
http://themodelmakersresource.co.uk/articles/article012.html
http://www.dccconcepts.com/index_files/DCCsoldering1.htm
All brass parts and their holding tabs should be trimmed and filed after removing from the etch.
http://www.victorianrailways.net/motive%20power/ydie/ydie.html
http://www.robx1.net/index/index.htm
http://www.pjv101.net/index.htm
Train Hobby Y class profile book
ABN 92 510 718 068
Web site:
http://www.spiritdesign.com.au
in bold and italics!
Parts referred to in the
Advertisement

Related Manuals for SPIRIT DESIGN SDLocoY1

Summary of Contents for SPIRIT DESIGN SDLocoY1
- Page 1 Requires LifeLike SW9/1200 loco to complete, available separately. Thank you for purchasing this kit and I hope you get many hours of enjoyment from it. Chris Pearce (Spirit Design) Brand new Y101 arrives from Clyde and is seen outside Dynon. Victorian Railways photo Basic history: The Y class was the second-largest diesel class of the Victorian Railways with 75 members being built by Clyde’s...
- Page 2 Cab: Whilst the cab etch (P4) is still flat fit a 3.0mm cab door handrail into the holes provided. Insert a small bit of paper (photocopy paper thickness is ideal) between the handrail and the cab so that when soldered there will be a space beneath the handrail after the paper is withdrawn when the soldering is done.
- Page 3 Fit the fuel gauges (P10, P11) etches into the holes provided just behind the cab. Use prototype photos depending on which class number you have chosen as they vary between the earlier series and the later ones. There are 2 spares provided.
- Page 4 13. Slide the long hood assembly (P8) into the walkway (P1) until the tabs stop any further movement and bend the tabs up 90 degrees, as this will aid the soldering process. Note the profile of the long hood should match the orientation on the floor.
- Page 5 2 views of the completed etched components with details – Y101-Y125 Bogies: At each staircase (P2) where the bogie swings, slightly trim the brake block area marked by the red line in the diagram below. Nested gear end of bogie. Stair case end Air tank end Smooth gear...
- Page 6 The following steps require the use of a gear puller and press to complete Spirit Design offers a gear pulling service for those that are not equipped to do so for a small fee. Extract the cab end worm gear and set it aside...
- Page 7 Wiring: Utilising the LifeLike walkway CAREFULLY remove a phosphor bronze pickup Lay a scrap piece of the chassis floor over the donor phosphor bronze pickup (P33) and bend the small arm back over the scrap piece forming a little “U” shape. Repeat for the other 3 pickups Attach the pickups using the four 14BA screws supplied to the underside of the chassis deck and bend the vertical tabs over so that they form a soldering point for the motor.
- Page 8 Decals: The chevrons and stripes are the highest quality decals on the market and have been especially screen printed for Spirit Design to match Steam Era Diesel Yellow. Also, they feature a unique border fractionally wider than the artwork work. This means you can cut away from the decal and when soaking off, only the artwork with the small clear border will come away.
- Page 9 Prototype photos: Y133 in VR and Y160 V/Line running LE at Seymour 1988. Chris Pearce Y134 Courtesy of Peter Vincent Y 122 Dynon 1980’s. Note the fuel gauge compared to Y173 below. Chris Pearce Long hood end of Y112; note the missing VR in the chevron.
- Page 10 Above: Final series Y173 courtesy of Mark Bau. Vincent Fuel tank pipe cab end. Photo courtesy Dave Crowhurst Fuel tank top side view. Photo courtesy Dave Crowhurst Fireman’s side. Photo courtesy Dave Crowhurst Driver’s side. Photo courtesy Dave Crowhurst Y139 doing what it does best. Photo courtesy of Geoff Winkler...
Need help?
Do you have a question about the SDLocoY1 and is the answer not in the manual?
Questions and answers