Table of Contents
Advertisement
Quick Links
Advertisement
Table of Contents

Related Manuals for Artusi AINT119/NF2


Summary of Contents for Artusi AINT119/NF2
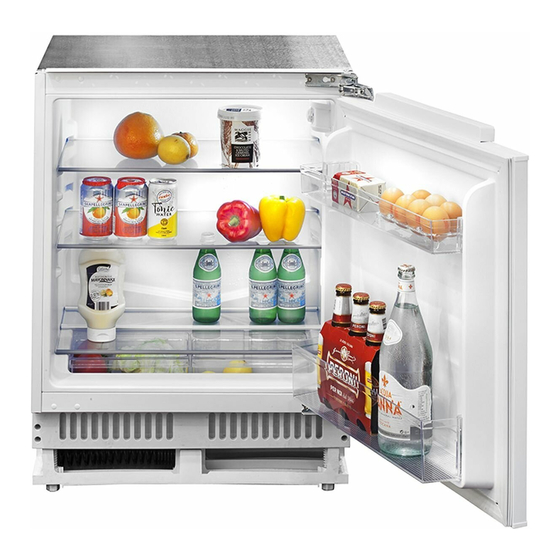
- Page 1 AP PL I AN CE S FOR L IVI NG AINT119 NF2 OPERATION MANUAL...
- Page 2 ARTUSI Family. This instruction manual has been specially created to inform you of the full range of features your ARTUSI appliance has to offer and serves as an introduction to getting the very best out of your ARTUSI appliance.
- Page 4 Important a i n The Manufacturer cannot be held responsible for injuries or losses caused by incorrect use or installation of this product. Please note that the Manufacturer reserves the right to invalidate the guarantee supplied with this product following incorrect installation or misuse of the appliance or use in a commercial environment.
- Page 5 IMPORTANT INFORMATION FOR CORRECT DISPOSAL OF THE PRODUCT IN ACCORDANCE WITH EU DIRECTIVE 2012/19/EU. At the end of its working life, the product must not be disposed of as urban waste. The refrigeration system contains insulating gases and refrigerants, which require specialised waste disposal. The valuable materials contained in this appliance can be recycled.
- Page 6 Important c i n Never store inflammable or explosive items and strong corrosive acids or alkalis in the appliance. This is a household appliance, which is produced in accordance with the national standard. It is intended for food storage only, not for storage of blood, medicine and biological products.
-
Page 7: Before First Use
Before first use You must allow the fridge to settle for at least twenty four hours prior to switching the power on. It is recommended that you clean the interior of the appliance prior to first use, using a solution of bicarbonate of soda and warm water and then thoroughly drying the interior. - Page 8 ene al se • Never put liquids in the refrigerator uncovered • Never put hot foods in the refrigerator. Warm food should be allowed to cool to room temperature before being put into the refrigerator • Nothing should rest against the rear wall of the refrigerator •...
- Page 9 ene al se ee e • The freezer compartment is designed to store only frozen food. • Never put hot or warm foods in the freezer, allow them to cool fully before putting them into the freezer • Follow the instructions on the food packaging for storage of frozen food.
-
Page 10: Storage And Use
Storage and use The fridge is for short term food storage. Although the temperature can be maintained between 0-10˚C, extended periods of food storage is not recommended. As the cold air circulates within the fridge, the temperature can vary between the different sections. As such, foods should be stored in different sections according to type. - Page 11 Controls Power Adjust Fig. 2 Temperature control The temperature controls for this fridge are simple and easy to use. To change the temperature simply press the adjust button on the right hand side of the unit to cycle through settings 1 to 5. The warmest setting being 1 and the coldest being 5.
-
Page 12: Care And Cleaning
Care and cleaning Cleaning Rod Always disconnect the appliance from the power supply before any cleaning or maintenance. Water Outlet The fridge and crisper sections should be cleaned using a solution of bicarbonate of soda and lukewarm water. Do not use abrasive products or detergents. -
Page 13: Defrosting The Fridge
Defrosting the fridge The fridge is self-defrosting. Any water created will run out of the fridge through the channel at the back of the fridge. It is important to keep the channel clear at all times using the cleaning tool supplied. The defrosted water is collected in the evaporating tray at the back of the appliance and dissipated by evaporation. -
Page 14: Troubleshooting
Troubleshooting If you have any problems with your appliance, you should check the troubleshooting • • •• • •prior to calling the Customer Care to prevent unnecessary service calls and potential cost. Contact details are on the back cover of this manual If the appliance is not working, check the following: •... - Page 15 If there is water in the lower part of the refrigerator compartment, check the following: • The drain hole in the channel at the back of the • There are no items touching the rear wall of the appliance If ice has formed on the back wall of the fridge: •...
-
Page 16: Installation And Ventilation
Installation and ventilation This appliance must never be installed close to heat sources, e.g. heating elements, cookers or in damp places. • To ensure the appliance is level, you should use the height adjustable feet at the front of the appliance •... -
Page 17: Mounting The Fascia Doors
Mounting the fascia doors Fig. 6 - Fitting the decor door bracket Remove the white decorative cover (Fig. 5) by lifting it upwards. Obtain the below measurements: Dimension B = Measure from the underside surface of kitchen unit to the bottom of fixing bracket. - Page 18 Fig. 9 - Aligning the decor door Close the door and check the alignment with the other unit doors. Adjust the decor door by screwing or unscrewing the adjustment bolts 3 for vertical adjustment and by the help of the slots on the fixing bracket for other directions.
- Page 19 Reversing the fridge door We recommend you seek the help of another individual to support the doors whilst performing this operation. Open the door 2 Carefully prise off the white cover caps for the side that you wish to switch the hinges to 3 Loosen the screws that hold the hinges to the fridge cabinet and remove the door...
- Page 20 Ensuring the door seals correctly: It is normal for the seal to be compressed after the door has been reversed. With the door closed, use a hair dryer to expand the seal and fill the gap between the door and the body of the appliance. Take care not to use the hair dryer too close to the appliance, which could damage the seal.
- Page 21 Warning; Risk of fire / flammable materials This appliance is not intended for use by persons (including children) with reduced physical, sensory or mental capabilities, or lack of experience and knowledge, unless they have been given supervision or instruction concerning use of the appliance by a person responsible for their safety.
-
Page 22: Electrical Information
Please according to local regulations regarding disposal of the appliance for its flammable refrigerant and blowing gas. If the LED lamp is damaged, it must be replaced by the manufacturer, its service agent or similarly qualified persons in order to avoid a hazard WARNING: To avoid a hazard due to instability of the appliance, it must be fixed in accordance with the instructions Electrical information... -
Page 23: Changing The Light Bulb
Changing the light bulb If the LED lighting fails in any way, it should only be replaced by an authorised service agent. In the event of light failure within your fridge please contact the Customer Care to arrange a service visit. Climate range The information about the climate range of the appliance is provided on the rating plate. -
Page 24: Practical Tips
Practical tips Due to the natural circulation of the air in the appliance, there are different temperature zones in the refrigerator chamber. The coldest area is directly above the vegetable drawers. Use this area for all delicate and highly perishable food such as: •... - Page 25 Warranty Registration Card and return breakage); it to us so that we have a record of the artusi (b) use for purpose for which the artusi product product purchased by you. was not sold or designed;...
- Page 26 Last Name: First Name: Address: State: Postcode: Email: Home Phone: Mobile: Purchase Date: (Please attach proof of purchase to validate warranty) SERIAL NUMBER MODEL NUMBER (if you cannot locate the serial number please call ARTUSI on 1300 694 583) 01032014...
- Page 28 Product dimensions indicated in our literature is indicative only. Actual product only should be used to define dimension cutouts. Distributors, and retailers are not agents of ARTUSI and are not authorised to bind ARTUSI by any express or implied undertaking or representation.
Need help?
Do you have a question about the AINT119/NF2 and is the answer not in the manual?
Questions and answers