Advertisement
Thank you for purchasing a Sealey product. Manufactured to a high standard this product will, if used according to these instructions and
properly maintained, give you years of trouble free performance.
IMPORTANT: PLEASE READ THESE INSTRUCTIONS CAREFULLY. NOTE THE SAFE OPERATIONAL REQUIREMENTS, WARNINGS, AND
CAUTIONS. USE THIS PRODUCT CORRECTLY, AND WITH CARE FOR THE PURPOSE FOR WHICH IT IS INTENDED. FAILURE TO DO SO
MAY CAUSE DAMAGE AND/OR PERSONAL INJURY AND WILL INVALIDATE THE WARRANTY.
1.
SAFETY INSTRUCTIONS
" Ensure the pipe bender is in sound condition and good working order. Take action for immediate repair or replacement of damaged
parts. Use recommended parts only. The use of improper parts may be dangerous and will invalidate the warranty.
" Keep bender and associated parts clean for best and safest performance.
" Locate the bender in a suitable, well lit work area.
" Keep work area clean and tidy and free from unrelated materials.
" Use on level and solid ground, preferably concrete.
" Ensure all non-essential persons keep a safe distance whilst the bender is in use.
" Check that bending die is correctly seated on ram and that roller shafts are fully engaged in the frame and pinned before operating hydraulic unit.
" Use only for DIN2440 and DIN2441 standard pipes.
" Use a qualified person to lubricate and maintain the hydraulic unit.
" Confirm that the recommended hydraulic oil is used during maintenance.
$ DO NOT operate the pipe bender if damaged.
$ DO NOT allow untrained persons to operate the bender.
$ DO NOT exceed the rated capacity of the hydraulic unit (9 tons).
$ DO NOT use the pipe bender for purposes other than that for which it is intended.
$ DO NOT top up system with brake fluid. Use hydraulic oil only.
$ DO NOT alter the pressure control valve.
" Store pipe bender in a dry, childproof area, with the hydraulic ram in the down position.
2.
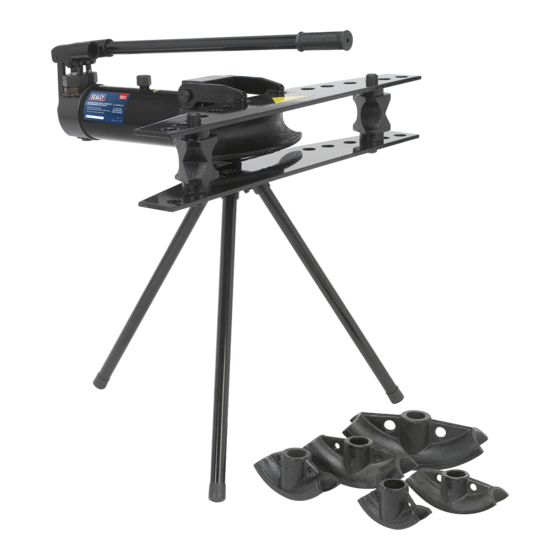
INTRODUCTION
Tripod mounted pipe bender suitable for bending pipes up to 180° (3 x
60° bends). Compact hydraulics with integral 9 ton ram for bending DIN
classified medium and heavy pipe. Two-speed hydraulic pump gives
fast positioning of pipe in dies and the power to bend up to 50mm pipe.
The unit is supplied with six interchangeable pipe dies.
Max Pipe Ø: . . . . .50mm
Die Sizes: . . . . . . .13, 19, 25, 31, 37, 50mm
Weight: . . . . . . . . .61kgs
3.
OPERATION & MAINTENANCE
WARNING! Ensure that you have read and understood Section 1 Safety Instructions before operating the pipe bender.
!
3.1
ASSEMBLY (refer to pictures overleaf)
3.1.1
Place the lower plate onto the main unit, using the bolt holes (fig 1).
3.1.2
Align the swivelling tripod head onto the bolts, on top of the lower plate, and secure with supplied washers and nuts (using a
19mm wrench) (fig 2).
3.1.3
Screw in the three tripod legs and tighten using a 19mm wrench (fig 3).
3.1.4
Turn construction over onto the tripod legs, line up upper plate and secure with pin and R-clip (fig 4).
3.1.5
Place die onto the ram (cross-reference with diameter of pipe to be bent), position the die guides into the appropriate slots, which
match the pipe diameter to be bent (fig 5).
3.1.6
Close the lower plate into position to secure the die and guides (fig 6).
3.1.7
Insert the jacking pole into one of the pumps and lever to operate the ram (fig 7). The pump with the larger piston will move the ram
a greater distance, the smaller pump is for smaller movement and higher bending force.
3.1.8
The filling plug (see fig. a) doubles as a vent and needs to be opened one turn before using the unit. The plug should be
done up tightly if the unit is moved or stored away for a long period, to prevent spillage.
3.2
OPERATION (refer to fig 8)
3.2.1
Once assembled, locate the bender on a sturdy, flat surface.
3.2.2
Before using the pipe bender purge any air from the hydraulic system by opening the release valve (1) and operating either pump (2)
several times.
3.2.3
Introduce the pipe between the die (3) and the guides (4), swing down the upper plate (5) onto the roller pins (6) and position the pipe
so that the centre of the required bend is over the centre of the die.
3.2.4
Close relief valve (1) and operate either pump (2) until the required degree of bend is achieved. The two pumps produce two different
degrees of movement in the ram, the pump with the larger piston creates a greater degree of movement and the pump with the
smaller piston is more accurate for small, measured bends and gives a higher bending force.
3.2.5
Open the relief valve (1) and the die (3) will retract under spring tension. Raise the upper plate (5) and remove/reposition pipe.
3.2.6
Repeat steps 3.2.3-3.2.5 until all pipe bends are achieved.
3.2.7
After use, store the pipe bender with both piston and ram fully retracted.
3.3
MAINTENANCE
3.3.1
After use, store the pipe bender with the ram fully retracted.
3.3.2
Regularly oil all moving parts.
3.3.3
Annually, replace hydraulic oil using Sealey Hydraulic Jack Oil - HJO/500ML or HJO/5L. Never use brake fluid. Fill capacity 850ml.
INSTRUCTIONS FOR:
INDUSTRIAL HYDRAULIC
PIPE BENDER - 9 TON
FILLER/VENT PLUG
PBS90
MODEL:
fig a
PBS90 - 2 - 200706
Advertisement
Table of Contents

Related Manuals for Sealey PBS90


Summary of Contents for Sealey PBS90
- Page 1 PBS90 MODEL: Thank you for purchasing a Sealey product. Manufactured to a high standard this product will, if used according to these instructions and properly maintained, give you years of trouble free performance. IMPORTANT: PLEASE READ THESE INSTRUCTIONS CAREFULLY. NOTE THE SAFE OPERATIONAL REQUIREMENTS, WARNINGS, AND CAUTIONS.
- Page 2 INFORMATION: For a copy of our latest catalogue and promotions call us on 01284 757525 and leave your full name and address, including postcode. Sole UK Distributor, Sealey Group, Bury St. Edmunds, Suffolk. 01284 757500 01284 703534 www.sealey.co.uk...
Need help?
Do you have a question about the PBS90 and is the answer not in the manual?
Questions and answers