Table of Contents
Advertisement
Quick Links
Advertisement
Table of Contents

Related Manuals for Rockwell Automation Fast Track

Summary of Contents for Rockwell Automation Fast Track
- Page 1 QUICK START GUIDE BULLETIN 1492 Fast Track™ Printer...
-
Page 2: Table Of Contents
1. Products in the FAST TRACK™ Printer Kit3 2. Product Safety Labels4 3. Construction of FAST TRACK™ Printer5 4. FAST TRACK™ Printer Operating Panel and LED Indicators6 5. Software Installation A. Installation of the FAST TRACK™ Printer Driver8 B. Installation of the Status Monitor10 C. -
Page 3: Products In The Fast Track™ Printer Kit3
1. Products in the FAST TRACK™ Printer Kit (1492- PRTKIT110V or 1492-PRTKIT220V) Shipment A • FAST TRACK™ Printer Cleaning cartridge (1492-PRTCLEAN) (color ink cartridge; for cleaning • printhead) Input rail • Output rail • Parallel printer cable • Power cord •... -
Page 4: Product Safety Labels4
2. Product Safety Labels Warning - Mind your hands Do not reach inside... -
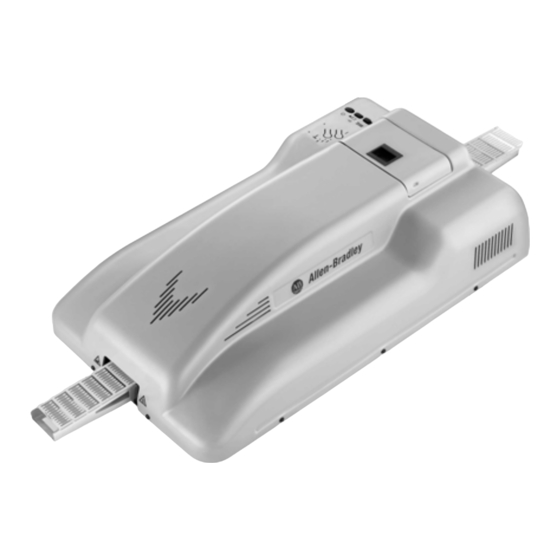
Page 5: Construction Of Fast Track™ Printer5
3. Construction of FAST TRACK™ Printer Ink Access Door Parallel Power Connection Connection Supply Operating panel Input rail Output rail Input Rail Output Rail... -
Page 6: Fast Track™ Printer Operating Panel And Led Indicators6
Open the Ink Access Door and remove the shipping brace. USB / parallel connection A printer cable is included. Connect the FAST TRACK™ Printer to your comput- er using either the parallel printer cable or by means of a USB cable. - Page 7 Use the Temperature Setting Toggle to make the correct setting. (Refer to www.ab.com. In the left navigation pane select A-Z Product Directory; click on Terminal Blocks, IEC; in the left navigation pane select marking Systems & Ac- cessories; select Fast Track Marking System; Marker Settings)
-
Page 8: Software Installation
5. Software Installation A. Installation of the FAST TRACK™ Printer Driver Place the CD in the CD-ROM drive, and a window opens automatically. In the window that opens, click the button for your preferred language. Click on the Printer Driver button. - Page 9 In the window that opens, click the button for your operating system. The software installation window will open, click Next to start the installation. Follow the instructions on the monitor.
-
Page 10: Installation Of The Status Monitor10
In the window please click the Status Monitor button. The software installation window will open; click Next to start the installation. Follow the instructions on the monitor. C. FAST TRACK™ Printer Driver Settings Click Start > Settings > Printer to open the printer driver. Windows 95 users: File>Properties>Printer Preferences... - Page 11 Select the Epson Stylus C62 printer driver • Click Printer > Printing Preferences. Then, adjust the settings as follows: Continu Plain Paper Best Photo Advanced • Select “Best Photo” as the Quality Type. Select “Plain Paper” as the Paper Options Type. •...
-
Page 12: Installation Of The Ab Print Software12
D. Installation of the AB Print Software If you already have AB Print installed on your computer, re-install if the provided software is an updated revision. Cartridge Place the CD containing the drivers into the CD-ROM drive. Carrier In the window that opens, click the button with your preferred language and select AB Ink Ac- Print. -
Page 13: Fast Track™ Printer Ink Cartridges13
6. FAST TRACK™ Printer Ink cartridges Ink cartridges are sealed units. Under normal circumstances, ink will not leak out of an ink cartridge. If you get ink on your hands, wash them thoroughly with soap and water. If you get ink in your eyes, rinse immediately with plenty of water. - Page 14 Open the Ink Access Door. Press the “Ink Cartridge” Button to move the cartridge carrier to the middle position. Never move the cartridge carrier manually. Press back the cartridge carrier clamp of the ink cartridge to be replaced and lift the clamp upwards.
-
Page 15: Print Alignment Setup15
Type an upper case X into each box of the first and last columns and along one row of each column. On the FAST TRACK™ Printer set the temperature to zero percent (0%). (Press • the Temperature Setting toggle repeatedly until all indicator lights are off. - Page 16 Determine the deviations and alter the values of the margin accordingly. Look at the bottom X in the first column to Margin set the margin. If the X is too low in the box, increase the left margin. Left Margin If the X is too high in the box, decrease the left margin.
- Page 17 Look at the Xs in the first column to set the width scale. Compare the Scale positions of the bottom X with the top X. If the top X is positioned higher in its box than the bottom X, decrease the width scale.
-
Page 18: Calibrating Individual Marker Cards18
8. Calibrating Individual Marker Cards On the PC, launch AB print: Click > Start > Programs > AB-Print. The Marker Card Section window should appear. Select the marker card type you desire to print. Click OK. Type X’s in the first and last columns and along one row of each column. - Page 19 9. Maintenance Cleaning the FAST TRACK™ Printer Head Note: Head cleaning should be done on a weekly basis even if printer has not been in use. 1. On the PC click Start->Settings->Printers. Choose “Epson Stylus C62 Series.” Click Printer-Printer Preferences. Click on the Maintenance Tab. Click on the icon next to: “Head Cleaning”...
- Page 20 If print heads move back and forth (verify by leaving cover open), but no text is printed: • Verify Arial font is used • Check the driver settings. Refer to FAST TRACK™ Printer Driver Settings, “C. FAST TRACK™ Printer Driver Settings” on page 10page 10.
- Page 21 • Place marker card on input rail (orientation with full rung facing towards the printer and insert the card until it stops). • Press “Maintenance” button for 1 second • If Marker card Carrier is being used: • Load several cards into the carrier •...
- Page 22 11. Warranty The following accessories and products are compatible for use with the FAST TRACK™ Printer: Cat. No. 1492-PRTINKCART (Ink cartridge) • Cat. No. 1492-PRTCLEAN (Cleaning Cartridge) • Note: May also use Epson color ink cartridge for Epson Stylus C62.
- Page 24 Publication 1492-QS001E-EN-P - September 2006 Supercedes Publication 1492-QS001D-EN-P - November 2005 Copyright ©2006 Rockwell Automation, Inc. All Rights Reserved. Printed in USA.
Need help?
Do you have a question about the Fast Track and is the answer not in the manual?
Questions and answers