Table of Contents
Advertisement
Advertisement
Table of Contents

Related Manuals for NextBase 222XRCZ


Summary of Contents for NextBase 222XRCZ
- Page 1 User Manual...
-
Page 2: Introduction To Using Your Dash Cam
2. Tips for stable memory card performance: Your Nextbase™ Dash Cam is set to record video, in files of just 1 minute in length. This means that each video file is a manageable size should you need to download and send to your insurance company. -
Page 3: Table Of Contents
PLAYBACK MODE MENUS - PROTECT & DELETE FUNCTIONS MYNEXTBASE PLAYER™ 22 - 23 MYNEXTBASE CLOUD™ PC CONNECTION / FIRMWARE UPDATE INFORMATION NEXTBASE™ SD CARDS FREQUENTLY ASKED QUESTIONS 27 - 28 CE MARK INFORMATION / SOFTWARE LICENSE AGREEMENT WARRANTY / ONLINE & INTERNATIONAL PURCHASES... -
Page 4: Precautions / Cautions On Using This Product
Nextbase Dash Camera. When you use your Nextbase Dash Camera, you do so at your own initiative and you are... -
Page 5: Product Warnings
Do not place the Dash Cam in front of or above any airbag. Battery Warnings Lithium-ion batteries are used in most Nextbase™ Dash Cams. If these guidelines are not followed, batteries may experience a shortened life span or may present a risk of damage to the Dash Cam, fire, chemical burn, electrolyte leak, and/or injury. -
Page 6: Usage Precautions / Notices
Nextbase™ does not assume any responsibility for any fines, penalties, or damages that may be incurred Protected Files as a result of any state or local law or ordinance relating to the use of your Nextbase™ Dash Cam. Protected Files may be overwritten, or deleted; make sure to back up important files to a separate, secure place as soon as possible to avoid accidental deletion from the Dash Cam's SD Card. -
Page 7: Product Specification
MicroSD™ and the microSD logo are trademarks of SD-3C, LLC. Unit Weight Front Camera Rear Camera Nextbase™, MyNextbase Player™, MyNextbase Cloud and Click&Go PRO™ are registered trademarks of Portable Multimedia Ltd. Other trademarks and trade names are those of their respective owners. -
Page 8: Package Contents / Product Features
Rear Camera Compatibility The Nextbase™ 222X is designed for use with a Rear Facing Camera, allowing you to record both the road ahead, and the road behind, making sure you’re protected against tailgaters and rear-end impacts. Click & Go... -
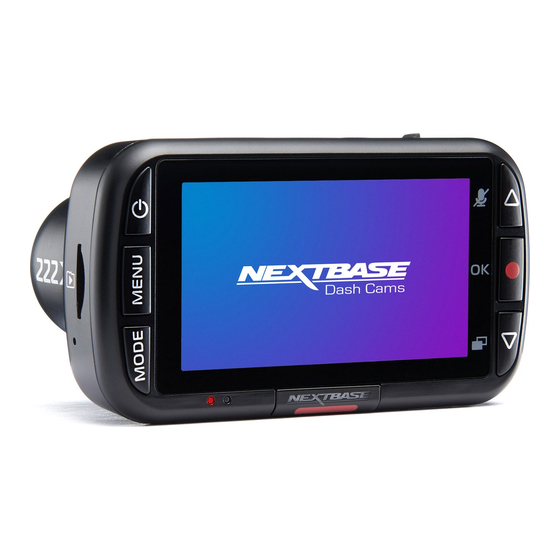
Page 9: Camera Parts & Controls
Camera Parts and Controls See below to identify the parts and controls of your Dash Cam LEDs Dust Cover Right: Blue Mounting point located under the dust cover. - The Blue LED will be on while the Dash Cam is charging. It will turn off when charging is complete, even if the Dash Cam is still plugged in. - Page 10 Camera Parts and Controls (cont.) See below to identify the parts and controls of your Dash Cam USB Cover MicroSD Card Slot USB-PC port located under the dust cover. Insert the MicroSD card here, taking care that the gold contacts are facing towards the screen side of the Dash Cam.
-
Page 11: In Vehicle Installation
Also available to purchase is a Nextbase Hardwire Kit. This connects your Dash Cam directly to the vehicle’s fusebox to power it leaving your 12Vdc outlet available for Phone / Sat Nav charging. - Page 12 In Vehicle Installation (cont.) 4. Scan the QR Code for adhesive mount installation guide. Watch the video to see how to best install the adhesive mount. This covers steps 5 - 10. 5. Clean the area of the windscreen you will mount the Dash Cam. Ensuring that the windscreen is clear of grease and dirt allows the most effective adhesion, keeping your Dash Cam securely mounted.
- Page 13 In Vehicle Installation (cont.) 8 Attach the Adhesive pad to the windscreen Firmly press the adhesive pad to the clean area of windscreen. Press for 5 seconds to ensure a strong bond between the pad and windscreen. Note: When positioning the pad on the windscreen, ensure that the thick end is pointing down, with the ‘notch’...
- Page 14 11 Connect power and Dash Cam Connect the power cable to the mount (attached to the windscreen). Connect the Dash Cam to the mount using the magnetic pull to guide the Dash Cam. Once the Dash Cam is connected, check that the Dash Cam feels secure. 12 Adjusting the Dash Cam With the mount attached to the windscreen, ensure that objects on the Dash Cam display (both front and rear views) are level and adjust as required.
-
Page 15: Positioning Your Dash Cam / Accessories
Nextbase™ Dash Cam. As per the installation instructions, you must install the Dash Cam so it does NOT obstruct the driver’s view of the road (red, above), preferably on the passenger side of the vehicle and behind the rear view mirror. -
Page 16: First Time Use
First Time Use To ensure the set up of this Dash Cam is as quick and Language simple as possible, there is an easy to follow English ‘First Time Use’ menu. Dansk This menu is used to set Language, Time, and Date. Deutsch Espanol This menu will appear when:... -
Page 17: Menus
Menus Video Menu Options Resolution Press the ‘Menu’ button to enter the Dash Cam’s ‘Video Menu’ system. Change your Dash Cam’s recording resolution Options: 1080P @ 30FPS, 720P @ 30FPS, 720P @ 60FPS Default: 1080P Video Menu The Rear Facing Camera records 720P video. The resolution Resolution of the Rear Facing Camera cannot be altered. - Page 18 Video Menu Options (cont.) Menus (cont.) Press the ‘Menu’ button again when in ‘Video Menu’ to enter the Dash Cam’s ‘Setup Menu’ system. Time & Date Stamp Turn On/Off the time and date stamp shown at the bottom of the screen on recorded files. Options: On and Off Setup Menu Default: On...
- Page 19 Setup Menu Options (cont.) Device Sounds Recording History Turn On/Off the beep that sounds when a button is pressed. Start up sound is NOT muted. In some territories, there are laws prohibiting the amount of footage your Dash Cam can store. Options: On and Off The default is ‘Maximum’, where your Dash Cam Default: On...
-
Page 20: Video Mode / Photo Mode / Playback Mode
Playback Mode Audio Recording ON Can be switched OFF in the Dash Cam Setup Menu. Nextbase Logo Stamp The key below explains the various information displayed Parking Mode ON on the screen when your Dash Cam is in Playback mode. -
Page 21: Playback Mode Menus - Protect & Delete Functions
Playback Mode Menus If the Menu button is pressed while scrolling through your videos, you will open the Playback Menu, How to Protect/Unprotect Files Using the Up and Down arrows, select ‘Protect Files’ giving you the option to protect, unprotect, or delete files. You can use the Menu button as a back button On the next page, you will be asked if you want to Protect or Unprotect while in the menu system. - Page 22 Opens the Help menu for MyNextbase Connect™. Options available include: how to use, check Add Video Remove Save for updates, Nextbase™ website, help & support, send diagnostics, register your Dash Cam, 190430_111804_009.MP4 contact us, and about. Playback Window Displays Dash Cam videos playing in MyNextbase Connect™.
-
Page 23: Mynextbase Player
Bring to Front your video will pause at the specified frame and Bring Forwards Videos can also be upload to the Nextbase server; you will be e-mailed a secure link to view or ™ Bring Backwards display any annotations that you have added. -
Page 24: Mynextbase Cloud
MyNextbase Cloud™ is our free online video sharing service where you can safely and securely store your Dash Cam files. Upload your file to the Nextbase™ Server using the ‘Share Video’ function on either MyNextbase Player™, or the MyNextbase Connect™ app. Please note Upload To that upload times are dependent on video file size. -
Page 25: Pc Connection / Firmware Update Information
Dash Cam, including what firmware version is currently active (i.e R05.3). appear, e.g. NEXTBASE (D:) and you will be able to view / manage the stored files upon the MicroSD card within the Dash Cam. You will be able to view your files using your system’s default media player. -
Page 26: Nextbase Sd Cards
A) You may experience any of the following: · SD error messages Nextbase have designed an SD card specifically to fulfil the needs of our Dash Cams. We work directly with the · Recording failure factory to ensure consistency of the SD card quality. Nextbase have spent years testing, trialling and developing ·... -
Page 27: Frequently Asked Questions
Video Image is blurred. the Polarising FIlter has been set properly; see the Accessories Manual (available from www.nextbase.com) for setup instructions. MicroSD cards are very small and require delicate use. Align the card with the diagram shown upon the Dash Cam and insert the card until you feel a slight spring resistance. - Page 28 It is normal for the camera to feel warm during typical use, especially when it’s recording high definition video or communicating via Wi-Fi. Reset the Dash Cam to the default settings within the Setup Menu and try again. Should the problem persist call the UK helpline (02920) 866429 or call your local support centre, found at www.nextbase.com Unresolved Issues Alternatively email: support@nextbase.com...
-
Page 29: Ce Mark Information / Software License Agreement
Europe. It is used on many products across many industries (for example, SD cards) as a mark of Nextbase™ grants to you for the period for which you possess the relevant device a non-exclusive, compliance with European standards. -
Page 30: Warranty / Online & International Purchases
If the unit sent in is still under its original warranty, then the new warranty is 30 days or to the end of state to state (or by country or province). Nextbase™ does not exclude, limit or suspend other legal rights the original 1 year warranty, whichever is longer. -
Page 31: Product Compliance Information
This product does not contain any user-serviceable parts. Repairs should only be made by an authorised Nextbase™ service centre. Unauthorized repairs or modifications could result in permanent damage to the equipment, and void your warranty and your authority to operate... - Page 32 Product Compliance Information...
-
Page 33: More Nextbase Products
MyNextbase Connect™ MyNextbase Player™ Accessories Ready for the Drive Everything you might need for video storage, Dash Cam protection, and more. For more details on our full range of Dash Cams and Accessories, download the Nextbase™ Accessories Manual, available from www.nextbase.com... -
Page 34: Dash Cam Functions
Bluetooth Polarising Filter Alexa Built-in Alexa Built-in Alexa Built-in Alexa Built-in Parking Mode Nextbase Emergency Response Nextbase Module Cam Compatible Yes - Front 4K/1440p/1080p (Cabin View, Rear Facing, Night Vision) Rear - 1080p Nextbase Cloud™ Storage MyNextbase Player™ MyNextbase Connect™... - Page 35 NBDVR222X-ENG-R14...
Need help?
Do you have a question about the 222XRCZ and is the answer not in the manual?
Questions and answers