Table of Contents
Advertisement
Quick Links
Instructions Manual
HAND CRIMPING TOOLS
This manual shows the appropriate crimping process by using the proprietary tools and quality control standards.
Since the applicable range of tools and product specifications of connectors may not be met with each other,
please contact us when using.
KYOCERA ELCO Corporation
Downloaded from
Elcodis.com
electronic components distributor
Advertisement
Table of Contents

Related Manuals for Kyocera 8455 Series

Summary of Contents for Kyocera 8455 Series
- Page 1 Instructions Manual HAND CRIMPING TOOLS This manual shows the appropriate crimping process by using the proprietary tools and quality control standards. Since the applicable range of tools and product specifications of connectors may not be met with each other, please contact us when using. KYOCERA ELCO Corporation Downloaded from Elcodis.com electronic components distributor...
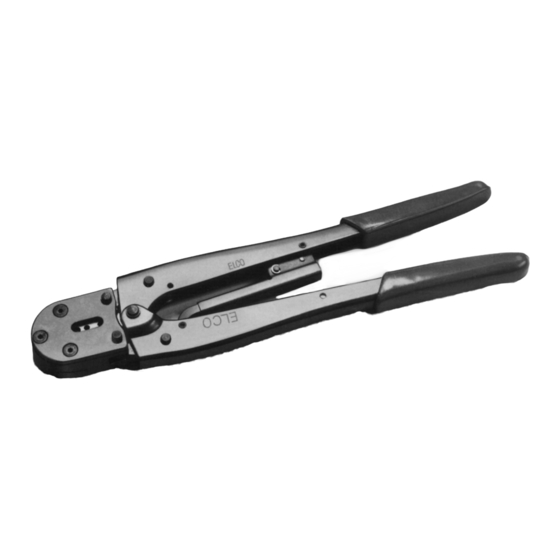
- Page 2 HAND CRIMPING TOOLS Type A Structure of the Tool and Part Names Locator pin Tool identification number Crimper Anvil Figure A" Cladding insulation crimper Wire crimper Ratchet Crimper Contact Cladding insulation This tool can crimp an applicable wire easily with a set of crimper and anvil. No need to replace the crimper and anvil. Anvil Wires Example of Failure Selecting the appropriate crimper Failure Description Cause Failure Item 1.Requisite blades are attached on top and bottom of the crimper. Malformation of The wire size is out of Pull strength is 2.Combine blades for the crimper so that chamfered planes are faced. the specification, the crimped area out of specification. or abrasion of the tool (Wire barrel) 3.Select the crimper to the size of the wire. 4.The number of applicable size of the wire is engraved on the crimper. 2)Deformation Bent up The terminal is not ...
- Page 3 Type B Structure of the Tool and Part Names Locator pin Tool identification number Crimper Ratchet Crimper fixing screw Contact feed bar Anvil Crimper Head Movable cutter Fixing screw Wire crimping part With this tool, a strip of contacts can be crimped easily with the applicable wire Wires Grip Anvil by using a set of crimper and anvil. (No need to replace the crimper and anvil.) Cladding insulator crimping part Shaft pin Example of Failure Selecting the appropriate crimper Failure Item Failure Description Cause 1.Requisite blades are attached on top and bottom of the crimper. 1)Malformation of The wire size is out of Pull strength is out of specification. 2.The number of applicable size of the wire is engraved on the crimper. the specification, or the crimped area abrasion of the tool 3.Select the crimper to the size of the wire. (Wire barrel) 2)Deformation of The terminal is not ...
- Page 4 Type C Structure of the Tool and Part Names Single head Wire size Tool identification number Ratchet Dual head Wire size Tool identification number Ratchet Example of Failure Procedures Failure Item Failure Description Cause 1.Make sure that the tool number and the wire size are met. Pull strength is out of specification. The wire size is out of 1)Malformation of 2.Open the grips fully. the specification, or the crimped area abrasion of the tool 3.Insert the contact fully into the nest. (Wire barrel) 2)Deformation of Due to the displacement 4.Strip the wire and insert it to the contact until the end of the terminal in position or uneven it hits against the nest. planes of the wire 1.Bend crimping part and 5.Close the grips fully until the ratchet is released. cladding insulation crimping part of the tool. 6.Open the grips to pick up the contact crimped with wire.
- Page 5 ■List of Hand Tools Part number Strip length Type Outer diameter of the Series No. Applicable contact Applicable wire size cladding insulator (mm) 8455 60 8455 0310 00 861 06 1001 001 AWG#22〜28 1.2〜1.7 2.5〜3.2 8263 60 8263 0513 00 808 06 1001 002 8283 60 8283 0513 30 808 AWG#24〜30 0.7〜1.3 3.0〜3.8 06 1001 003 9073 60 9073 0212 00 808...
Need help?
Do you have a question about the 8455 Series and is the answer not in the manual?
Questions and answers