Gardena V1 Operating Instructions Manual
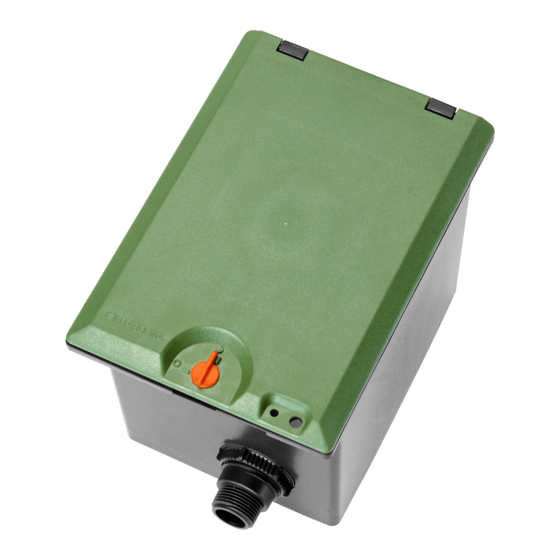
Valve box
Hide thumbs
Also See for V1:
- Operator's manual (43 pages) ,
- Operating instructions manual (10 pages) ,
- Operator's manual (11 pages)
Table of Contents
Advertisement
Quick Links
GARDENA
Betriebsanleitung
D
Ventilbox
Operating Instructions
GB
Valve Box
Mode d'emploi
F
Bloc-vanne
NL
Instructies voor gebruik
Ventielbox
Bruksanvisning
S
Ventildosa
Brugsanvisning
DK
Ventilboksen
Bruksanvisning
N
Automatisk ventil
Istruzioni per l'uso
I
Pozzetto per valvole
®
Manual de instrucciones
E
Caja de válvulas
Instruções de utilização
P
Boxe de válvulas
Käitamisjuhend
EST
Klapikast
LV
Lietošanas instrukcija
Vārstu bloks
Eksploatavimo instrukcija
LT
Ventilių dėžutė
V 1 Art.1254
V 3 Art.1255
Advertisement
Table of Contents

Related Manuals for Gardena V1


Summary of Contents for Gardena V1
- Page 1 GARDENA ® V 1 Art.1254 V 3 Art.1255 Betriebsanleitung Manual de instrucciones Ventilbox Caja de válvulas Operating Instructions Instruções de utilização Valve Box Boxe de válvulas Mode d’emploi Käitamisjuhend Bloc-vanne Klapikast Instructies voor gebruik Lietošanas instrukcija Ventielbox Vārstu bloks Bruksanvisning...
-
Page 2: Table Of Contents
Art. 1277 and the Connection Cable Art. 1280. * Only available on selected markets. You must read and comply with the Operating Instructions provided by GARDENA to ensure that you use the Valve Box properly. 2. Safety Precautions Winter Storage V Read the notes on safety in the Valve Box V Before the frost period starts : see point 5. -
Page 3: Assembly
20 cm x 30 cm x 10 cm (V1) / 30 cm x 35 cm x 10 cm (V 3). This ensures proper drainage of the box. 2. Install the valve box with the top edge of the box at ground level. - Page 4 V 3 : Close open distributor If you are only installing 2 valves in a Valve Box V 3, the open output : distributor output must be sealed with an end cap. 1. Push the short telescopic pipe into the open distributor output.
-
Page 5: Operation
Valves and the entire watering system : 1. Close the water tap and disconnect the hose from the GARDENA Water Connection Point Art. No. 1594 / 2795 This allows air to flow freely. 2. If the watering system is directly connected to the water tap, turn off the water supply and open the venting tap. -
Page 6: Trouble-Shooting
Set selector lever “ON” position. “AUTO / OFF”. In the event of other faults please contact GARDENA Service. Repairs should only be carried out by GARDENA service centres or dealers authorised by GARDENA. 7. Accessories Control GARDENA Soil Moisture Sensor Art. -
Page 7: Service / Warranty
If a fault occurs with your Irrigation Valve, please return the faulty unit together with a copy of the receipt and a description of the fault, with postage paid to one of the GARDENA Service Centres listed on the back of these operating instructions. - Page 8 We expressly point out that, in accordance with the product liability law, we are not liable for any damage caused by our units if it is due to improper repair or if parts exchanged are not original GARDENA parts or parts approved by us, and, if the repairs were not carried out by a GARDENA Service Centre or an authorised specialist.
- Page 9 GARDENA / Husqvarna 23868 VALMADRERA (LC) Sweden info @ gardena.no Belgium Consumer Outdoor Products Phone: (+ 39) 0341.203.111 Husqvarna AB GARDENA Belgium NV / SA Salgsafdelning Danmark Peru info @ gardenaitalia.it S-561 82 Huskvarna Sterrebeekstraat 163 Box 9003 Husqvarna Perú S.A.
Need help?
Do you have a question about the V1 and is the answer not in the manual?
Questions and answers