Advertisement
Quick Links
The
...since 1986
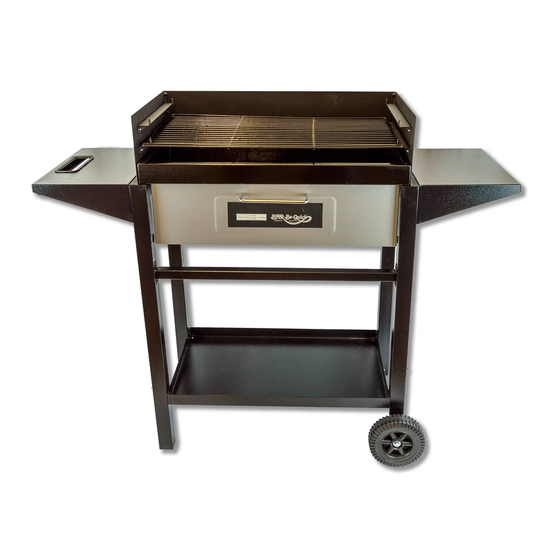
Trolley
Grill & Bake
B
A
R
B u i l d
Before you start assembling your barbecue here are some important safety warnings
Do not use indoors. Always site your barbecue outdoors and on level ground away from trees and wooden fencing. CAUTION! Do not use spirit or
petrol for lighting or re-lighting. Use a specially formulated barbecue lighting uid, gel or re lighters. Do not attempt to light the re if lighting
uid has been spilt over clothing Do not try to re-light the re with uid/gel as the charcoal may still be hot and cause a are-up WARNING! keep
children and pets away from the barbecue area. ATTENTION! This barbecue will become very hot. Do not move it during operation. Always wear
oven gloves when handling your hot barbecue.
Flame-ups can occur if hot fat drips onto the burning charcoal. Keep a water sprayer handy to extinguish the ames.
Make sure that the barbecue has completely cooled before removing the ash.
7
8
9
10
15
11
12
13
B
E
C
U
I n s t r u c t i o n s
6
14
Missing parts - call 01282 478200
E
Parts list
1- Wheel x 2
2- Right sideframe leg (shorter welded assembly)
5
3- RH side table (no handle)
4- RH windsheild & cooking grill brackets (assembled)
5- Rear windsheild, with retaining clips (assembled)
4
6- Cooking Grill
7- LH windsheild & cooking grill brackets (assembled)
3
8- LH side table (with handle)
9- Firetray
10- Build-In Oven (assembled)
11- Crossmember bar (welded assembly)
12- Left sideframe leg (welded assembly)
2
13- Lower shelf tray
14- Wheel axle bolt x 2 (M8 x 55)
15- Oven side bracket x 2
1
Fasteners - supplied.
34x Bolts M6 x 12mm
20x Nuts M6
Tools required to build
M10 spannner, X-head,
Flat screwdriver
Advertisement

Related Manuals for BAR-BE-QUICK Trolley Grill & Bake


Summary of Contents for BAR-BE-QUICK Trolley Grill & Bake
- Page 1 ...since 1986 Trolley Grill & Bake B u i l d I n s t r u c t i o n s Before you start assembling your barbecue here are some important safety warnings Do not use indoors. Always site your barbecue outdoors and on level ground away from trees and wooden fencing. CAUTION! Do not use spirit or petrol for lighting or re-lighting.
- Page 2 ( Parts 1, 2, 14 ) ( Parts 2, 12, 13 ) 2 x M8 x 55mm 4 x M6 x 12mm bolts 4 x M6 x 12mm b bolts nuts & washers Fix wheels Fix base shelf Fix crossmemb Fit the axle bolt (14) from the inside of the assembly.
- Page 3 ( Part 11 ) ( Part 5 ) ( Parts 7 & 8 ) Colour 2 x M6 x 12mm bolts 8 x M6 x 12mm bolts, with nuts Original issue 222222 Original issue 24-09-19 Fix rear windshield Fix side grill windshields (7&8) Importan member (11).
- Page 4 Make sure the assembly instructions have been followed correctly and the retray stops are located behind the oven. HOW TO LIGHT We recommend you light your lumpwood / briquettes with Bar-Be-Quick lighting uid, gel or cubes. USING CUBES (If using traditional lumpwood or briquettes) Place two or three cubes in the retray.
Need help?
Do you have a question about the Trolley Grill & Bake and is the answer not in the manual?
Questions and answers