Table of Contents
Advertisement
Quick Links
Advertisement
Table of Contents

Subscribe to Our Youtube Channel
Related Manuals for AMH ULTRAMIG 200

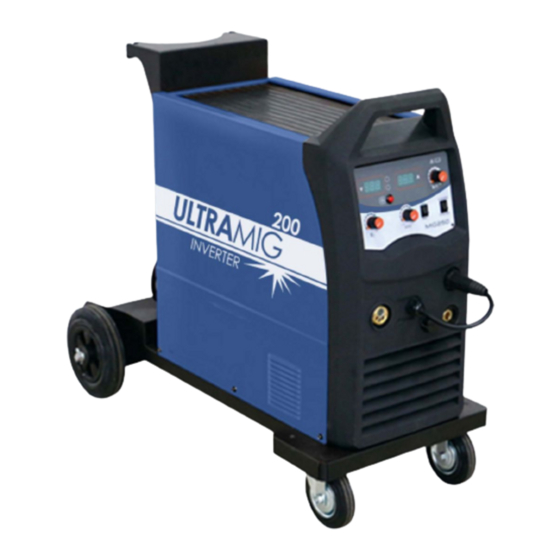
Summary of Contents for AMH ULTRAMIG 200
- Page 2 Please read this manual carefully before operation: 1. AMH Canada make every effort to achieve the full accuracy and data integrity of this manual’s content; AMH Canada assume no liability and responsibility for any nonconforming operation to this manual.
-
Page 3: Table Of Contents
Contents Safety -------------------------------------------------------------------------------------------------------------------------- 1 Symbol Description -------------------------------------------------------------------------------------------------------- 2 Functions --------------------------------------------------------------------------------------------------------------------- 3 Performance Features ---------------------------------------------------------------------------------------------------- 3 Technical Parameters ------------------------------------------------------------------------------------------------------ 4 Operation Description ---------------------------------------------------------------------------------------------------- 6 Installation & Commission & Operation ------------------------------------------------------------------------------ 7 7.1 MMA Installation and Operation 7.2 Gas Shielded Welding Installation and Operation ---------------------------------------------------------------- 9 7.3 Gasless Shielded Welding Installation and Operation ---------------------------------------------------------- 1 0 Precautions ----------------------------------------------------------------------------------------------------------------- 11 8.1 Working Environment... -
Page 4: Safety
1. Safety Welding may cause damage to you and others. Please take good protection during welding. Please refer to the operator safety guidelines in conformity with the accident prevention requirements of the manufacturer for more details. Only qualified personnel can operate this machine! Please use welding protection appliances approved by national safety ... -
Page 5: Symbol Description
manual for according contents. If you are still in lost, or you still cannot solve the problem, please contact the AMH Canada dealer or the service center for professional support. 2. Symbol Description Cautions in operation Items need special instruction It’s forbidden to dispose electric waste with... -
Page 6: Functions
3. Function Description Multi-function Design MMA/MIG are available Integrated trolley Spool gun FCAW 4. Performance Features Advanced IGBT inverter technology 20-33KHz inverting frequency greatly reduces welder’s size and weight Great reduction in copper and iron loss greatly enhances the welding efficiency and saves energy. ... -
Page 7: Technical Parameters
5. Main Technical Parameters MODEL ULTRAMIG 200 INVERTER Input power supply Single-phase AC220V-240V, 50/60Hz Rated input capacity (KVA) Rated output current (A) Rated output voltage (V) Rated duty cycle (%) No-load voltage (V) Output current range in MMA (A) 10~200 Output current range in MIG (A) 30~200... -
Page 8: Operation Description
6. Operation Description 1. VRD LED 2. Power LED 3. Overheating LED 4. Voltage meter 5. Manual wire feeding button 6. Voltage control knob in MIG 7. Wire feed speed control knob in MIG 8. Inductance control knob 9. European connector of the welding torch in 10. - Page 9 18. Power switch 19. Input power cord 20. Socket of gas regulator heater 21. Fan 22. Gas inlet 23. Burn back time...
-
Page 10: Installation & Commission & Operation
24.Spool 25.Wire feeder 26.Euro connector 7. Installation, Debugging & Operation Notice: Please install the machine strictly according to the following steps. Turn off the power supply before any electric connection operation. IP21S enclosure protection grade, please do not operate it in rain. 7.1 MMA Installation Fig 6 MMA Sketch Map 1. - Page 11 line is connected to the right voltage class. 2. Please make sure the primary source is in fine contact with the according power line terminal or socket and prevent oxidation. 3. Please measure the voltage with multi-meter and check if it’s in the fluctuation range. 4.
-
Page 12: Gas Shielded Welding Installation And Operation
Note: This table is suitable for mild steel welding. For other materials, please consult related materials and welding processing manual. 7.2 Gas Shielded Welding Installation and Operation 7.2.1 Installation: Insert the welding torch into the front panel’s “Euro connector for torch” output socket and tighten it. After install the wire spool, pull through the welding wire into the torch body. - Page 13 and adjust the flow regulator to get the proper gas flow. 2) Preset the wiring feeding speed and welding voltage according to workspace’s thickness and electrode diameter. 7.3 Installation and operation of gasless self-shielded metal arc welding 7.3.1 Installation 1) Insert the welding torch into the front panel’s “Euro connector for torch” output socket and tighten it. After install the wire spool, pull through the welding wire into the torch body.
-
Page 14: Precautions
8. CAUTION 8.1 Working Environment 1) Welding should be carried out in dry environment with humidity of 90% or less. 2) The working environment temperature should be between -10℃ and 40℃. 3) Avoid welding in the open air unless sheltered from sunlight and rain. Keep welder dry. 4) Avoid welding in dusty area or environment with corrosive chemical gas. -
Page 15: Basic Knowledge Of Welding
9. BASIC KNOWLEDGE OF WELDING 9.1 Basic knowledge of MMA Manual metal arc welding (MMA) is an arc welding by manually operating electrode. MMA requires simple equipment and is a convenient, flexible and adaptive welding processing type. MMA is applied to various metal materials with thickness more than 2mm. - Page 16 c) Slag hammer (peen hammer): for the use of removing slag crust on the surface of weld joint. d) Wire brush: for the use of removing dirt and rust at the joints of the workpiece before welding, as well as cleaning the surface of weld joint and the spatter after welding.
- Page 17 Fig. 10 Arc ignition modes 4) Tack weld For fixing the relative positions of the two pieces of weldment and welding conveniently, 30~40mm short weld joints are welded every certain distance in order to fix the relative positions of the workpiece during welding assembly.
- Page 18 3-transversely swing Fig.11 Three basic movement directions of electrode Fig.12 Angles of electrode in flat welding 6) Arc extinguishing Arc extinguishing is unavoidable during welding. Poor arc extinguishing may bring shallow weld crater and poor density and strength of weld metal by which cracks, air holes, slag inclusion and shortage the like are easy to be produced.
- Page 19 GMAW can be applied to the welding of most metals and alloys, and it is ideal for welding carbon steel, low alloy steel, stainless steel, aluminum, aluminum alloy, copper, copper alloy and magnesium alloys. For metal with high melting point such as high strength steel and high strength aluminum alloy, some ...
- Page 20 c) Welding torch: The welding torch for GMAW can be classified into semi-automatic torch and automatic torch, and the former can be classified into air-cooled torch and water-cooled torch according to different cooling methods. 9.2.3 Basic Operation of GMAW a) Preweld cleaning, equipment checks and labor protection Preweld cleaning Chemical cleaning: Chemical cleaning methods vary with the materials.
- Page 21 Mechanical cleaning: Mechanical cleaning includes sanding, scraping and sand blasting, and it is used to clean oxidation film on the metal surface. Equipment check Firstly, check if there are obvious damage marks on the exterior of the welding machine, and if there is any lack or damage of any components of the welding machine.
- Page 22 The effect on the weld bead shaping caused by the angle of welding wire is shown in the above figure. When welding wire changes to backward position from vertical position with other conditions fixed, the penetration will increase, the weld bead will narrow, the weld reinforcement will increase, and arc will be stable with little spatter.
- Page 23 e) Arc extinguishing Do not extinguish arc immediately when ending welding. Otherwise, crater will be left and defects such as cracks and air holes are easy to be produced. Keep the torch staying a little while at the crater when extinguishing arc, and raise the torch slowly after the crater is filled, so that the molten pool can be well protected before it is solidified.
-
Page 24: Maintenance
c) Vertical position welding There are two modes for the vertical position welding of GMAW, namely upward welding in the vertical position and downward welding in the vertical position. Due to the gravitation effect, the melting metal may drop down easily in upward welding in the vertical position. -
Page 25: Troubleshooting
equipment (including that between the connections and that between the connection and the enclosure). Only when there are no abnormal phenomena anymore, can the machine be used. 5) Check periodically whether the insulation cover of all cables is in good condition. If there is any dilapidation, rewrap it or replace it. - Page 26 There is output current when pushing the torch trigger to feed gas, but the The wire feeder is clogged. Unclog it. wire feeder does not work. The wire feeder fails. Repair it. The control PCB or wire feeding power Replace it. PCB inside the machine fails.
-
Page 27: Appendix A: Packing, Transportation, Storage
APPENDIX A: PACKING, TRANSPORTATION AND STORAGE A1. Packing Name Unit Quantity User’s manual for MIG series (English) Volume Product certificate Sheet Warranty card Sheet Desiccant Pack Accessories Pack A2. Transportation Equipment should be handled with care in transportation to avoid severe impact. Equipment should be prevented from being affected with damp and caught in the rain in transportation. - Page 28 rectifier rectifier bridge bridge ~ ~ + - ~ ~ + - Filter Capacitor PCB Control PCB module Voltmeter control MMA/MIG switch Power PCB STANDARD MMA signal SPOOL GUN...
- Page 29 This product is under continuous improvements; therefore, there might be differences in some respects except for functions and operation. Your understanding is much appreciated. -------------------...
- Page 30 AMH Canada Ltd, 391 St-Jean-Baptiste Est, Rimouski (Québec) CANADA Website : http://www.amh.ca Email: sales@amh.ca Facebook @canadamh Instagram @amhcanada...
Need help?
Do you have a question about the ULTRAMIG 200 and is the answer not in the manual?
Questions and answers
Ultramig 200 with microprocessor
The AMH UltraMig 200 with microprocessor includes the following features:
- 100% microprocessor-controlled Synergic MIG welder
- Touch pad control panel with continuous, spot, and stitch weld modes
- Pre-programmed for 3 wires of steel and aluminum wire
- Patented jam-free wire drive system
- Built-in spool gun receptacle
- Auto-regulation of incoming AC power
- Maximum output of 225 amps
- Weighs 165 lbs
- Operates on 200–240V, 1 phase, 30A, 50–60Hz power supply.
This answer is automatically generated