
Subscribe to Our Youtube Channel
Related Manuals for Candy FIDC X612


Summary of Contents for Candy FIDC X612
- Page 1 User Instructions OVENS Istruzioni per l’uso FORNI Instruções para o utilizador FORNOS CANDY HOOVER GROUP Via Comolli 16 Brugherio – Italy...
-
Page 2: Table Of Contents
Summary Safety Indications General Instructions Product description Display description Cooking Modes General notes on cleaning Maintenance Troubleshooting Installation EN 2... -
Page 3: Safety Indications
Safety Indications • During cooking, moisture may condense inside the oven cavity or on the glass of the door. This is a normal condition. To reduce this effect, wait 10-15 minutes after turning on the power be- fore putting food inside the oven. ln any case, the condensation disappears when the oven reaches the cooking temperature. - Page 4 and cause the glass to shatter. • The oven must be switched off before removing the removable parts. After cleaning, reassemble them according the instruc- tions. • Only use the meat probe recommended for this oven. • Do not use a steam cleaner or high pressure spray for cleaning operations.
- Page 5 of incompatibility between the socket and the appliance plug, ask a qualified electrician to substitute the socket with another suitable type. The plug and the socket must be conformed to the current norms of the installation country. Connection to the power source can also be made by placing an omnipolar break- er, with contact separation compliant to the requirements for overvoltage category III, between the appliance and the pow-...
- Page 6 inserted completely into the cavity. • When inserting the grid tray pay attention that the anti-slide edge is positioned rearwards and upwards. • WARNING: Do not line the oven walls with aluminium foil or sin- gle-use protection available from stores. Aluminium foil or any other protection, in direct contact with the hot enamel, risk melting and deteriorating the enamel of the insides.
-
Page 7: General Instructions
General Instructions We thank you for choosing one of our products. For the best results with your oven, you should read this manual carefully and retain it for future reference. Before installing the oven, take note of the serial number so that you can give it to customer service staff if any repairs are required. Having removed the oven from its packaging, check that it has not been damaged during trans- portation. - Page 8 The grounding wire connected to the oven’s earth terminal must be connected to the earth ter- minal of the power supply. WARNING Before connecting the oven to the power supply, ask a qualified electrician to check the conti- nuity of the power supply’s earth terminal. The manufacturer accepts no responsibility for any accidents or other problems caused by failure to connect the oven to the earth terminal or by an earth connection that has defective continuity.
-
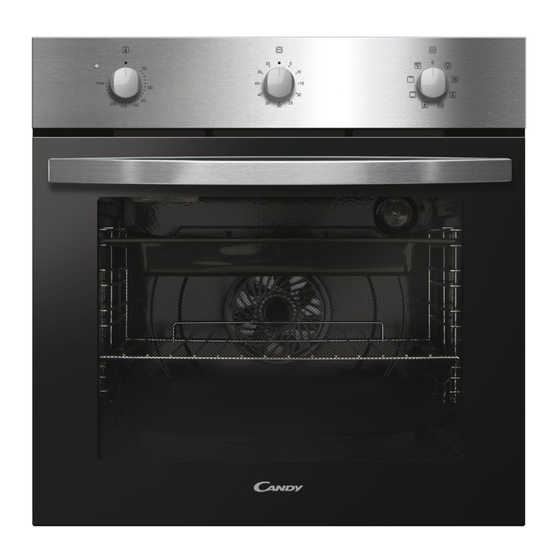
Page 9: Product Description
Product description 1. Control panel 2. Shelf positions (lateral wire grid if included) 3. Grids 4. Trays 5. Fan (if present) 6. Oven door 7. Lateral wire grids (if present: only for flat cavity) 8. Serial number ACCESSORIES Drip tray Metal grid Collects residues that drip when cooking food Holds baking trays and plates. -
Page 10: Display Description
Display description 1. Thermostat selector knob 2. Cooking time 3. Function selector knob To set the cooking time, turn dial one complete revolution and then position the index to the required time. When the time has lapsed, the signal will ring for a few seconds. -
Page 11: Cooking Modes
Cooking Modes T °C T °C Symbol Function range fault LAMP: Turns on the oven light. DEFROST: When the dial is set to this position. The fan circulates air at room temperature around the frozen food so that it defrosts in a few min- utes without the protein content of the food being changed or altered. -
Page 12: General Notes On Cleaning
General notes on cleaning The lifecycle of the appliance can be extended damp sponge. through regular cleaning. Wait for the oven to cool before carrying out manual cleaning op- ACCESSORIES erations. Never use abrasive detergents, steel Clean accessories with a wet, soapy sponge wool or sharp objects for cleaning, so as to not before rinsing and drying them: avoid using irreparably damage the enamelled parts. -
Page 13: Troubleshooting
Waste management and environmental protection This appliance is labelled in SAVING AND RESPECTING THE ENVIRON- accordance with European Di- MENT rective 2012/19/EU regarding Where possible, avoid pre-heating the oven electric and electronic appli- and always try to fill it. Open the oven door as ances (WEEE). - Page 14 Sommario Indicazioni di Sicurezza Avvertenze Generali Descrizione del Prodotto Descrizione del display Modalità di cottura Pulizia e manutenzione del forno Manutenzione Risoluzione dei Problemi Garanzie Installation IT 14...
-
Page 15: Indicazioni Di Sicurezza
Indicazioni di Sicurezza • Durante la cottura, l’umidità può condensarsi all’interno del vano cottura o sul vetro della porta. Questa è una condizione normale. Per ridurre questo effetto, attendere 10-15 minuti dopo l’accensione prima di mettere gli alimenti all’interno del forno. - Page 16 in sicurezza, comprendendo i rischi che derivano dall’uso dello stesso. • Le operazioni di pulizia e manutenzione non devono essere ef- fettuate dai bambini senza sorveglianza. • Non utilizzare materiali ruvidi, abrasivi o raschietti metallici affi- lati per pulire le porte in vetro del forno, dato che possono graf- fiare la superficie e causare la frantumazione del vetro.
- Page 17 La presa deve essere adatta al carico indicato sulla targhetta e deve avere il contatto di terra collegato e in funzione. Il condut- tore di terra è giallo-verde. Questa operazione deve essere ese- guita da un professionista adeguatamente qualificato. In caso di incompatibilità...
- Page 18 ma della pulizia. • L’interruzione prolungata dell’alimentazione durante una fase di cottura potrebbe causare un guasto del monitor. In tal caso contattare il servizio clienti. • L’elettrodomestico non deve essere installato dietro a una por- ta a scopo ornamentale per evitarne il surriscaldamento. •...
-
Page 19: Avvertenze Generali
Avvertenze Generali Vi ringraziamo per aver scelto uno dei nostri prodotti. Per utilizzare il forno in modo ottimale è consigliabile leggere con attenzione questo manuale e conservarlo con cura per ogni ulteriore consultazione. Prima di installare il forno, prendere nota del numero di serie in modo da poterlo comunicare al personale del servizio di assistenza in caso di richiesta di intervento. - Page 20 ATTENZIONE Prima di collegare il forno alla rete elettrica, far controllare la continuità della messa a terra della rete elettrica ad un elettricista qualificato. Il produttore declina ogni responsabilità per eventuali incidenti o altri problemi derivanti dal mancato collegamento a terra del forno o dal suo collega- mento ad una messa a terra con una continuità...
-
Page 21: Descrizione Del Prodotto
Descrizione del Prodotto 1. Pannello di controllo 2. Posizioni dei ripiani (griglia metallica laterale se inclusa) 3. Griglie 4. Vassoi 5. Ventola (se presente) 6. Sportello del forno 7. Griglie metalliche laterali (se presenti: solo per cavità piane) 8. Numero di serie ACCESSORI Vassoio di gocciolamento Griglia metallica... -
Page 22: Descrizione Del Display
Primo utilizzo PULIZIA PRELIMINARE Pulire sempre il forno prima di utilizzarlo per la prima volta. Pulire le superfici esterne con un panno mor- bido leggermente inumidito. Lavare tutti gli accessori e pulire l’interno del forno con del detergente per piatti ed acqua calda. Verificare che il forno sia vuoto, impostare la temperatura massima e lasciarlo acceso per almeno 1 ora, così... -
Page 23: Modalità Di Cottura
Modalità di cottura Manopola T° Intervallo commu- preim- Funzione di T° tatore postata LAMPADA: accende la luce interna. SCONGELAMENTO: questa posizione permette di far circolare l’aria a temperatura ambiente intorno al cibo surgelato facendolo così sconge- lare in pochi minuti senza modificare od alterare il contenuto proteico. COTTURA MULTILIVELLO: l’aria calda viene ripartita sui diversi ripiani. -
Page 24: Pulizia E Manutenzione Del Forno
Pulizia e manutenzione del forno La vita di servizio dell’apparecchio si allunga se Se sporca, la guarnizione può essere pulita con questo viene pulito ad intervalli regolari. Atten- una spugna leggermente inumidita. dere che il forno si raffreddi prima di effettuare le operazioni di pulizia manuali. -
Page 25: Risoluzione Dei Problemi
Gestione dei rifiuti e rispetto dell’ambiente Questo apparecchio è con- Quando si acquista un nuovo apparecchio, quel- trassegnato in conformità alla lo vecchio potrebbe essere restituito al rivendi- Direttiva europea 20 12/19/EU tore che deve acquisirlo gratuitamente su base sulle apparecchiature elettriche singola, sempre che l’apparecchio sia del tipo ed elettroniche (WEEE). -
Page 26: Installation
Resumo Instruções de segurança Indicações De Carácter Geral Descrição do produto Descrição do visor Modos de cozedura Limpeza e manutenção do forno Manutenção Resolução de problemas Installation PT 26... - Page 27 Instruções de segurança • Durante a cozedura, a humidade pode condensar no inte- rior da cavidade do forno ou no vidro da porta. Esta é uma condição normal. Para reduzir este efeito, aguardar de 10 a 15 minutos, depois de ter ligado a energia, an- tes de colocar a comida dentro do forno.
- Page 28 • A limpeza e a manutenção não devem ser realizadas por cri- anças não supervisionadas. • Não use materiais ásperos ou abrasivos ou raspadores metáli- cos afiados para limpar o vidro da porta do forno, pois podem arranhar a superfície e fazer com que o vidro se parta. •...
- Page 29 mento. O condutor de terra tem uma cor amarelo-verde. Esta operação deve ser efetuada por um profissional com qualifi- cação adequada. No caso de incompatibilidade entre a toma- da e a ficha do aparelho, peça a um eletricista qualificado para substituir a tomada por outra de tipo adequado.
- Page 30 • O aparelho não deve ser instalado atrás de uma porta decora- tiva para evitar sobreaquecimento. • Quando colocar a prateleira no interior, certifique-se que o batente está colocado para cima e na parte de trás da cav- idade. A prateleira deve ser inserida completamente na cavidade.
- Page 31 Indicações De Carácter Geral Obrigado por ter optado por um dos nossos produtos. Para tirar o maior proveito possível do seu forno, recomendamos que: Leia atentamente este manual de instruções de utilização; ele contém instruções importantes sobre a instalação, a utilização e a manutenção seguras deste forno. Mantenha este manual de instruções à...
- Page 32 AVISO Antes de ligar o forno à alimentação elétrica, solicite a um eletricista qualificado para verificar a continuidade do terminal de terra da rede de alimentação. O fabricante não se responsabiliza por quaisquer acidentes ou outros problemas resultantes do não cumprimento das instruções de ligação do forno ao terminal de terra ou por uma ligação com uma continuidade deficiente.
- Page 33 Descrição do produto 1. Painel de controlo 2. Posições de prateleira (grelha de arame lat- eral, se incluída) 3. Grades 4. Tabuleiros 5. Ventilador (se presente) 6. Porta do forno 7. Grades de arame laterais (se presentes: ap- enas para cavidade plana) 8.
- Page 34 Descrição do visor 1. Botão seletor do termostato 2. tempo de cozimento 3. Botão seletor de funções Para definir o tempo de cozimento, gire o botão uma volta completa e de- pois posicione o índice no tempo desejado. Quando o tempo tiver decorri- do, o sinal tocará...
- Page 35 Modos de cozedura Indicador T °C T °C Função de função predef. intervalo LUZ: Acende a luz do forno DESCONGELAR: Quando o indicador é definido para esta posição. A ven- toinha promove a circulação de ar à temperatura ambiente em torno do alimento congelado para que o mesmo descongele em alguns minutos sem alterar o teor de proteína dos alimentos.
- Page 36 Limpeza e manutenção do forno O ciclo de vida do equipamento pode ser au- ACESSÓRIOS mentado com a limpeza regular do mesmo. Limpar os acessórios com uma esponja húmida Aguardar que o forno arrefeça antes de realizar e embebida em detergente e enxaguar os mes- algum tipo de operação de limpeza manual.
- Page 37 Gestão de resíduos e gestão ambiental protecção Este aparelho está classificado istir serviços de recolha ao domicílio. de acordo com a Diretiva Euro- • quando compra um novo aparelho, o antigo peia 2012/19/UE relativa aos pode ser devolvido ao comerciante que terá Resíduos de Equipamentos a obrigação de o transportar gratuitamente Elétricos e Eletrónicos (REEE).
- Page 38 Installation 600 mm 595 mm 20 mm 590 mm 595 mm 20 mm INSTALLATION 38...
- Page 39 EN If the furniture is coverage with a bottom at the back part, provide an opening for the power supply cable. EN If the oven does not have a cooling fan, create an opening 460 mm x 15 mm IT Se il mobile ha un fondo posteriore, praticare un foro per il passaggio del cavo di alimentazione.
- Page 40 70011841...
Need help?
Do you have a question about the FIDC X612 and is the answer not in the manual?
Questions and answers