Advertisement
Quick Links
INNOVATORS OF TECHNOLOGY
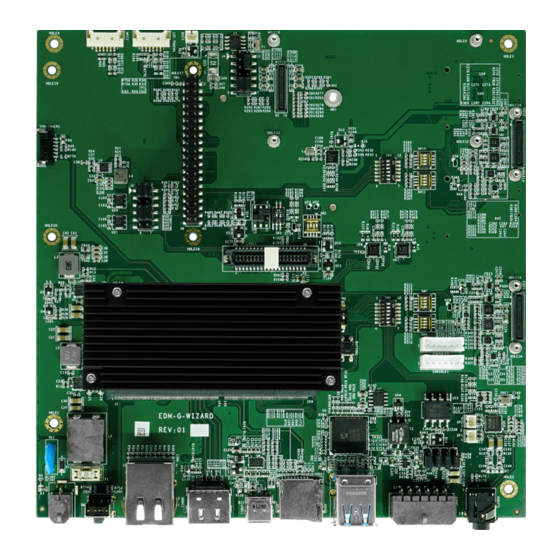
1. Identifying the Parts
Front View
40-pin Expansion Header
USB Touch Connector
Audio I
2
S Bus Jump
LVDS Connector
Boot Mode Setting Switch
Camera Module Voltage DIP Switch ( right)
2
and I
S Signal(left) for Camera 1
Power Input Connector
Reset Button (up)
ON/OFF Button (down)
RJ-45 Connector
Rear View
Micro SIM Card Slot 1
Micro SIM Card Slot 2
M.2 Expansion Card Setting DIP Switch
2
MIPI DSI I
S Bus Jump
2
I
C Touch Connector
NFC Connector
HDMI Connector
USB 3.0 Type-C Connector
M.2 Expansion Card Setting DIP Switch
Quick Install Guide
LVDS Voltage Selection Jump
MIPI DSI Connector
LVDS Backlight Signal and Voltage DIP Switch
USB 3.0 Type-A Connector x2
Micro SD Card Slot
EDM-G-WIZARD-IMX8M-PLUS
Camera Module Voltage DIP Switch (right)
2
and I
S Signal(left) for Camera 2
MIPI CSI Connector 2
LVDS I
2
C Voltage DIP Switch
USB Serial Download Push Button
MIPI CSI Connector 1
Console 2
Console 1
R-Speaker Connector (up)
L-Speaker Connector (down)
Audio Out Jack
CAN Bus Connector
M.2 Slot (only PCIE)
M.2 Slot (only USB)
Advertisement

Related Manuals for TechNexion EDM-G-WIZARD-IMX8M-PLUS


Summary of Contents for TechNexion EDM-G-WIZARD-IMX8M-PLUS
- Page 1 Quick Install Guide INNOVATORS OF TECHNOLOGY EDM-G-WIZARD-IMX8M-PLUS 1. Identifying the Parts Front View MIPI DSI I S Bus Jump LVDS Voltage Selection Jump C Touch Connector MIPI DSI Connector NFC Connector LVDS Backlight Signal and Voltage DIP Switch Camera Module Voltage DIP Switch (right)
- Page 2 Connect the 2-pin Micro-Fit 3.0 cable to power up the evaluation kit. VCC:DC Voltage input (12V DC) GND:Ground ENABLE CANBUS2 TERMINATOR RESISOR ENABLE CANBUS1 TERMINATOR RESISOR DISABLE CANBUS2 TERMINATOR RESISOR DISABLE CANBUS1 TERMINATOR RESISOR For more information contact TechNexion sales www.technexion.com sales@technexion.com INNOVATORS OF TECHNOLOGY...
- Page 3 Ethernet cable is plugged into the RJ45 connector. Click <Upgrade> if there is a new version of TSL (TechNexion Software Loader) available on the Internet, or click <Skip> to go to step or 9. For more information contact TechNexion sales www.technexion.com...
- Page 4 The actual supported operating systems may vary depending on the evaluation kit. Click to reconfigure the display. This configuration is available when using an ARM32 architecture module. For more information contact TechNexion sales www.technexion.com sales@technexion.com INNOVATORS OF TECHNOLOGY...
- Page 5 13. Installation is completed. Click <Reboot> to reboot the system. For more information contact TechNexion sales www.technexion.com sales@technexion.com INNOVATORS OF TECHNOLOGY...
Need help?
Do you have a question about the EDM-G-WIZARD-IMX8M-PLUS and is the answer not in the manual?
Questions and answers