
Related Manuals for Sherwood SBD-15

Summary of Contents for Sherwood SBD-15
- Page 1 7/22 SBD-15 Sonic Belt & Disc Sander Owner’s Manual 1300 880 996 customer.service@timbecon.com.au...
- Page 2 This manual provides critical safety instructions on the proper setup, operation, maintenance and service of your machine. Save this document, refer to it often and use it to instruct others on correct operation. Failure to read, understand and follow the instructions in this manual may result in serious personal injury - including amputation, electrocution or even death.
-
Page 3: Table Of Contents
Contents Introduction Safety Electrical Information Specifications Set Up & Operation Maintenance & Care Warranty Contents... -
Page 5: Introduction
Alternatively, you can contact us directly at support@sherwoodtools.com.au Technical Support If you have a question about your Sherwood product that isn’t covered in this manual, please email us directly at support@sherwoodtools.com.au Introduction... -
Page 6: Safety
Section 1: Safety General Safety Rules For your own safety, please read and understand this instruction manual before installing and operating the machine. Owners Manual: Read and understand this Disconnect the Power First: Always disconnect owners manual before using the machine. the machine from the power supply before making adjustments, changing tooling or Failure to Read This Manual: Failure to adhere... - Page 7 General Safety Rules Use Correct Tool for the Job: Only ever use Unattended Operation: To reduce the risk of the machine for its intended purpose. Do not accidental injury, turn the machine OFF and force it or use any attachment to complete a ensure all moving parts are completely stopped job for which it was not designed.
- Page 8 Specific Safety Rules For Sonic Belt & Disc Sander Check The Voltage: Make sure the operating Do Not Try To Repair It Yourself: Do not voltage stated on the type label corresponds to disassemble the machine and do not try to the power mains available in your area.
-
Page 9: Electrical Information
Section 2: Electrical Information Electrical Requirements Extension Cords Power Supply And Motor Specifications: Grounded Tools require a three wire extension cord. Warning: To avoid electrical hazards, fire hazards, or damage to the tool, use proper Double Insulated Tools can use either a two or circuit protection. - Page 10 Guidelines for Using Extension Guidelines & Recommendations Cords for Extension Cords When Using An Extension Cord, be sure to If you are Using An Extension Cord outdoors, use one heavy enough to carry the current be sure it is marked with the suffix “W-A” to your product will draw.
-
Page 11: Specifications
Section 3: Specifications SBD-15 Sonic Belt & Disc Sander Model Number: SBD-15 Warranty 5 years Voltage: 230V~50Hz Power: 250W Sanding belt size: 25.4 x 762mm Sanding disc size: 125mm Specifications... -
Page 12: Set Up & Operation
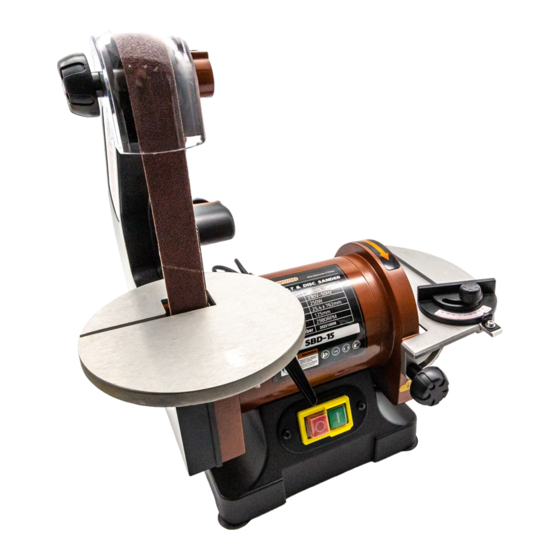
Section 4: Set Up & Operation Key Features Cover Locking Knob Sanding Dish with Sanding Disc Sanding Belt Sanding Dish Table Sanding Belt Board Scale Sanding Table Base Adjusting Knob Table Locking Knob Switch Rubber Foot Set Up & Operation... - Page 13 Assembling the Belt Mounting the Sanding Table (Fig. 1-2) and Disc Sander Make sure the motor is switched off. Fig. 1 Select a suitable work place before using the belt and disc sander. Your work place Thread the sanding belt throu gh the should be well illuminated and enables opening in the sanding table.
- Page 14 Sanding Belt Board Adjusting the Sanding Belt (Fig. 3) (Fig. 4) The sanding belt board protects the work Belt adjustment is factory set, so that the piece during sanding. sanding belt will run centrically through the pulleys. Mount the sanding belt board so that the board touches the backside of the sanding If the sanding belt does not run straight, belt.
- Page 15 Adjusting the Sanding Table (Fig. 5) For most work, mount the sanding table to 90° angle to the sanding belt. The Fig. 5 sander is equipped with a positive stop in order to enable quick positioning the Allen Wrench sanding table to 90° angle to the sanding belt. Adjust the positive stop as follows: Triangle Loosen the locking lever and position the...
- Page 16 Assembling the Sanding Dish Cover and the Sanding Dish Sanding Dish Table Guard (Fig. 6-7) Make sure the motor is switched off. Fig. 6 Mount the sanding dish cover with the four encolsed screws and the four flat washers. Mount the sanding dish table on the sanding dish guard.
- Page 17 Switching ON/OFF the Belt and Dust Collection System Disc Sander For dust collection two adapters are provided with the belt and disc sander. Make sure that the mains power in your area corresponds with the type labelled on the Use the dust collection whenever possible. machine.
-
Page 18: Maintenance & Care
Section 8: Maintenance & Care Removing and Inserting the Removing the Sanding Disc Sanding Belt The sanding disc is glued to the sanding dish. Unscrew the cover locking knob and remove To remove the sanding disc, detach the the acrylic glass cover. sanding dish table and the sanding dish guard. -
Page 19: Warranty
Warranty and Service If your Sherwood product has a warrantable fault, please contact the retailer that it was purchased from. Our goods come with guarantees that cannot be excluded under the Australian Consumer Law. You are entitled to a replacement or refund for a major failure and compensation for any other reasonably foreseeable loss or damage. - Page 20 Notes:...
- Page 22 1300 880 996 customer.service@timbecon.com.au...
Need help?
Do you have a question about the SBD-15 and is the answer not in the manual?
Questions and answers